Something I found on Ebay for the new MY15 MN's
http://www.ebay.com.au/itm/Mitsubishi-L ... 3ce7e580ee
Installing Double DIN radio (Digoptions) in MN GLX-R
Re: Installing Double DIN radio (Digoptions) in MN GLX-R
![]() by ag9111 on Wed Sep 10, 2014 7:19 pm
by ag9111 on Wed Sep 10, 2014 7:19 pm
I love cats, but I couldn't eat a full one!
Mud is like unprotected sex
30 secs of fun for a lifetime of grief
Mud is like unprotected sex
30 secs of fun for a lifetime of grief
-

ag9111 - Platinum Subscriber
- Posts: 4858
- Joined: Sun Mar 30, 2008 2:00 pm
- Location: Wollongong, NSW
Re: Ask here FIRST, before you start a new thread
![]() by sloppyjoe24 on Fri Sep 26, 2014 8:10 am
by sloppyjoe24 on Fri Sep 26, 2014 8:10 am
Ok uv looked in the double din install thread but can't find what I'm after..
I'm going to install a kenwood unit soon, I've taken the facia off my 08 ml triton and it has a black box on the metal bracket the trip computer is fixed to. Obviously the trip computer wiring is going to be left disconnected but does the wiring to the black box need to be connected? It didn't look like it went to the trip computer that I could see...
I'm going to install a kenwood unit soon, I've taken the facia off my 08 ml triton and it has a black box on the metal bracket the trip computer is fixed to. Obviously the trip computer wiring is going to be left disconnected but does the wiring to the black box need to be connected? It didn't look like it went to the trip computer that I could see...
Take it easy, if u get it easy take it twice!!
- sloppyjoe24
- Posts: 74
- Joined: Thu Jun 11, 2009 4:42 pm
Re: Ask here FIRST, before you start a new thread
![]() by Cowboy Dave on Sat Sep 27, 2014 12:35 pm
by Cowboy Dave on Sat Sep 27, 2014 12:35 pm
Re this black box I am wondering if it might be the unit that sits between the canbus and the info display? If so it should have a label on it somewhere. If we had the wiring colours in/out of it we could match it to the diagrams in the workshop manual.
-

Cowboy Dave - Moderator
- Posts: 18098
- Joined: Tue Dec 29, 2009 9:46 am
- Location: Sydney
Re: Ask here FIRST, before you start a new thread
![]() by ag9111 on Sat Sep 27, 2014 12:37 pm
by ag9111 on Sat Sep 27, 2014 12:37 pm
Maybe something to do with the compass?
I love cats, but I couldn't eat a full one!
Mud is like unprotected sex
30 secs of fun for a lifetime of grief
Mud is like unprotected sex
30 secs of fun for a lifetime of grief
-
ag9111 - Platinum Subscriber
- Posts: 4858
- Joined: Sun Mar 30, 2008 2:00 pm
- Location: Wollongong, NSW
Re: Ask here FIRST, before you start a new thread
![]() by Cowboy Dave on Sat Sep 27, 2014 12:48 pm
by Cowboy Dave on Sat Sep 27, 2014 12:48 pm
Have a look at item 4 in this image - that's my pick.
You do not have the required permissions to view the files attached to this post.
-
Cowboy Dave - Moderator
- Posts: 18098
- Joined: Tue Dec 29, 2009 9:46 am
- Location: Sydney
Re: Ask here FIRST, before you start a new thread
![]() by NowForThe5th on Sat Sep 27, 2014 1:36 pm
by NowForThe5th on Sat Sep 27, 2014 1:36 pm
sloppyjoe24 wrote:Ok uv looked in the double din install thread but can't find what I'm after..
I'm going to install a kenwood unit soon, I've taken the facia off my 08 ml triton and it has a black box on the metal bracket the trip computer is fixed to. Obviously the trip computer wiring is going to be left disconnected but does the wiring to the black box need to be connected? It didn't look like it went to the trip computer that I could see...
Ah yes! It's part of the CANBUS.
Identified and mentioned here. Not quite half way down the page.
Chris
If work is so terrific, why do they have to pay us to do it?
If work is so terrific, why do they have to pay us to do it?
-

NowForThe5th - Moderator
- Posts: 9234
- Joined: Sun Jun 15, 2008 2:00 pm
- Location: Holt, ACT
Re: Installing Double DIN radio (Digoptions) in MN GLX-R
![]() by MacL3od on Sat Sep 27, 2014 2:05 pm
by MacL3od on Sat Sep 27, 2014 2:05 pm
rodeddy wrote:thanks Dave for posting the pics ...as for being ugly .... I'm not sure its the best looking either BUT its original mitsubishi.
It is a different dash panel yes BUT maybe the info display unit will fit within the area where the radio was.. would need measurements.
I'm thinking this is the best option ....but not cheap::
http://www.ebay.com.au/itm/251612322021 ... 1423.l2649
and i can't seem to find anyone that has one fitted for more info or pictures of it fitted . I know on the Barabarian in England, it was an option - i think.
cheers Rod
Should let us know how this goes Rod. Looks interesting. Would love to see what the trip computer looks like in this setup.
- MacL3od
- Posts: 22
- Joined: Sat Sep 13, 2014 4:33 am
Re: Ask here FIRST, before you start a new thread
![]() by sloppyjoe24 on Sat Sep 27, 2014 2:14 pm
by sloppyjoe24 on Sat Sep 27, 2014 2:14 pm
Cowboy Dave wrote:Have a look at item 4 in this image - that's my pick.
Item 4 it is thanks fellas
Take it easy, if u get it easy take it twice!!
- sloppyjoe24
- Posts: 74
- Joined: Thu Jun 11, 2009 4:42 pm
Re: Ask here FIRST, before you start a new thread
![]() by sloppyjoe24 on Sat Sep 27, 2014 2:18 pm
by sloppyjoe24 on Sat Sep 27, 2014 2:18 pm
NowForThe5th wrote:sloppyjoe24 wrote:Ok uv looked in the double din install thread but can't find what I'm after..
I'm going to install a kenwood unit soon, I've taken the facia off my 08 ml triton and it has a black box on the metal bracket the trip computer is fixed to. Obviously the trip computer wiring is going to be left disconnected but does the wiring to the black box need to be connected? It didn't look like it went to the trip computer that I could see...
Ah yes! It's part of the CANBUS.
Identified and mentioned here. Not quite half way down the page.
Yeah skipped over it without seeing a pic of it thanks mate
Take it easy, if u get it easy take it twice!!
- sloppyjoe24
- Posts: 74
- Joined: Thu Jun 11, 2009 4:42 pm
Re: Installing Double DIN radio (Digoptions) in MN GLX-R
![]() by rodeddy on Sun Sep 28, 2014 7:11 pm
by rodeddy on Sun Sep 28, 2014 7:11 pm
hi,
i would like to see what it looks like too ... can't seem find any good pic's... if i choose to go this way, will put pics up.
i would like to see what it looks like too ... can't seem find any good pic's... if i choose to go this way, will put pics up.
MacL3od wrote:rodeddy wrote:thanks Dave for posting the pics ...as for being ugly .... I'm not sure its the best looking either BUT its original mitsubishi.
It is a different dash panel yes BUT maybe the info display unit will fit within the area where the radio was.. would need measurements.
I'm thinking this is the best option ....but not cheap::
http://www.ebay.com.au/itm/251612322021 ... 1423.l2649
and i can't seem to find anyone that has one fitted for more info or pictures of it fitted . I know on the Barabarian in England, it was an option - i think.
cheers Rod
Should let us know how this goes Rod. Looks interesting. Would love to see what the trip computer looks like in this setup.
- rodeddy
- Posts: 236
- Joined: Fri Jun 07, 2013 9:36 pm
- Location: Engadine, Sydney
Re: Ask here FIRST, before you start a new thread
![]() by 4wd26 on Mon Sep 29, 2014 7:25 am
by 4wd26 on Mon Sep 29, 2014 7:25 am
sloppyjoe24 wrote:Ok uv looked in the double din install thread but can't find what I'm after..
I'm going to install a kenwood unit soon, I've taken the facia off my 08 ml triton and it has a black box on the metal bracket the trip computer is fixed to. Obviously the trip computer wiring is going to be left disconnected but does the wiring to the black box need to be connected? It didn't look like it went to the trip computer that I could see...
I know the black box you are referring to but I don't know it's function
When I did my double din the box was removed with the screen function, I also replaced the radio, it has not effected anything else
-

4wd26 - Moderator
- Posts: 8299
- Joined: Tue Dec 18, 2007 3:00 pm
- Location: Bayside Bundy and Monto
Re: Installing Double DIN radio (Digoptions) in MN GLX-R
![]() by Cowboy Dave on Mon Sep 29, 2014 8:51 am
by Cowboy Dave on Mon Sep 29, 2014 8:51 am
Question already answered above 26.
-
Cowboy Dave - Moderator
- Posts: 18098
- Joined: Tue Dec 29, 2009 9:46 am
- Location: Sydney
Re: Installing Double DIN radio (Digoptions) in MN GLX-R
![]() by NowForThe5th on Mon Sep 29, 2014 8:59 am
by NowForThe5th on Mon Sep 29, 2014 8:59 am
Probably my fault. I missed a post when I moved the bulk of them into this thread. Forgiven 26.
Chris
If work is so terrific, why do they have to pay us to do it?
If work is so terrific, why do they have to pay us to do it?
-
NowForThe5th - Moderator
- Posts: 9234
- Joined: Sun Jun 15, 2008 2:00 pm
- Location: Holt, ACT
Re: Installing Double DIN radio (Digoptions) in MN GLX-R
![]() by tritonliz on Sat Oct 25, 2014 8:28 am
by tritonliz on Sat Oct 25, 2014 8:28 am
RockoWallaby wrote:Heya folks
As promised, I'm posting up the install for my Digoptions Lifestyle Double DIN radio in my MN GLX-R.
Much of this install will also be relevant to other brands of Double DIN radio's.
However, the GLX and GLR models have different hood and bracket systems, so much will be different for them.
Also, unsure how this compares to the ML GLX-R. If the brackets are similar, then it may be identical.
As I only have a MN GLX-R, I can't compare to anything else.
Anyways....
1. Hood and brackets.
You will need to get some parts, to install the radio into. The GLX and GLR already have these bits (Lucky buggers).
The computer hood will NOT fit...so, don't waste your time cutting it down
HOOD:
Part number: 8060A079XA
Part Name: Hood-Console Meter
Cost: Around $76.00
[IMG]http://i830.photobucket.com/albums/zz222/rockowallaby/Triton/Double%20DIN%20Radio%20Install/P4010039.jpg[/IMG
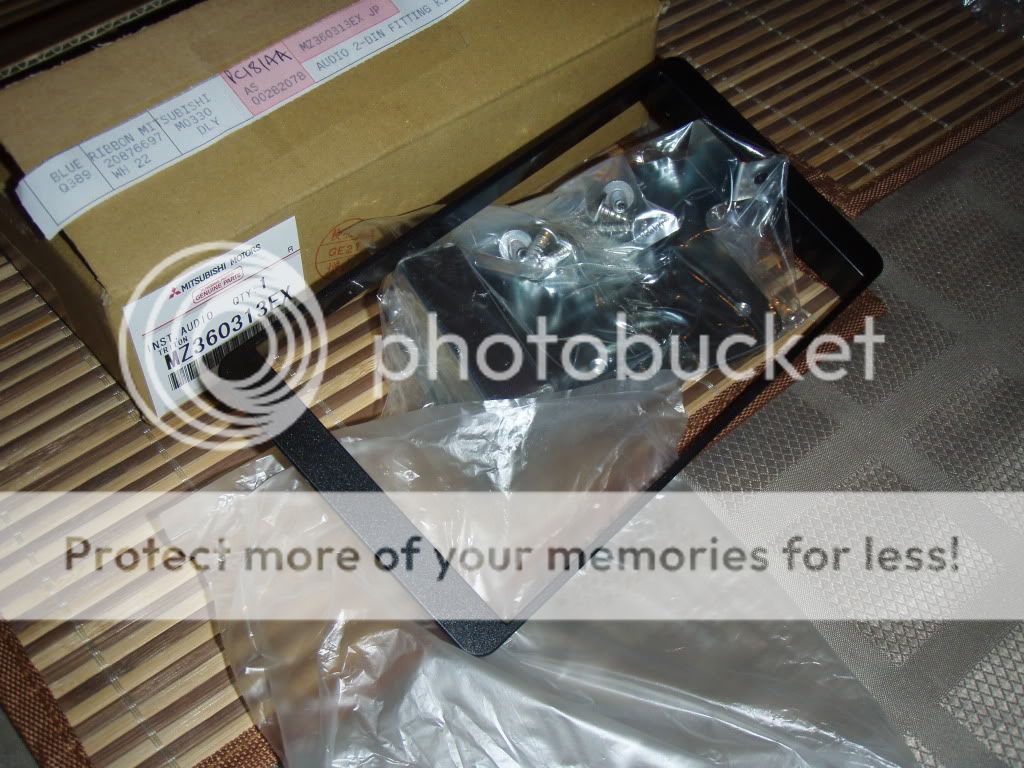
PLATE AND BRACKET:
The bracket and front plate fit the MN GLX and GLR.
They do NOT fit straight on the GLX-R, for the above reasons.
However!! The front plastic plate bit is needed to fill the gap between the hood and radio.
Unfortunately, there is NO GLX-R bracket kit available. It wasn't made to fit a Double DIN radio under the hood, in its standard format.
This kit is your only factory option to fill the gap (apart from making something up yourself out of ABS sheet, or out of another plate for a different vehicle somehow), so if you want a nice pretty trim around your radio, you have to use it.
Plate and Bracket Part Number: MZ360313EX
Part Name: Audio 2-DIN fitting kit
Cost: Around $105.00
Put them together and you get....
2. Remove the original Hood.
Grab it and pull it horizontally towards the rear of the car.
3. Remove the Trip Computer:
Ignore the silver bracket in the pic, from the front fascia kit. That was testing the location, and you can't use it anyway.
4. Cut & trim tabs:
Using a sharp blade or hacksaw blade, remove the tabs that stop the new radio sliding in place.
Repeat on other side...
Then remove side tabs
5. Cut, score and fold base plate:
Cut approx 3-4cm from back of base towards rear of vehicle (see pic).
Score across base from one side to another, not going right through material. You want it cut enough to fold down, BUT still strong enough to support the radio.
WATCH THE WIRES!! Don't cut any!
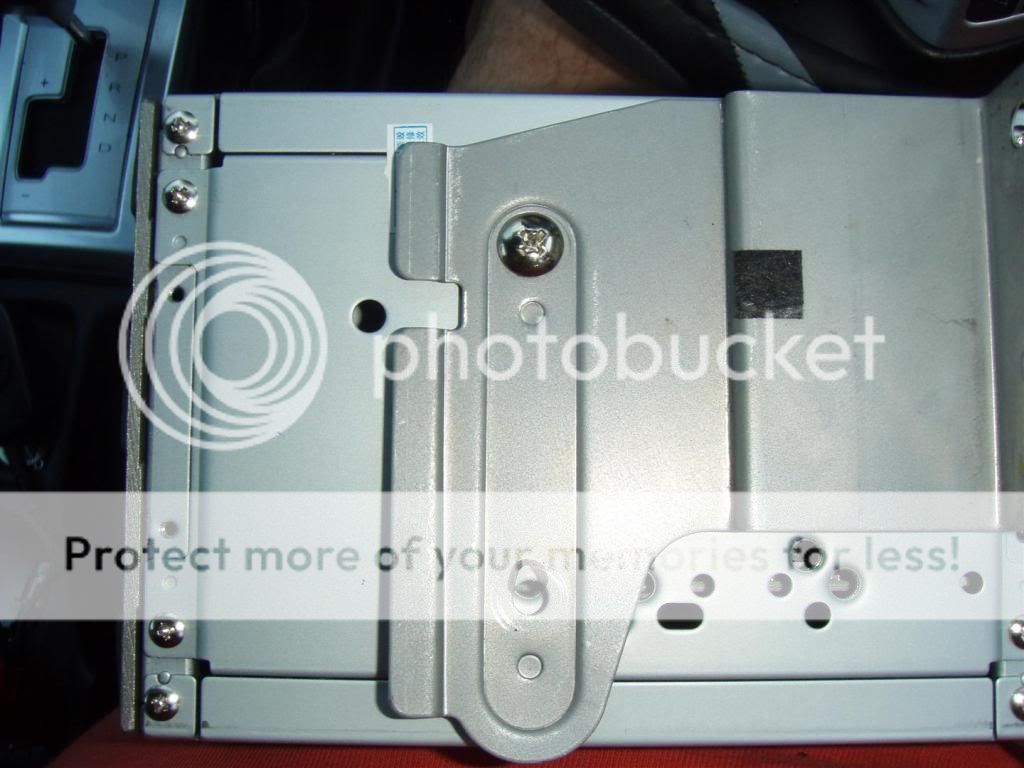
6. Modify original computer brackets to fit new radio and install:
The brackets supplied with the front plate are useless for the GLX-R.
You can readily modify the original trip computer brackets to work perfectly, though.
Firstly, cut the right angle tab off the back of the original bracket with a grinder. You can see it cut off the bracket in this pic.
Then find the holes on the radio to use. The rear most holes are the ones.
Position the bracket with screws in the TOP holes only!! Tighten firm, but so the bracket can be adjusted under pressure.
You'll see the bottom holes don't line up. Mark them, and drill or file them out to an oval shape. Then reinstall brackets with all 4 screws in place.
If you go as pictured with the oval holes, the unit should slide straight in!
If you want to check (which is pretty wise) put only the top 2 in, fit the unit roughly in place, fit the hood, and check clearances with the fascia plate. mine just worked perfectly! Almost dropped from the shock.
HOWEVER, don't do what I did, and scratch your fascia! Put a small towel under the unit to protect the paint.
7. Remove old radio:
You need either the proper radio removal tools, as pictured, or try some heavy wire.
Remove the original radio loom from the back of the radio. NOTE that the earth wire doesn't just pull out! It has a button clip, so press down and removes easily.
Welcome to Spaghetti central!
Feed the wires up to the new location, being careful to not bend the aerial wire too much (after removing it from it's holding clip if required)
Next, cut the end off the earth wire from the new radio loom, and put on a male spade bit, to plug into the earth wire above.
Because I'm fitting reverse cameras, I put on a double adapter bit on the earth wire, for the camera earth.
Now, as my reverse cameras are not the ones supplied with the kit, I made a special loom for my install. You'll need to follow the instructions with your cameras. Blue (back) wire to reverse lights, red to power, etc.
8 Install unit:
Add the new cable to the old loom, attach the earth and all the rest of the cables, aerials, usb, iPod, etc, and CAREFULLY slide the unit into place, taking care not to scratch the fascia beneath (remember the towel!!!) as well as not crush or compress the wires behind. Theres a small space above the radio housing, thats perfect for the GPS antenna, so use some double sided tape and secure it there.
Install the screws holding the brackets in place, and TEST it!! Now's the time to see everything works...not once the hood's on!
9. Install hood.
Push on, and clip into place, making sure the back clips (at front of vehicle) are properly in their slots
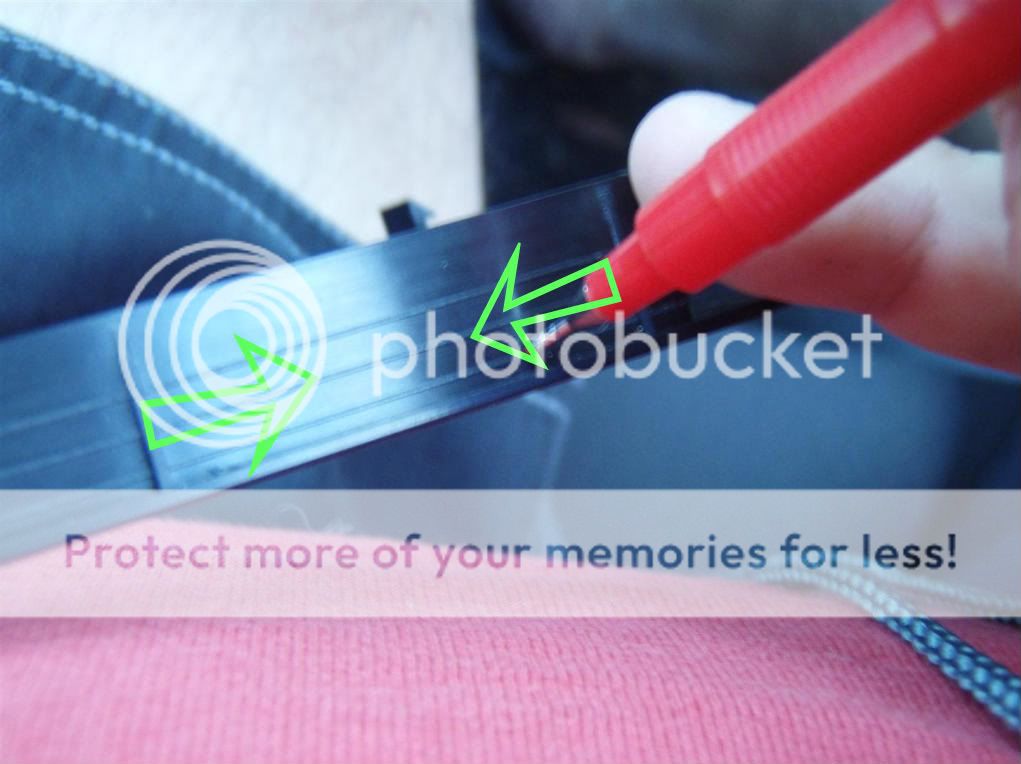
10. Trim fascia plate:
You need to cut around the fascia plate at the line indicated by the green arrows (and NOT the red pen tip). CHECK IT'S THE SAME LINE FOR YOUR INSTALL!! You may need another line to use, depending where the radio sits, although mine worked here...
Install plate around radio.
12. Install GPS SD card:
It don't work without it
13. Sit back and gloat what a friggin' awesome radio you have in your Triton!
Even space now for a Single DIN UHF Radio!
Hopefully, this info will help people get started on their radio install, and make for what is really an incredibly fast job, all things considered.
It's a bloody awesome unit. For the price, you'd be hard pressed buying better, and the service so far from Matt at Digoptions has been excellent. Radio's clear, iPod works fine (but ONLY on newer iPods, incl Nano Gen 3 or newer), Nav is excellent (although the voices sometimes get a bit patched together), DVD is excellent, and everything else seems to work great. Look, a $2000 unit might be a little more...polished...but I bet it'd be hard to beat this unit for the money.
Few things could be improved. Daylight visibility (which is as much a function of the high position in the Triton as anything else, although still hard to see in the Landcruiser),iPod connectivity (ie. better interface would be nice), the prettiness of the menu's, bit vague at times on the touch sensitive screen, etc. These are trivial, and even the expensive units suffer from this sort of thing. Nothing I can't live with. You could try fitting it further back in the housing, but I prefer it closer to see. We're going to try a matt finish screen protector, from eBay, for an iPad, cut it down, and see how it goes at stopping the glare.
Still have things to check out, including OziExplorer, etc. But I'd recommend this unit to anyone. Housemate and I both bought it, and we're both stoked. Best $500 I've spent on the Triton so far. Admittedly, the extra bits have made it approach $800 installed, but still WAY cheaper than most other options there, which will cost at least $1500-$2000.
Now to install the last one in my old man's Navara
Cheers
Scotty


Hi Scotty,
Do you need to order the hood or not if it is for a GLR?
- tritonliz
- Posts: 246
- Joined: Sun Feb 03, 2013 7:00 pm
Re: Installing Double DIN radio (Digoptions) in MN GLX-R
![]() by Cowboy Dave on Sun Oct 26, 2014 12:53 am
by Cowboy Dave on Sun Oct 26, 2014 12:53 am
Liz if you remind me when we meet I'll bring the glxr hood for you to compare
-
Cowboy Dave - Moderator
- Posts: 18098
- Joined: Tue Dec 29, 2009 9:46 am
- Location: Sydney
Re: Installing Double DIN radio (Digoptions) in MN GLX-R
![]() by tondo12 on Wed Dec 24, 2014 11:16 am
by tondo12 on Wed Dec 24, 2014 11:16 am
Ok, hopefully this doesn't sound stupid.
i have a trition MY13 GL. I have the cheap mitsubishi double din model (no screen or trip computer).
I bought a double din head unit the other day. Im wondering will i need to replace the fascia or will it slide in with the current 1 i have?
i have a trition MY13 GL. I have the cheap mitsubishi double din model (no screen or trip computer).
I bought a double din head unit the other day. Im wondering will i need to replace the fascia or will it slide in with the current 1 i have?
- tondo12
- Posts: 134
- Joined: Sun Jan 12, 2014 4:24 pm
Re: Installing Double DIN radio (Digoptions) in MN GLX-R
![]() by Cowboy Dave on Wed Dec 24, 2014 11:58 am
by Cowboy Dave on Wed Dec 24, 2014 11:58 am
Measure it to make sure it's 100mm high at the opening. If it is I would guess it will fit. Luckily hoods are getting pretty cheap these days.
-
Cowboy Dave - Moderator
- Posts: 18098
- Joined: Tue Dec 29, 2009 9:46 am
- Location: Sydney
Re: Installing Double DIN radio (Digoptions) in MN GLX-R
![]() by shorsfall on Sun Dec 28, 2014 3:36 pm
by shorsfall on Sun Dec 28, 2014 3:36 pm
Gday guys,
I have searched high and low and read most of the stereo wiring posts but still can't seem to find the info I'm chasing. I want to change the Head Unit in my 2014 MY15 Triton GLX-R. The unit I want to find comes with a ISO plug so that should just be plug and play. The info I need is for the steering wheel controls. I have attached a photo of the pin outs of the new head unit. Has anybody done this before on this model Triton and could give me some pointers? I have also posted a pic of my dash layout.


I have searched high and low and read most of the stereo wiring posts but still can't seem to find the info I'm chasing. I want to change the Head Unit in my 2014 MY15 Triton GLX-R. The unit I want to find comes with a ISO plug so that should just be plug and play. The info I need is for the steering wheel controls. I have attached a photo of the pin outs of the new head unit. Has anybody done this before on this model Triton and could give me some pointers? I have also posted a pic of my dash layout.
- shorsfall
- Posts: 22
- Joined: Sun Dec 28, 2014 8:11 am
Re: Installing Double DIN radio (Digoptions) in MN GLX-R
![]() by NowForThe5th on Sun Dec 28, 2014 5:13 pm
by NowForThe5th on Sun Dec 28, 2014 5:13 pm
Shorsfall, I didn't give you the link to this thread so you could just repost your question. The idea was that you actually read it. The steering wheel controls discussion is mainly on page 3 of this thread, or you could actually do a search, like this.
As for the DIN to Mitsubishi connection there is an off the shelf Aerpro adaptor which is available and which you would have seen if you'd read the other thread I gave you the link to.
I suppose that you have run a tape measure over the unit that you have now and realise that its measurements are somewhat different to those of the unit that you appear to intend to purchase?
Chris
If work is so terrific, why do they have to pay us to do it?
If work is so terrific, why do they have to pay us to do it?
-
NowForThe5th - Moderator
- Posts: 9234
- Joined: Sun Jun 15, 2008 2:00 pm
- Location: Holt, ACT
Re: Installing Double DIN radio (Digoptions) in MN GLX-R
![]() by bigjobs on Sun Dec 28, 2014 6:09 pm
by bigjobs on Sun Dec 28, 2014 6:09 pm
Shorsfall, have you pulled your headunit out yet?
When you do, you may find that the plugs you have will not match any of the Aerpro adapters.
I went through the same exercise 6 months ago and nothing to suit the MY14 was available (that I could find) at the time.
I think I posted what I ended up doing in a thread on here somewhere... no idea where though
-

bigjobs - Posts: 176
- Joined: Wed Dec 25, 2013 10:32 am
- Location: Brisbane
Re: Installing Double DIN radio (Digoptions) in MN GLX-R
![]() by shorsfall on Sun Dec 28, 2014 6:39 pm
by shorsfall on Sun Dec 28, 2014 6:39 pm
NowForThe5th wrote:Shorsfall, I didn't give you the link to this thread so you could just repost your question. The idea was that you actually read it. The steering wheel controls discussion is mainly on page 3 of this thread, or you could actually do a search, like this.
As for the DIN to Mitsubishi connection there is an off the shelf Aerpro adaptor which is available and which you would have seen if you'd read the other thread I gave you the link to.
I suppose that you have run a tape measure over the unit that you have now and realise that its measurements are somewhat different to those of the unit that you appear to intend to purchase?
I did actually read every single post in this thread. I wasn't actually expecting such hostility to be honest. Nowhere in this thread has anybody given an answer previously to my asked question. Sort of feeling like maybe I shouldn't have asked the question now. If you actually look at page 3 the posts are all from 2011 which is 3 years before my model was actually released. No quite sure how that's relevant to my year.
Big jobs, yes I have pulled the unit out and the ISO plugs seem to be standard. It's really just the steering wheel controls that I will have to sort out
- shorsfall
- Posts: 22
- Joined: Sun Dec 28, 2014 8:11 am
Re: Installing Double DIN radio (Digoptions) in MN GLX-R
![]() by Cowboy Dave on Sun Dec 28, 2014 7:31 pm
by Cowboy Dave on Sun Dec 28, 2014 7:31 pm
Are you sure your existing head unit has ISO plugs? Or are you calling them that and they're not actually ISO plugs?
Here's a male ISO plug as an example:
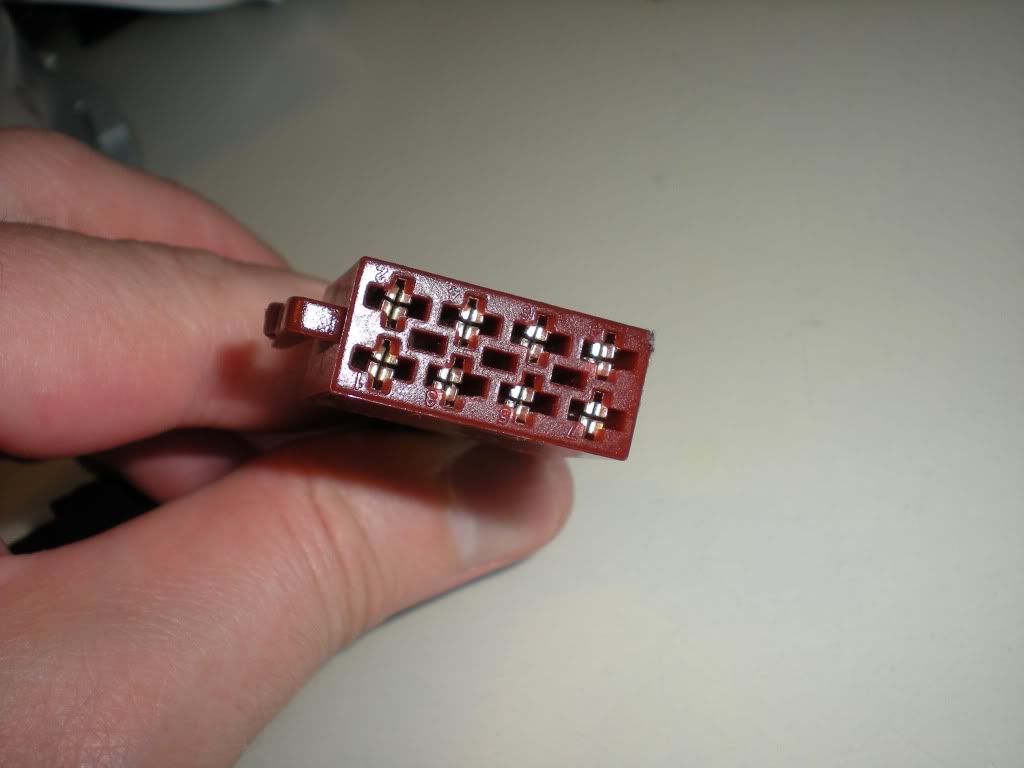
and the female looks like this (and the ones in your image):
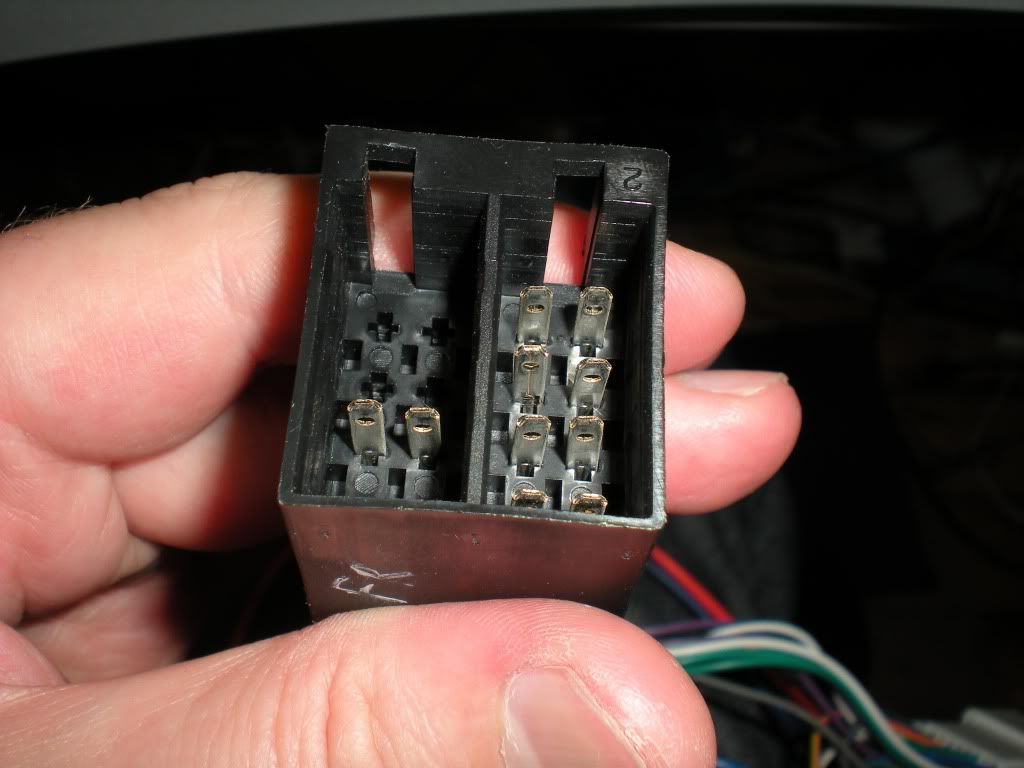
If your existing head unit actually has those plugs it will be something of a miracle since Mitsubishi has always tended to use white plugs with random configurations of its own.
Next I have to say your unit it quite new, so you're unlikely to find too many posts about that precise unit. But, the steering wheel controls are likely to have remained exactly the same across the different models. Which is why Chris referred you to that other stuff.
Then if you have a look here the guy works out what the wire colours are etc
http://www.newtriton.net/phpbb/viewtopic.php?f=18&t=10531&p=301648&hilit=mmcs+plug+play#p373755
Also there are manuals you can access to check the wire colours etc.
The biggest problem though to be honest is that you've given people SFA to work with in terms of answering your question. I looked closely at your post this morning and mostly gave up on it as there's insufficient information there without me heading off to the eonon site looking for installation manuals.
My best guess was the the wires labelled SW1 and SW2 might be for the steering wheel but they could have been extra subwoofer cables of some sort too. If they are the wires in question I reckon you might be a few wires short of where you need to be given the number of functions in the steering wheel controls of a triton - at least 5 functions on mine.
I'm happy to try and help and there are plenty of others who would too, but you need to help us help you. Also you need to drop the attitude a little when you don't find what you want when someone else is trying to give you a hand. The reality is all of the triton information you need is probably already here, and what is missing is information about how your new headunit is going to interface with it.
Here's a male ISO plug as an example:
and the female looks like this (and the ones in your image):
If your existing head unit actually has those plugs it will be something of a miracle since Mitsubishi has always tended to use white plugs with random configurations of its own.
Next I have to say your unit it quite new, so you're unlikely to find too many posts about that precise unit. But, the steering wheel controls are likely to have remained exactly the same across the different models. Which is why Chris referred you to that other stuff.
Then if you have a look here the guy works out what the wire colours are etc
http://www.newtriton.net/phpbb/viewtopic.php?f=18&t=10531&p=301648&hilit=mmcs+plug+play#p373755
Also there are manuals you can access to check the wire colours etc.
The biggest problem though to be honest is that you've given people SFA to work with in terms of answering your question. I looked closely at your post this morning and mostly gave up on it as there's insufficient information there without me heading off to the eonon site looking for installation manuals.
My best guess was the the wires labelled SW1 and SW2 might be for the steering wheel but they could have been extra subwoofer cables of some sort too. If they are the wires in question I reckon you might be a few wires short of where you need to be given the number of functions in the steering wheel controls of a triton - at least 5 functions on mine.
I'm happy to try and help and there are plenty of others who would too, but you need to help us help you. Also you need to drop the attitude a little when you don't find what you want when someone else is trying to give you a hand. The reality is all of the triton information you need is probably already here, and what is missing is information about how your new headunit is going to interface with it.
-
Cowboy Dave - Moderator
- Posts: 18098
- Joined: Tue Dec 29, 2009 9:46 am
- Location: Sydney
Re: Installing Double DIN radio (Digoptions) in MN GLX-R
![]() by NowForThe5th on Sun Dec 28, 2014 7:43 pm
by NowForThe5th on Sun Dec 28, 2014 7:43 pm
shorsfall wrote:If you actually look at page 3 the posts are all from 2011 which is 3 years before my model was actually released. No quite sure how that's relevant to my year.
They're relevant because they relate to the MN model, which you have. However, I have found some later information which may help you since there have been a series of rolling changes. This was also in one of the links I gave you earlier.
http://www.newtriton.net/phpbb/viewtopic.php?f=18&t=10531&p=433032&hilit=steering+wheel+controls#p411243
I happened across this as well. Most of the units out of China are wired almost the same.
You do not have the required permissions to view the files attached to this post.
Chris
If work is so terrific, why do they have to pay us to do it?
If work is so terrific, why do they have to pay us to do it?
-
NowForThe5th - Moderator
- Posts: 9234
- Joined: Sun Jun 15, 2008 2:00 pm
- Location: Holt, ACT
Re: Installing Double DIN radio (Digoptions) in MN GLX-R
![]() by shorsfall on Sun Dec 28, 2014 8:10 pm
by shorsfall on Sun Dec 28, 2014 8:10 pm
Cowboy Dave wrote:Are you sure your existing head unit has ISO plugs? Or are you calling them that and they're not actually ISO plugs?
Here's a male ISO plug as an example:
and the female looks like this (and the ones in your image):
If your existing head unit actually has those plugs it will be something of a miracle since Mitsubishi has always tended to use white plugs with random configurations of its own.
Next I have to say your unit it quite new, so you're unlikely to find too many posts about that precise unit. But, the steering wheel controls are likely to have remained exactly the same across the different models. Which is why Chris referred you to that other stuff.
Then if you have a look here the guy works out what the wire colours are etc
http://www.newtriton.net/phpbb/viewtopic.php?f=18&t=10531&p=301648&hilit=mmcs+plug+play#p373755
Also there are manuals you can access to check the wire colours etc.
The biggest problem though to be honest is that you've given people SFA to work with in terms of answering your question. I looked closely at your post this morning and mostly gave up on it as there's insufficient information there without me heading off to the eonon site looking for installation manuals.
My best guess was the the wires labelled SW1 and SW2 might be for the steering wheel but they could have been extra subwoofer cables of some sort too. If they are the wires in question I reckon you might be a few wires short of where you need to be given the number of functions in the steering wheel controls of a triton - at least 5 functions on mine.
I'm happy to try and help and there are plenty of others who would too, but you need to help us help you. Also you need to drop the attitude a little when you don't find what you want when someone else is trying to give you a hand. The reality is all of the triton information you need is probably already here, and what is missing is information about how your new headunit is going to interface with it.
Cowboy Dave thankyou for the info. I have to admit that I'm not 100% sure if they are ISO plugs or not on the back of my head unit. I did assume this after reading up and looking at many looms on eBay. The ones I saw all showed ISO plugs for the MY.
I do apologise sincerely if my response to the previous post sounded like I had an attitude but that was not my intention. I do see how my question my be abit ambiguous but it didn't seem that way when I posted it. All I really wanted to find out was had somebody fitted an aftermarket unit to this model before and did they have a solution to the steering control issue. I didn't even get a friendly " look mate could we have some more info" I just got accused of not doing any research on the subject. I have read all the posts on both topics and haven't found anyone that has got a solution. I will take it on board for future reference and try and be more polite in future even if the same respect hasn't been shown to me
- shorsfall
- Posts: 22
- Joined: Sun Dec 28, 2014 8:11 am
Re: Installing Double DIN radio (Digoptions) in MN GLX-R
![]() by croc.me on Sun Dec 28, 2014 8:44 pm
by croc.me on Sun Dec 28, 2014 8:44 pm

-

croc.me - Posts: 43
- Joined: Tue Sep 02, 2014 1:11 pm
- Location: Adelaide, SA
Who is online
Users browsing this forum: No registered users and 13 guests
![]()