Here's the post from
Steane's build..... I hope he doesn't mind

Steane wrote:the following.....
Lokka - Fitting to front of ML TritonThis weekend turned out to be quite enjoyable, and a good laugh. While some of the Melbourne NTN crew were melting the plastic at the 4x4 Show, I took the Tri up to Shepparton on Saturday and spent the afternoon installing the Lokka to the front diff with Salt36.
Salt is running the Lokka (fitted himself) in his Super Select Tri so he brought the shed, the bench, the tools, the experience and know-how to this event. I brought the Triton and a Lokka.

 What you need:
- Lokka
- LHS diff / driveshaft oil seal (part number to be added soon)
- Circlip for driveshaft (part number to be added soon)
- RTV Blue gasket goo (or similar)
- Loktite 270 or 271 (or equivalent)
- Trolley jack
- Chassis stands
- Dial indicator guage
- Torque wrench
- set of feeler gauges
- grease
- diff oil (2 litres)
- bench with a vice (strongly recommended, you need some way of keeping the diff housing secured while removing and re-torquing bolts)
Time taken - took two of us 6 hours from start to finish
IMPORTANT NOTE - READ THE SUPPLIED INSTRUCTIONS. ESPECIALLY NOTE WHERE THEY SUGGEST MARKING (CENTRE PUNCHING ETC) VARIOUS PARTS SO THEY ARE REFITTED IN THE SAME PLACE. AN EXAMPLE IS THE TAIL SHAFT, AND THERE ARE OTHERS.
I REPEAT - READ THE SUPPLIED INSTRUCTIONSStep 1 - Remove the rear bash plate (you can leave the front one on).
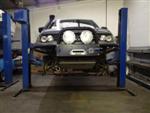
Remove the centre cap from the passenger side front wheel, so that you can access the castellated nut that bolts the driveshaft into the hub assembly. Remove the split pin and loosen the nut off. You should be able to push on this nut when loose and feel the driveshaft move. If not some gentle persuasion might need to be used to free it up.
Then Jack the car up, get some chassis stands in place, and remove the wheel (You do not need to remove the drivers side front wheel).
Drain oil from diff.
 Step 2 -
 Get the trolley jack under the lower control arm and jack it up until the suspension is no longer hanging at full droop (ie it needs to be off the bump stop).
Remove the bolt that holds the brake line bracket in place (behind the brake disc), and the two bolts that hold the ABS sensor wiring. Then remove the three upper ball joint bolts.
 Step 3 -
 Carefully ease the pressure off the jack so that the brake/hub assembly separates from the upper control arm. Keep an eye on the brake line and ABS wiring to make sure they are out of harms way and not under tension (this is why we removed the bolts earlier to give them more flex).
Let the whole assembly swing free.
 Step 4 -
 Pull the driveshaft out of the brake/hub assembly (takes a bit of effort), and move the brake/hub assembly out of the way (as much as possible), so that you have access to the rest of the driveshaft.
Take a good grip on the driveshaft and give it a solid pull towards you. You may need to do this more than once before it pulls out of the diff housing.
 Step 5 -
 Undoing things...and housing removal
- Undo the 4 bolts that hold the driver's side driveshaft to diff/axle housing
- Undo the bolts (x2) in the housing's forward mounts (the bolts that run through the bush)
- Undo the two bolts that secure the rear mount to the chassis (easier to replace than the one bolt that runs through the mount/bush)
- Remove the three hoses that run into the diff actuator (noting their positions)
- Unplug the electrical connection to the actuator and the clip securing the wiring
- Remove the four bolts securing the tailshaft to the rear of the diff (let the tailshaft hang there)
- If you are doing this with a mate you should be able to manhandle the housing out of its position and out from under the car, or use a trolley jack to support it and ease it out of its spot. You'll need to lift it over a chassis crossmember. Bit fiddly but not too difficult.

The space where the diff housing used to be...

The assembly out of the car and on the bench.
 Step 6 -
 Undo the bolts securing the axle housing to the diff.

A pic of the diff with the axle housing removed.

The diff up on the bench ready for the serious work to begin.
 Step 7 -
 remove the 8 bolts holding the diff cover on, to expose the 'inner workings'
 Step 8 -
 Using a dial guage, check the backlash/movement in the crown wheel (the instructions say to rotate the gear and take four measurements, but we just did the one). My diff came up matching a new diffs specs and Salt looked at me out the corner of his eye and said "Hmmm...your diff has had a much easier life than mine..."
 Step 9 -
 Remove the diff centre.
- Remove the four bolts ( 2 each cap) holding the bearing caps in. Gently release them with a few gentle taps with a wooden hammer handle or similar.
- gently tap out the shims on the outside of each bearing (between the bearing and the housing). Use a screw driver or similar but be very careful not to hit the bearing. Only tap the shim and take your time. Move from side to side so that you move both shims out in a relatively even fashion. When the shims are out far enough, the pressure on the bearings is released and the entire centre will fall out.
 Step 9.5 -
 Diff centre out and on the bench. A good time to remove the driveshaft oil seal. You can punch it out with a screwdriver (it's on the towel to the right of the assembly)
 Step 10 -
 remove the crown wheel (to get access to the planetary gears)
- Mark the position of the crown wheel (see white marker line in pic of removed crown wheel), it needs to go back in the same spot.
- Remove the 10 bastard bolts that hold the crown wheel in place. They are bloody tight.
- Use a suitable tap, and plenty of solvent to remove clean up the threads in the crown wheel (very important, they must be perfectly clean so that they are not torqued down on gunk in the rebuild process)
- clean the threads of the 10 bolts (for the same reason)

Crown wheel - note the white mark on the right of the CW. We marked it there as it corresponded with a hole in the casting of the crown wheel carrier (I made that name up...the thing the crown wheel bolts to...
) Threads have been cleaned.
This was the most time consuming part of the job.
Cleaning - Very important to clean all of the diff housing internals. We used spray brake cleaning solvent. It cleaned it all out beautifully and being a solvent it evaporates so doesn't make it's own mess.
Lots of brake cleaner was used on all of the internal pieces, the housing, the diff cover, all of the bolts. It also helped to clean the old Loktite out of threads.
VERY IMPORTANT TO KEEP EVERYTHING SPOTLESS.
 Step 11 -
 Lokka install (refer to instructions supplied, the following is a brief summary)
- remove the planetary gears and their shims.
- thoroughly clean the housing.
- begin to install the Lokka centre, building one side at a time, using the same shims that you removed. You need to grease each mating surface. Insert the centre shaft and use a feeler guage to make sure that the gap between the Lokka centre and the shaft is within tolerance. Repeat for the other side. Is a little fiddly trying to keep the installed half in place as you flip the unit over, but it's not to difficult.
- When the centre is replaced with the Lokka assembly, you then gently tap the supplied dowels into place by tapping them into the cut-out and then pushing them down into their slots. A spring is then eased into place, locking over the small raised section on top of the dowel and into the slight recess in the top of the cut-out.

Pic showing completed Lokka 'insertion'

Another pic showing completed Lokka 'insertion' - you can see where the dowels and springs sit in the cut-out. When you see it in person it will make more sense.
We still have no-idea how this device works and have put it down to magic...
 Step 12 -
 replace the crown wheel
- Use loktite on all bolts
- Tighten to correct torque (per manual)
 Step 13 -
 install centre back into housing
- make sure housing is perfectly clean
- tap the new driveshaft seal into place using something that applies even pressure over the seal as it seats it
- gently ease/tap the centre back into the housing making sure that the shims are replaced on the side they were removed from
- replace bearing caps a tighten to correct torque (check manual)
- use the dial gauge to recheck the backlash. In this case it was reduced by a whisker. We moved the crown wheel around and checked this measurement in four places and got the same result
 Step 14 -
 replace diff cover using RTV blue or similar gasket goo (use torque wrench and torque settings per manual)
 Step 15 -
 Replace axle assemlby using same gasket goo (use torque wrench and torque settings per manual)
 Step 16 -
 Get Salt to bolt the whole assembly back into your car while you have a beer...
Well...not quite. It took two of us to manhandle the unit back into position. One person can do it with the help of a trolley jack.
Then it's just a reversal of the removal procedure.
- Bolt up the mounting points
- Bolt up the driver's side driveshaft
- Bolt up the tailshaft
- re-attach electrical connection and hoses to the actuator
- re-attach passenger side driveshaft;
Getting the passenger side driveshaft in was interesting, but only took a few minutes. We replaced the circlip on the end of the shaft that is inserted into the diff housing (through the new seal), just in case the other one was damaged on removal.
It's then a case of getting a bit of grease onto the end of the driveshaft around the circlip and centering the circlip so that it isn't sticking out past the splines too much in one spot. Push the shaft in through the seal (being careful not to damage the seal) and then push it onto the splines. Might take a few tries and you'll probably need to re-align the circlip a few times before you get it just right. When it's right it will push straight in.
The brake/hub assembly is then arranged so that the other end of the driveshaft can be pushed through the hub.
Use the jack to raise the lower control arm up enough to bolt the upper ball joint into the upper control arm again. Re-attach all brackets (brake line / ABS) and replace the castellated nut on the end of the driveshaft (in hub).
- Replace wheel
- Fill diff with oil
- Re-attach rear bash-plate
 Step 17 -
 Test (as per instructions) that both wheels lock and unlock as they should, which ours did!

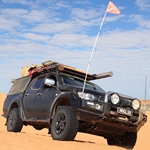
 The testing
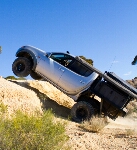
Salt and I headed out to some crown land on the river flats for some shakedown testing. All went really well until Salt got himself bogged
Bloody petrol Tritons...

Walking back from hooking the winch cable around an old tree stump

The water was absolutely freezing. It actually hurt to stand in it...

Still standing in the water...ouch...

And still in that bloody freezing water...

Freedom!

And back into the freezing water to unhook the winch cable...

And one final shot of Salt in the water, although he looks quite happy in this one


The VerdictIt's really difficult to get a solid description of what the Lokka is like online, so I'll add my experience to those already expressed here at NTN.
My Tri is easy select, so I don't have to worry about the affect it will have on super select. Salt can help you with that rundown, suffice to say he hasn't found any issue with using SS on bitumen with the Lokka, aside from the steering wanting to return to centre more quickly.
As soon as we got of the bitumen I engaged 4H and felt the steering stiffen momentarily as drive went to both front wheels. It then returned to normal almost instantly. Touring on dirt roads at 80km/h feels much the same as before. The steering is a fraction sharper, and after negotiating tighter turns wants to self-centre more quickly, but there is really nothing negative in the experience at all. It feels mostly normal and perfectly safe.
I now know that it won't be an issue sitting at touring speed in 4H on dirt roads. It is barely any different to how it was before. It 'feels' a little more direct and a touch different, but I actually prefer it.
You can feel the Lokka actively pulling you up creek banks, and through the mud. Salt was stopped because his rear diff pumkin got hung-up on a high point and he lost traction. I flicked the rear locker on, gave it a bit more stick than Salt did and sailed through the spot without issue.
In my opinion there is (so far) very little that is negative to say about the Lokka off-road. Works a treat and is really very unobtrusive in how it operates. You steer as normal, there was no torque steer during my test and it does make the Triton feel unbeatable...which might be the biggest thing to watch.
More extensive testing will follow, and it may throw up some traits that are not so great on different surfaces, but for now, with testing limited to muddy/slippery conditions and touring speeds on gravel roads, it works a treat.
HUGE THANK-YOU TO SALT FOR HIS HELP AND HIS FAMILY FOR PUTTING ME UP FOR A NIGHT. It was a lot of fun mate and one of the smoothest running projects that I've been involved with on my Triton. I think that has a lot more to do with your involvement than mine.