Tech article - Add an ipod input cable to the stock headunit
92 posts
• Page 4 of 4 • 1, 2, 3, 4
Re: Tech article - Add an ipod input cable to the stock head
![]() by Chef_Dave on Wed Jul 10, 2013 6:00 am
by Chef_Dave on Wed Jul 10, 2013 6:00 am
How do you remove iPod cable? Replacing head unit and seem to get the cable out now???
I know a lot about cars, man. I can look at any car's headlights and tell you exactly which way it's coming.
-

Chef_Dave - Posts: 547
- Joined: Sun Jun 05, 2011 3:07 pm
- Location: YAMBA NSW
Re: Tech article - Add an ipod input cable to the stock head
![]() by fridgie on Wed Jul 10, 2013 7:10 am
by fridgie on Wed Jul 10, 2013 7:10 am
There should be some little tags on the connectors that secure it into the plug. From memory the plug has a section that will pop out a bit (use small flatblade) to release the tags
I'm not so good with the advice  ... Can I interest you in a sarcastic comment???
FORUM DIRECTORY - Click here
SEARCH TUTORIAL - Click here
MY TRITON - SEE IT HERE
FORUM DIRECTORY - Click here
SEARCH TUTORIAL - Click here
MY TRITON - SEE IT HERE
-

fridgie - Posts: 10485
- Joined: Sat Mar 15, 2008 2:00 pm
- Location: Caboolture, QLD
Re: Tech article - Add an ipod input cable to the stock head
![]() by Reardy Mister on Sun Jul 14, 2013 9:14 pm
by Reardy Mister on Sun Jul 14, 2013 9:14 pm
subi_man wrote:For around $36 and 15mins of your install time, you can add an ipod input cable to your stock headunit.
Get your Mitsubishi dealer to order you the cable (part no: MZ360135EX "aux cable").
Once you have the cable in your hand, you're ready to install!
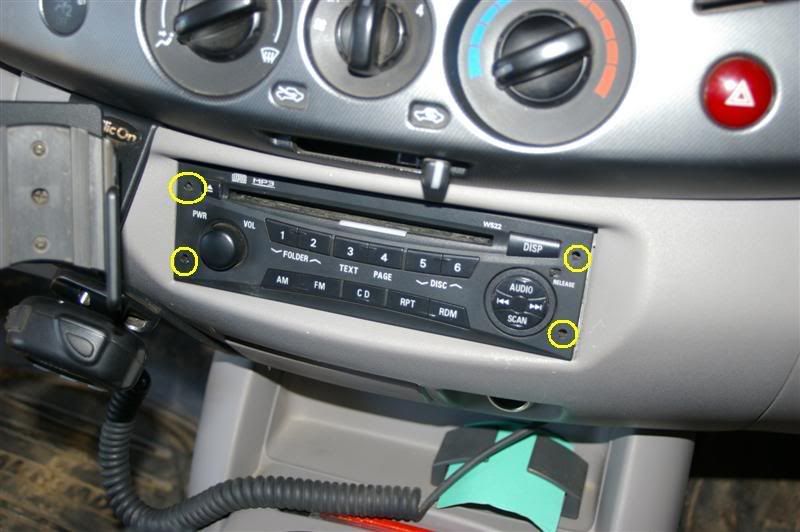
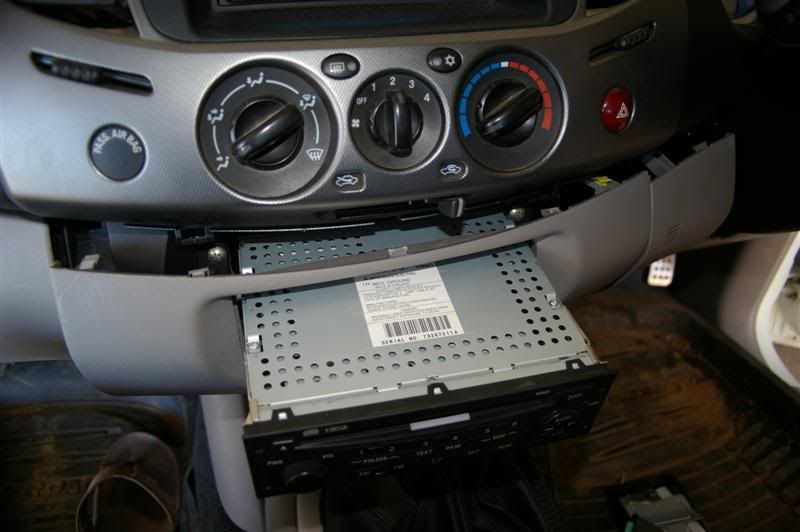
You need to remove the headunit, and possibly the plastic surround if the cables behind aren't long enough (like mine weren't). You can release the headunit by poking in a thin rod (like a nail or pop-rivet) into the 4 small holes on the front...
The plastic surround is held in with clips along the top, and one screw on the bottom RHS...
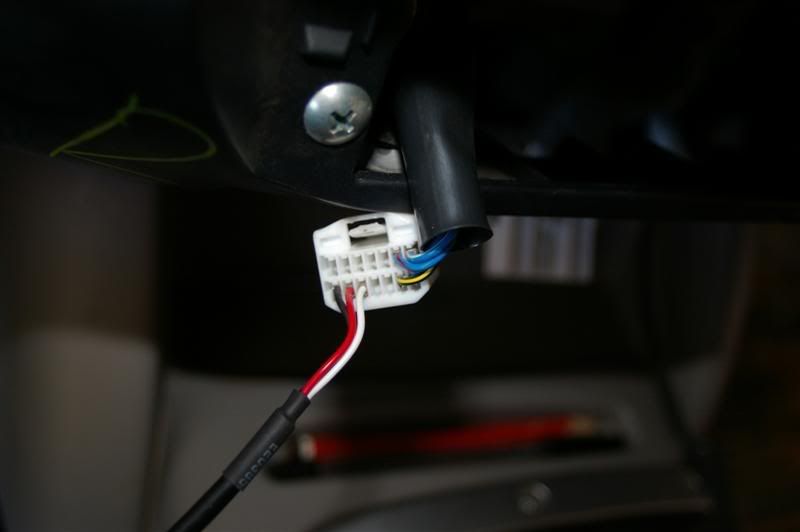
Remove the two connectors, earth cable and aerial from the rear of the headunit. The black, red & white wires from the ipod cable go in the back of the white 14-pin plug as per the instructions that come with it - they slot in and lock very easily.
I routed the cable into the glovebox, but you could bring it out under the ashtray if you want. I have since cut the cable and installed a 3.5mm headphone socket in the dash, so when not listening to the iPod, there is no cable floating around
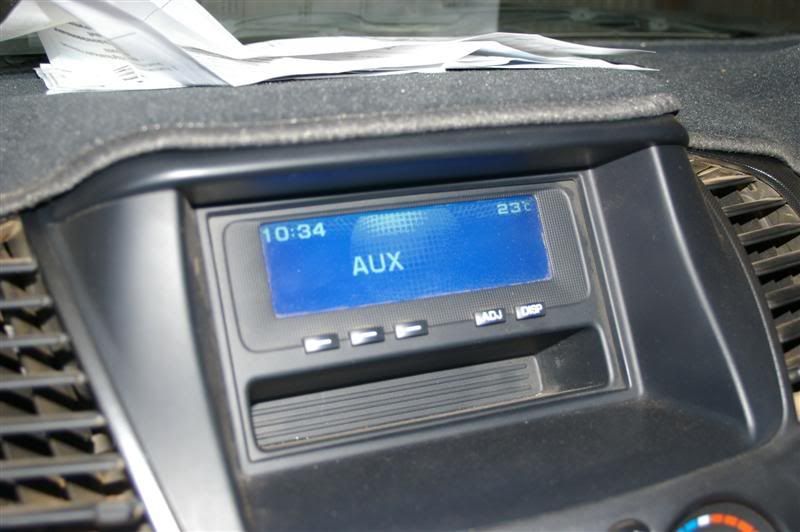
Now carefully put it all back together and you are good to go!! Plug the cable to the headphone jack of your ipod and choose your songs normally. To listen to the ipod through the speakers, press and hold the CD button until AUX appears in the top dash display..
The volume on the ipod AND the headunit volume both work, so you will have to fine-tune both levels until you are happy...
ENJOY!!!
These are good instructions, no doubt. But I found they assumed too much talent on the part of the reader
Here is mine for the ham-fisted electronic and mechanical dullard (in Perth):
Aux cable: available from Paceway Mitsubishi in Osborne Park, just as listed above.
Female headphone plug jack: available from Jaycar Electronics in Northbridge for (about) $2.60
Firstly, put out of your mind any thoughts that this is a 15 minute job. It's at least a six-pack from the time you pull into the garage to the time you drive out listening to your choons via MP3 player.
If you can get the right tool for popping the stereo out, do so. If not, use fence wire, I found coat hanger wire too thin and weak. Make careful note of how it comes apart, because as with anything, reassembly is harder.
Once the radio is out, unplug everything. It's just in the way and the plugs on the back can't be mixed up. DO be careful not to lose any of the cables into the abyss behind the dash.
As you look at the dash, you need the 14pin plug on the right. It has plenty of spare pins on it, the other one doesn't.
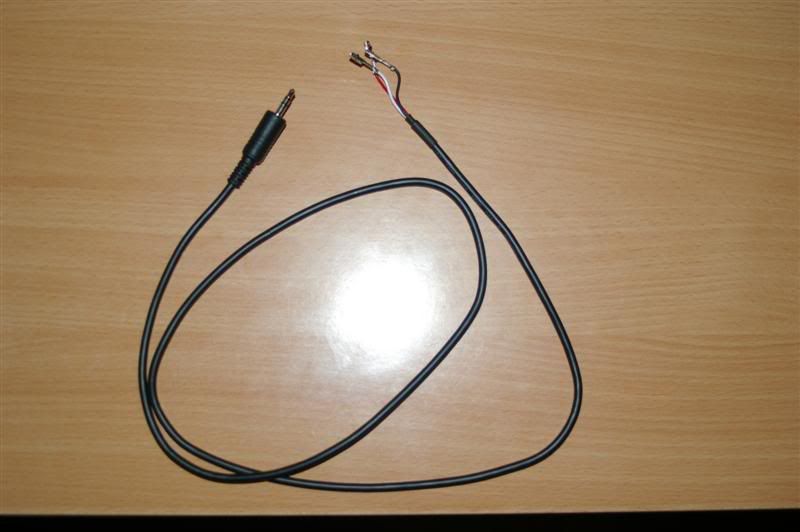
Take your aux cable and BEFORE you snip the male part off, plug it into your Jaycar plug jack. Now take a multimeter and one by one look for a circuit between the tabs on the back of the plug jack and the bear wires on the other end of your aux cable. This gives you a map for the correct way to wire it after you've snipped the male end off and are ready to solder your up the plug jack.
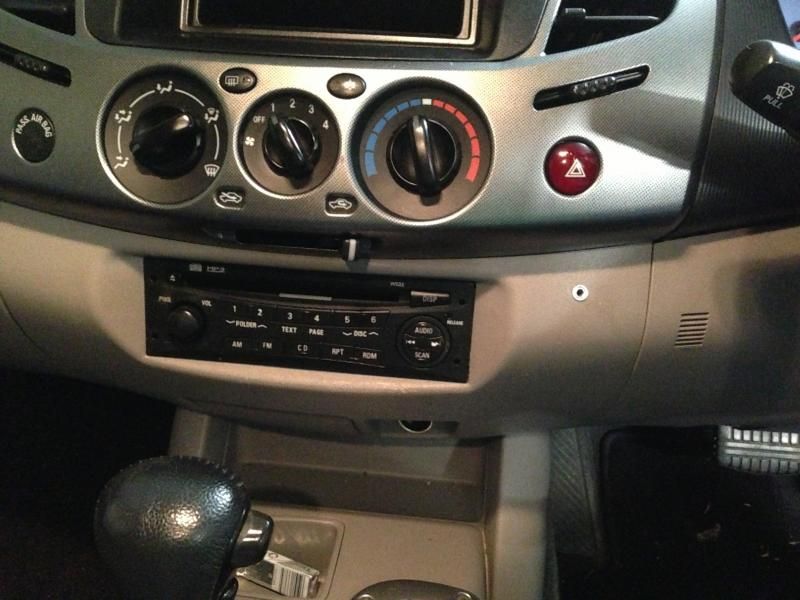
I set out to install my jack in the centre console near the 12v outlet. In the end, I simply couldn't be bothered removing more interior trim so it is located as par my picture. Assuming you locate your jack as I have, you will need to prize off the plastic piece of dash surrounding the head unit. I have read talk of a specific tool, but I was told to just pull it. If feels like you're going to break something, you're doing it correctly. I found it easier to remove by undoing the screw on the right side of this panel, that points down into the drivers footwell and links it to the panel under the steering column. Expect to not be able to line this hole up again when you reassemble.
There is also an important clip at the bottom on the left side of this panel near the glovebox but mainly you need to get the top ones out. You will likely break either this one or the two large ones at each corner of the top of this panel. If you don't break it, you may be lucky and just fire the useful part of the clip somewhere into the abyss.
Solder your female plug jack as per your multimeter wiring diagram. Before you attempt to plug your factory-prepared bear wires into the 14 pin plug in the dash, use a very small flat head screw driver and open the locking mechanism on the bottom of the plug, it slides out about 2mm and permits the insertion of the wires. They will click into place when theyre in far enough. Now re-connect your head unit, plug into the headphones jack and test everything with your MP3. If ok, unplug the head unit again and put it to one side. Now select where your headphones jack will go. You'll need a spot with a reasonably flat area behind. I didn't check the correct size of drill bit - apologies. Mine started too small but remember, you can't cut something a bit longer. I was able to ream my hole (ooh err) with a chain saw sharpening file. By not reaming with the drill, you eliminate the risk of melting the plastic to an odd size or shape and more swarf doesn't help with insertion either.
I also coiled my cable and secured with two zip ties. I didn't test it fully but it looks to me like the the standard aux cable does have enough length to reach the centre console if you wanted to. I didn't, I had already soldered so ended up with excess. The zip ties kept it neat.
I also applied a thick daub of silicone sealant over the soldered terminals once in situ, to ensure insulation as there is no chance of getting electrical tape in there if you don't have the touch and patience of a brain surgeon. Wind the washer on over the top, the section of dash I used is quite thick so I really only had the thickness of the washer left protruding. I used long nose pliers to ensure it was tight, you can see where my deft touch has scuffed the plastic slightly with the jaws.
Once done, retest. I say that because the less often you remove and replace the dash panels, the less likely you will be break more clips, create more rattles, throw tools, use words your kids shouldn't have to hear or assault loved ones.
If all ok, re-locate all the cables from in the abyss and ensure they are accessible and not going to be irretrievable once the dash is back together. Then replace the dash panels. I believe the correct engineering term is to initially "offer it up" before you go pressing clips back in place. Do the right side top clip first was what I found best and you will need locate the clip before you reset the overlap with the panel next door, as they interlock. Also take care to locate that lower left clip by the glove box.
Once pressed in, pay close attention to the screw at the bottom right above the footwell. Look at how it goes together before you snap it all together, because once its back together, your are blind. When I attempted to locate the self tapper to the rapid-fix clip, it wouldn't go close to lining up. It did however line up perfectly with another hole about 5mm lower, but there was no fastener on it. I solved it by just getting another self tapper 6mm longer and 2mm wider and just winding it into the new hole. Job jobbed, looks like a bought one.
Reconnect the head unit and push it back into place. Mysteriously, the right hand side of my head unit WILL NOT clip back secure. I know for a fact it is going to shake itself to death on the first unsealed road I hit and make a sound akin to a jackhammer until I stuff a folded up piece of paper into it.
Then as per the first post, hold the CD button down until AUX appears and you're good to go.
I will likely find a decent phone holder for my music iPhone (distinct from the one I use for calls) and mount it very close to the jack.
Here is the jack:
NB. I had the help of my Dad and his mate, so most of the good ideas listed above were theirs
-

Reardy Mister - Posts: 37
- Joined: Mon Jul 01, 2013 12:44 pm
Re: Tech article - Add an ipod input cable to the stock head
![]() by emjayar on Wed Sep 04, 2013 1:56 pm
by emjayar on Wed Sep 04, 2013 1:56 pm
Okay so I installed an iPod cable with power capabilities, however it didn't come with any wiring diagrams (the ebay add said it would) So it is playing audio but I don't know where to wire the power to? Any ideas?
http://www.lifesbumpyroads.com | Facebook | Twitter | Youtube
Driving the conversation on depression and suicide awareness and intervention for Lifeline and beyondblue
'07 ML GLXR 3.2L as seen in Australian 4WD Action issue 238
Driving the conversation on depression and suicide awareness and intervention for Lifeline and beyondblue
'07 ML GLXR 3.2L as seen in Australian 4WD Action issue 238
-

emjayar - Posts: 499
- Joined: Sun Aug 04, 2013 11:45 am
Re: Tech article - Add an ipod input cable to the stock head
![]() by magictux on Thu Jul 31, 2014 5:02 pm
by magictux on Thu Jul 31, 2014 5:02 pm
I bought a stock MN GL cab chassis 4x2 yesterday (2013 MY14). After much stuffing around I found that the stock radio is held in by two screws on each side. To access that you need to pull the plastic fascia off. When I did so I found an Aux cable connected and just coiled up and stuck to the rear of the radio. Why the hell they would do that and not just poke it out somewhere is beyond me. Anyhow I hope this helps anyone who might be contemplating this in the newer models.
BTW, I replaced the radio with a JVC system which cost just $125 on special from Supacheap. So now I have bluetooth audio and phone with a much better all round system.
Mick
BTW, I replaced the radio with a JVC system which cost just $125 on special from Supacheap. So now I have bluetooth audio and phone with a much better all round system.
Mick
- magictux
- Posts: 2
- Joined: Sat Jul 26, 2014 5:02 pm
Re: Tech article - Add an ipod input cable to the stock head
![]() by de Jager on Thu Aug 28, 2014 8:51 pm
by de Jager on Thu Aug 28, 2014 8:51 pm
Hi Guys!
It looks like I am the only one with a 22 pin plug in my radio? anyone else with this problem?
It looks like I am the only one with a 22 pin plug in my radio? anyone else with this problem?
- de Jager
- Posts: 1
- Joined: Wed Aug 13, 2014 8:59 pm
Re: Tech article - Add an ipod input cable to the stock head
![]() by SinWolf on Mon Sep 22, 2014 9:20 pm
by SinWolf on Mon Sep 22, 2014 9:20 pm
magictux wrote:I bought a stock MN GL cab chassis 4x2 yesterday (2013 MY14). After much stuffing around I found that the stock radio is held in by two screws on each side. To access that you need to pull the plastic fascia off. When I did so I found an Aux cable connected and just coiled up and stuck to the rear of the radio. Why the hell they would do that and not just poke it out somewhere is beyond me. Anyhow I hope this helps anyone who might be contemplating this in the newer models.
BTW, I replaced the radio with a JVC system which cost just $125 on special from Supacheap. So now I have bluetooth audio and phone with a much better all round system.
Mick
Hi... Do you still have the radio you removed from the Triton ?? If so, does it have the 14 or 22-pin plug ?
Thanks
- SinWolf
- Posts: 164
- Joined: Tue Jun 08, 2010 8:05 pm
- Location: South Africa
Re: Tech article - Add an ipod input cable to the stock head
![]() by diver albie on Tue Sep 23, 2014 7:39 pm
by diver albie on Tue Sep 23, 2014 7:39 pm
Well what a ball ache, couldn't get the radio out separate of the trim  anyway picked up the lead from Paceway in WA and what a pleasant change from dealing with my usual dealership. Fitted it tonight, even with the non radio popping out issue took about 20 minutes.
“Wilderness is not a luxury but necessity of the human spirit.” –Edward Abbey
-

diver albie - Posts: 251
- Joined: Wed Oct 02, 2013 10:03 pm
- Location: Perth WA
Re: Tech article - Add an ipod input cable to the stock head
![]() by triton_guru on Wed Sep 24, 2014 7:05 am
by triton_guru on Wed Sep 24, 2014 7:05 am
Just wondering if anyone else is having the problem that when they turn off the car in aux when ubturn it back on its on a random radio channel? Any way of making it start on aux aswell?
-

triton_guru - Posts: 865
- Joined: Sat Mar 23, 2013 4:49 pm
Re: Tech article - Add an ipod input cable to the stock head
![]() by lukey10 on Thu Nov 27, 2014 6:43 pm
by lukey10 on Thu Nov 27, 2014 6:43 pm
Anyone know the Mitsubishi part number for the iPod cable to suit current model GLX head unit?
If you don't know what you're doing then you may as well do it quickly.
-
lukey10 - Posts: 34
- Joined: Sat Aug 02, 2014 8:48 pm
- Location: Ballarat, Victoria
Re: Tech article - Add an ipod input cable to the stock head
![]() by lukey10 on Thu Nov 27, 2014 8:04 pm
by lukey10 on Thu Nov 27, 2014 8:04 pm
And there isn't an aux cable coiled upup behind it, if there's anywhere others have found it in the dash?
thanks
thanks
If you don't know what you're doing then you may as well do it quickly.
-
lukey10 - Posts: 34
- Joined: Sat Aug 02, 2014 8:48 pm
- Location: Ballarat, Victoria
Re: Tech article - Add an ipod input cable to the stock head
![]() by ditezz on Wed Dec 24, 2014 7:23 pm
by ditezz on Wed Dec 24, 2014 7:23 pm
magictux wrote:I bought a stock MN GL cab chassis 4x2 yesterday (2013 MY14). After much stuffing around I found that the stock radio is held in by two screws on each side. To access that you need to pull the plastic fascia off. When I did so I found an Aux cable connected and just coiled up and stuck to the rear of the radio. Why the hell they would do that and not just poke it out somewhere is beyond me. Anyhow I hope this helps anyone who might be contemplating this in the newer models.
BTW, I replaced the radio with a JVC system which cost just $125 on special from Supacheap. So now I have bluetooth audio and phone with a much better all round system.
Mick
Mate,
I couldn't work out why the stereo had a aux function and no aux jack..You saved me a whole lotta time and potential damage looking for the aux jack..fixed in half hour ....ipod working and you are right WTF would they leave the thing coiled up behind the unit..many thanks
Terry
- ditezz
- Posts: 1
- Joined: Tue Dec 23, 2014 1:11 pm
Re: Tech article - Add an ipod input cable to the stock head
![]() by lukey10 on Thu Jan 08, 2015 3:59 pm
by lukey10 on Thu Jan 08, 2015 3:59 pm
Anyone have a picture of where they found there aux input in the later model tritons?
If you don't know what you're doing then you may as well do it quickly.
-
lukey10 - Posts: 34
- Joined: Sat Aug 02, 2014 8:48 pm
- Location: Ballarat, Victoria
Re: Tech article - Add an ipod input cable to the stock head
![]() by fridgie on Thu Jan 08, 2015 6:18 pm
by fridgie on Thu Jan 08, 2015 6:18 pm
Have you tried inside the centre console? Others have found taped up behind the head unit or the glove box
I'm not so good with the advice ... Can I interest you in a sarcastic comment???
FORUM DIRECTORY - Click here
SEARCH TUTORIAL - Click here
MY TRITON - SEE IT HERE
FORUM DIRECTORY - Click here
SEARCH TUTORIAL - Click here
MY TRITON - SEE IT HERE
-
fridgie - Posts: 10485
- Joined: Sat Mar 15, 2008 2:00 pm
- Location: Caboolture, QLD
Re: Tech article - Add an ipod input cable to the stock head
![]() by lukey10 on Thu Jan 08, 2015 8:54 pm
by lukey10 on Thu Jan 08, 2015 8:54 pm
I'll have to have a look behind the glove box, can't see it behind the head unit. But could just be going blind 
If you don't know what you're doing then you may as well do it quickly.
-
lukey10 - Posts: 34
- Joined: Sat Aug 02, 2014 8:48 pm
- Location: Ballarat, Victoria
Re: Tech article - Add an ipod input cable to the stock head
![]() by Trentd on Wed Feb 11, 2015 7:51 pm
by Trentd on Wed Feb 11, 2015 7:51 pm
Does anyone know if you would then be able to use a usb?
Say for instance if I bought off of ebay a USB port with a male jack on the end, and hooked this all up, do you think it would work or does it only work by amplifying the iPods sound !
Say for instance if I bought off of ebay a USB port with a male jack on the end, and hooked this all up, do you think it would work or does it only work by amplifying the iPods sound !
- Trentd
- Posts: 79
- Joined: Sun Jan 11, 2015 4:19 pm
Re: Tech article - Add an ipod input cable to the stock head
![]() by 08glxr on Fri Mar 13, 2015 6:21 pm
by 08glxr on Fri Mar 13, 2015 6:21 pm
I made my own cable and fitted the female socket inside the console. Cn still put ipod in cupholder and close console lid too. That way when I change stereo there will be no hole in the dash
- 08glxr
- Posts: 37
- Joined: Fri Feb 21, 2014 6:13 pm
92 posts
• Page 4 of 4 • 1, 2, 3, 4
Who is online
Users browsing this forum: No registered users and 4 guests
![]()