Fitting Fog Lights and GLX-R Stalk to a ML VR, MN GLX/GLR
Re: Tech Article-Fitting Fog Lights and GLXR Fog Switch to a
![]() by Brent1 on Mon Feb 18, 2013 7:15 am
by Brent1 on Mon Feb 18, 2013 7:15 am
-

Brent1 - Posts: 524
- Joined: Fri Feb 10, 2012 5:00 pm
- Location: Grenfell
Re: Tech Article-Fitting Fog Lights and GLXR Fog Switch to a
![]() by 2012triton on Mon Feb 18, 2013 9:42 pm
by 2012triton on Mon Feb 18, 2013 9:42 pm
- 2012triton
- Posts: 8
- Joined: Sat Apr 21, 2012 1:26 pm
Re: Tech Article-Fitting Fog Lights and GLXR Fog Switch to a
![]() by Bigbirdalx on Mon Mar 11, 2013 5:02 pm
by Bigbirdalx on Mon Mar 11, 2013 5:02 pm
-

Bigbirdalx - Posts: 677
- Joined: Tue Oct 30, 2012 7:19 am
- Location: northside of brisbane
Re: Tech Article-Fitting Fog Lights and GLXR Fog Switch to a
![]() by RHKTriton on Wed Mar 13, 2013 8:30 am
by RHKTriton on Wed Mar 13, 2013 8:30 am
- RHKTriton
- Platinum Subscriber
- Posts: 4747
- Joined: Wed Jun 10, 2009 10:05 pm
- Location: La trobe Valley - Gippsland
Re: Tech Article-Fitting Fog Lights and GLXR Fog Switch to a
![]() by fridgie on Wed Mar 13, 2013 9:47 am
by fridgie on Wed Mar 13, 2013 9:47 am
FORUM DIRECTORY - Click here
SEARCH TUTORIAL - Click here
MY TRITON - SEE IT HERE
-

fridgie - Posts: 10485
- Joined: Sat Mar 15, 2008 2:00 pm
- Location: Caboolture, QLD
Re: Tech Article-Fitting Fog Lights and GLXR Fog Switch to a
![]() by sijmen on Tue Aug 06, 2013 12:00 am
by sijmen on Tue Aug 06, 2013 12:00 am
I've prepared a detailed description with diagrams and photos to show what needs to be done. I just have to work out how to get them in the post.
- sijmen
- Posts: 16
- Joined: Sun Jan 29, 2012 9:22 pm
- Location: Brisbane (South side)
Re: Tech Article-Fitting Fog Lights and GLXR Fog Switch to a
![]() by NowForThe5th on Tue Aug 06, 2013 12:06 am
by NowForThe5th on Tue Aug 06, 2013 12:06 am
sijmen if you have problems posting up what you have then just let me know and I'll put it all up for you.
If work is so terrific, why do they have to pay us to do it?
-

NowForThe5th - Moderator
- Posts: 9239
- Joined: Sun Jun 15, 2008 2:00 pm
- Location: Holt, ACT
Re: Tech Article-Fitting Fog Lights and GLXR Fog Switch to a
![]() by andriesvdv on Tue Aug 06, 2013 1:01 pm
by andriesvdv on Tue Aug 06, 2013 1:01 pm
- andriesvdv
- Posts: 40
- Joined: Sat Jun 01, 2013 10:22 pm
- Location: Kellyville, NSW
Re: Tech Article-Fitting Fog Lights and GLXR Fog Switch to a
![]() by sijmen on Fri Aug 09, 2013 1:27 am
by sijmen on Fri Aug 09, 2013 1:27 am
With regards to fog lights on the 2012 GL-R triton, there are 2 problems. (I can only assume the GLX is the same)
1. The first is a missing wire from the ETACS unit (under the driver side dash) to a plug near the ECU (under the passenger side dash against the side wall). This problem is a little fiddly to fix, but it can be done relatively easily. I'll provide complete details below.
2. The second is getting the fog light indicator to display on the dash. I haven't been able to resolve this yet. What I do know is that when you turn the fog light switch on, it sends a signal to the ETACS unit, which then turns on the relay under the bonnet (assuming the missing wire is in place). It should also turn on the dash indicator, however, because the GL-R does not come with fog lights out the factory, this feature is disabled in the ETACS unit. Now apparently, its a simple matter of downloading the vehicle configuration file, changing the configuration to enable the dash indicator and writing it back to the ETACS unit. The problem here is that no one seems to know which setting needs to be changed, and the configuration file is not very descriptive. Maybe someone else has had some success in this area.
Now back to the missing wire.
The GL-R is factory fitted with fog light wiring under the bonnet. If you get under the bumper, you will find a loose plug where each fog light would normally be located. All that's missing under the bonnet is a relay, as Choady indicated at the start of this post. Also, all switches from the indicator stork to the ETACS unit are signal based, so all the necessary wiring for that is there. Once again, all you need to do, is remove the cover around the steering column, unclip the old indicator stork and clip in a GLX-R indicator stork. Now, switching on the fog light sends a signal to the ETACS unit (under the drivers side dash), which then powers a wire to the relay under the bonnet (next to the battery). Unfortunately, the wire from the ETACS unit to the relay is only half there. A segment from the ETACS unit to a plug on the passenger side, under dash side wall, is missing.
So here's a wiring diagram I managed to get hold of. It a scan of a photocopy of a printout of a print-screen, so the quality is crap, but it gives enough information to describe the issue.

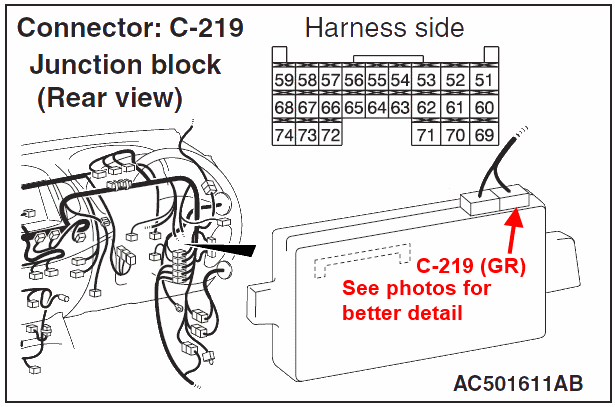
I've highlighted the missing wire in red. It shows that it goes from pin 3 of plug C-33 (located near the ECU) to pin 67 of plug C-219 at the ETACS unit. The following 2 images I took from a workshop manual to identify the pins of the plugs in question.
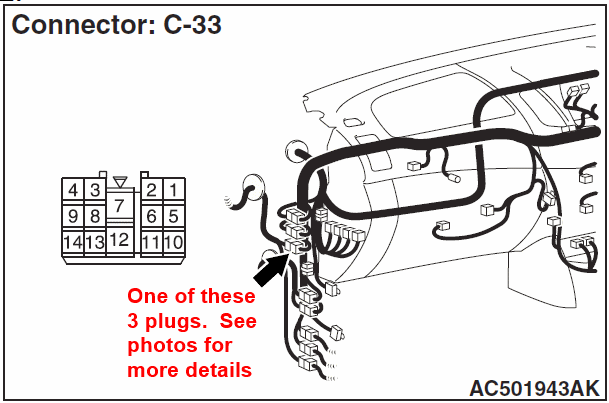
At this point the first thing I suggest is going to the wreckers and getting some old plugs with from under the dash of various models. This image shows the sort of things I mean.
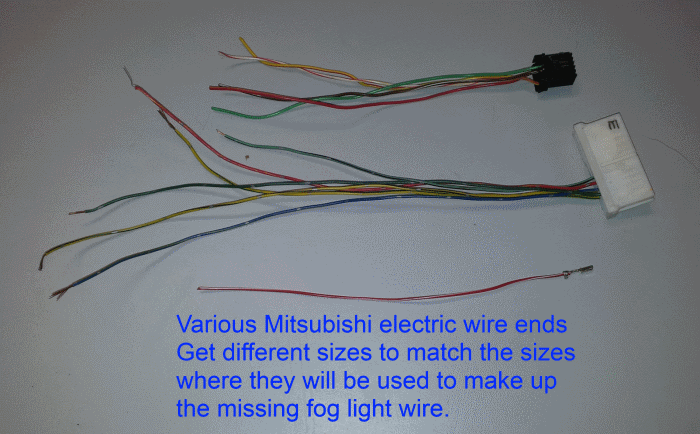
What we are interested in are the crimp terminals. These are near impossible to get hold of from Mitsubishi, so we get a number of different sizes, (and there are a few different sizes to choose from), which we will lengthen by soldering wire between the two short wires with the crimp terminals. Once you have a number of wires with crimp terminals, you can then start getting to the plugs.
The first plug I started with was C-33 which is located alongside the ECU, under the passenger side glove box, against the side wall. The following picture shows the ECU in place.
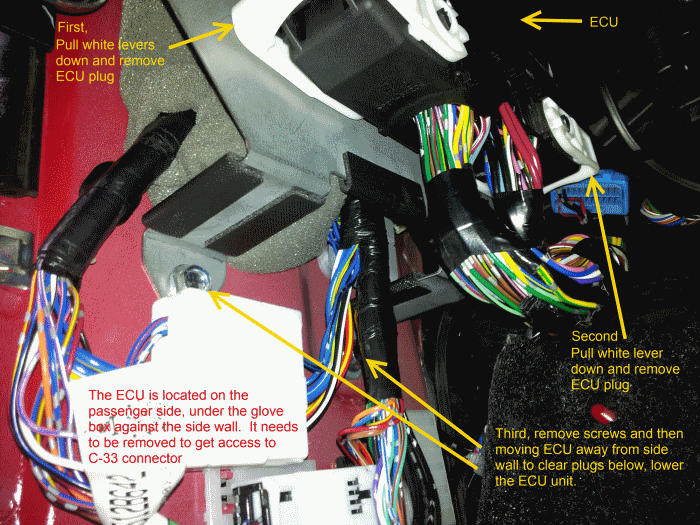
The ECU needs to be removed in order to get access to plug C-33. This is easily done by pulling down the white cam levers of the ECU loom connectors and removing the plugs. Then removed the two screws, and you can then lower the ECU out of the way. Note, that it would be helpful to remove the glove-box in order to give you enough access to the ECU, especially when replacing it, after fitting the fog light wire.
The following image shows the area of the ECU, after it has been removed.

The next image shows the plug we are interested in, C-33, after it has been disconnected from its mate.

Originally, the plug was clipped onto the wall. It is necessary to remove it from the wall to make it easier to fit the new wire.
In the next photo, you can see the existing wire from the relay under the bonnet going into the plug, but no wire in the same hole of the other half of the plug.
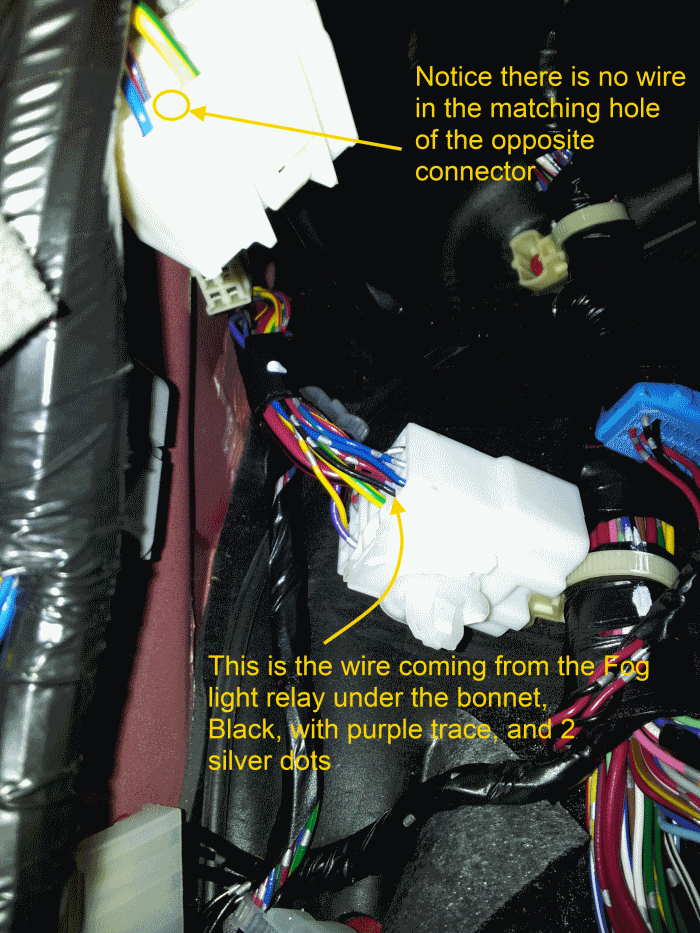
This photo is another view of the same plug, looking at the pins.

Finding a second hand terminal and tail (which you got from an old Mitsubishi) and which matches the terminals in the plug, fit it into the appropriate hole as show in the supplied diagrams and pictures.

In my case the crimp terminal would not clip into the plug and kept falling out, so I used some silicone to glue it into place. Do not use glue. Silicone is ideal, because it is quick drying, and the wire can still be removed in the future.
Now at this point, if you connect the C-33 plug halves together and supply 12 volt onto the tail you just added to the C-33 connector, you should see the fog lights come on, for as long as you keep the power on. This will confirm you have got the correct wire. Before doing this, use a multimeter to check that the wire under the dash goes to the relay.
Next you can solder on a longer piece of wire, about 2 metres onto the tail, and insulate the join with heat shrink and insulation tape. Then feed the wire under the dash to the passenger side, taping or cable tying the cable well out of the way.
At the drivers side, under the dash is the ETACS unit. There are a number of fuses and relay attached to the ETACS unit as shown in the following picture.
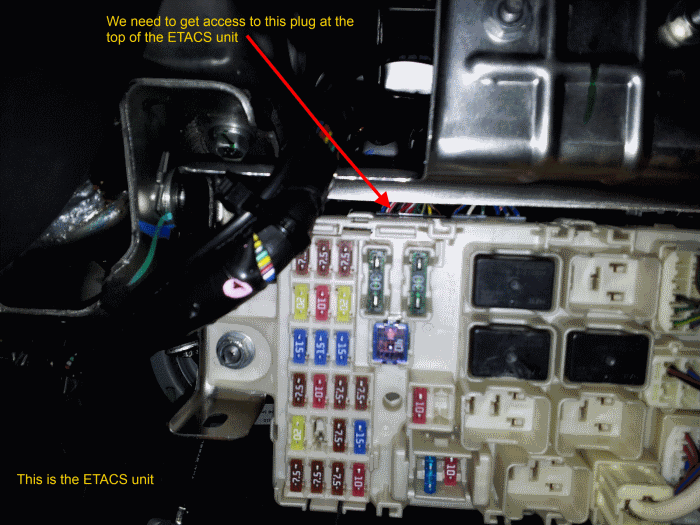
The grey plug at the top of the unit is the one we need to access. To get to it, first remove all the plugs from the fuse side of the unit and ten remove the 2 nuts (one each side) holding the ETACS unit secure.
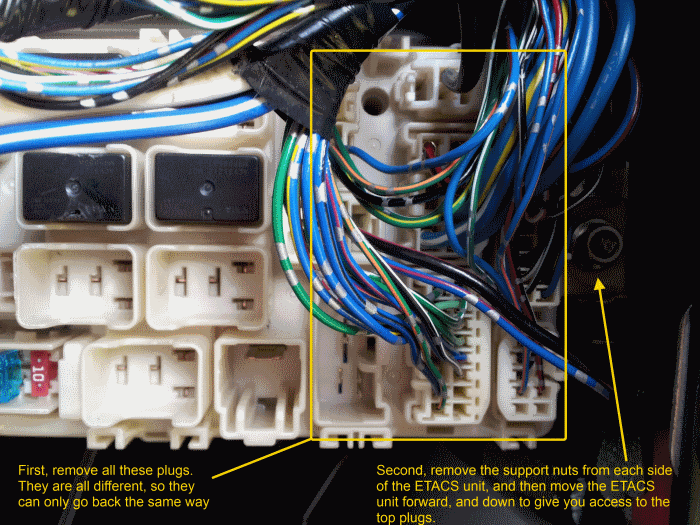
The plugs are all different and can only go back one way. I suggest taking pictures before removing the plugs if you are unsure about how they should go back. When the nuts are removed, you can pull the unit towards the driver, and rotate it to get access to the top plugs. The gray plug should be C-219.

The next picture shows where the opposite end of the fog light wire goes.
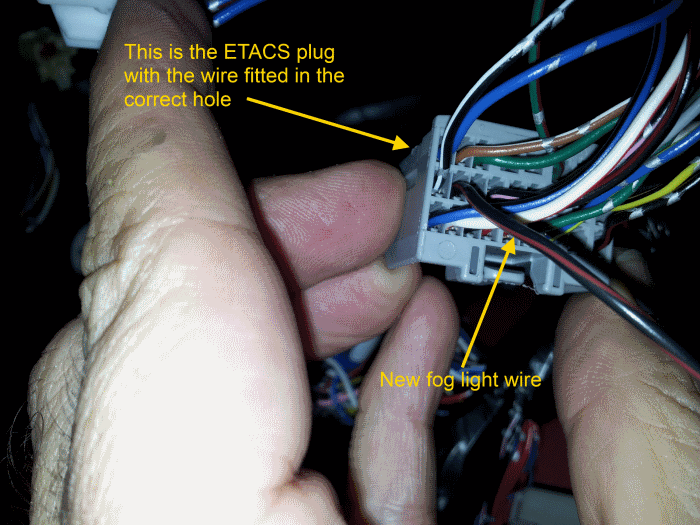
Find a suitable terminal that matches the terminals in the plug. Before fitting it, cut the fog light wire to a suitable length, allowing enough for securing against the existing loom, then solder the tail onto the wire and insulate it with heat shrink and insulation tape. You can then fit the wire into the plug.
At this point it's not really possible to test the fog lights until all the plugs are back in place. Reassemble everything in the reverse order of disassembly. Make sure all the plugs are properly seated and clip into place. I had one plug on the ETACS unit which was not properly seated, and nothing would work. For a while, I thought I had fried the ETACS unit, and it was a little distressing to say the least. After going back over the process, I found the plug at fault and pushed it in all the way, and everything started to work as expected.
Its also worth spending the time to tape the new wire with the existing loom were possible just to keep things neat under the dash.
This whole process took me about 5 or 6 hours, and that was because I also added an illuminated custom switch for the spot lights, which I positioned in the centre console in front of the gear stick. That was a little tricky to get too.
I hope this information proves useful to you.
- sijmen
- Posts: 16
- Joined: Sun Jan 29, 2012 9:22 pm
- Location: Brisbane (South side)
Re: Tech Article-Fitting Fog Lights and GLXR Fog Switch to a
![]() by NowForThe5th on Fri Aug 09, 2013 3:32 am
by NowForThe5th on Fri Aug 09, 2013 3:32 am
This should really help those who want to use the existing wiring and have a switch on the stalk.
As I understand it, accessing the various features in the ETACS unit can be done via the MUT3 which all dealers will have. Whether they will actually do it for you remains to be seen. There are some aftermarket alternatives but the expense would be difficult to justify. Being on good terms with your local dealer might be the best solution.
The switching of the relay, via the circuit completed above is negative. That is, the relay is constantly powered from the battery and the ETACS unit completes the circuit by grounding it. This being the case, it would be possible to have the dash indicator come on by running a line from the relay to ETACS circuit that you've completed, through the indicator lamp and back, so it runs in parallel. Thus when the fogs are switched on the circuit is completed and the indicator light comes on.
If work is so terrific, why do they have to pay us to do it?
-
NowForThe5th - Moderator
- Posts: 9239
- Joined: Sun Jun 15, 2008 2:00 pm
- Location: Holt, ACT
Re: Tech Article-Fitting Fog Lights and GLXR Fog Switch to a
![]() by Bigbirdalx on Fri Aug 09, 2013 4:30 am
by Bigbirdalx on Fri Aug 09, 2013 4:30 am
-
Bigbirdalx - Posts: 677
- Joined: Tue Oct 30, 2012 7:19 am
- Location: northside of brisbane
Re: Tech Article-Fitting Fog Lights and GLXR Fog Switch to a
![]() by 4wd26 on Fri Aug 09, 2013 4:34 am
by 4wd26 on Fri Aug 09, 2013 4:34 am
awesome write up, thanks for taking the time to take pics and then label them so others can follow.
very detailed
cheers
-
4wd26 - Moderator
- Posts: 8299
- Joined: Tue Dec 18, 2007 3:00 pm
- Location: Bayside Bundy and Monto
Re: Tech Article-Fitting Fog Lights and GLXR Fog Switch to a
![]() by snowman on Fri Aug 09, 2013 6:05 am
by snowman on Fri Aug 09, 2013 6:05 am
-

snowman - Platinum Subscriber
- Posts: 12031
- Joined: Sat Feb 07, 2009 10:59 pm
- Location: Toongabbie, NSW
Re: Tech Article-Fitting Fog Lights and GLXR Fog Switch to a
![]() by borngeek on Fri Aug 09, 2013 6:21 am
by borngeek on Fri Aug 09, 2013 6:21 am

Did you search first?
FL/LSD FTW
Sucks to be you, glad I bought a 3.2
-

borngeek - Platinum Subscriber
- Posts: 9202
- Joined: Fri Jul 10, 2009 7:02 am
- Location: Somewhere on Earth, at the moment.
Re: Tech Article-Fitting Fog Lights and GLXR Fog Switch to a
![]() by andriesvdv on Sat Aug 10, 2013 7:20 am
by andriesvdv on Sat Aug 10, 2013 7:20 am
- andriesvdv
- Posts: 40
- Joined: Sat Jun 01, 2013 10:22 pm
- Location: Kellyville, NSW
Re: Tech Article-Fitting Fog Lights and GLXR Fog Switch to a
![]() by Juggz on Sat Aug 10, 2013 9:03 am
by Juggz on Sat Aug 10, 2013 9:03 am
Now to find some parts (nobody deals with Tritons
-
Juggz - Posts: 405
- Joined: Sun Jun 16, 2013 2:20 pm
- Location: Canberra
Re: Tech Article-Fitting Fog Lights and GLXR Fog Switch to a
![]() by NowForThe5th on Sat Aug 10, 2013 11:42 am
by NowForThe5th on Sat Aug 10, 2013 11:42 am
If work is so terrific, why do they have to pay us to do it?
-
NowForThe5th - Moderator
- Posts: 9239
- Joined: Sun Jun 15, 2008 2:00 pm
- Location: Holt, ACT
Re: Tech Article-Fitting Fog Lights and GLXR Fog Switch to a
![]() by Tritium on Sun Sep 01, 2013 10:51 pm
by Tritium on Sun Sep 01, 2013 10:51 pm
NowForThe5th wrote:For those looking for the stalk with fog light switch, both Challenger and Lancer are a straight plug-in. Gen 4 Pajero also, but it doesn't have the fog light switch, this being a double switch down on the right hand side of the dash.Suppliers here in Australia tend to be expensive, particularly if they sense an increasing demand. Parts like these can often be sourced cheaper on Ebay UK, even with postage. Not all sellers will post outside of the UK/Europe though.
I assume that is the PB challenger, What are the Lancer variants? (so I know what to ask for at the wreckers)
Some of the Ebay ones appear to be shown as LHD do you know if these are compatable?
Regards Tritium
-
Tritium - Posts: 207
- Joined: Mon Feb 23, 2009 8:11 pm
- Location: Latrobe Valley, Victoria.
Re: Tech Article-Fitting Fog Lights and GLXR Fog Switch to a
![]() by NowForThe5th on Mon Sep 02, 2013 2:21 am
by NowForThe5th on Mon Sep 02, 2013 2:21 am
Lancer? Current bodyshape should be right.
Yep, LHD won't work, nor will LH indicator.
If work is so terrific, why do they have to pay us to do it?
-
NowForThe5th - Moderator
- Posts: 9239
- Joined: Sun Jun 15, 2008 2:00 pm
- Location: Holt, ACT
Re: Tech Article-Fitting Fog Lights and GLXR Fog Switch to a
![]() by Katant308 on Sat Aug 16, 2014 10:28 pm
by Katant308 on Sat Aug 16, 2014 10:28 pm
- Katant308
- Posts: 20
- Joined: Sat Aug 16, 2014 7:49 pm
Re: Tech Article-Fitting Fog Lights and GLXR Fog Switch to a
![]() by Katant308 on Fri Aug 22, 2014 8:13 pm
by Katant308 on Fri Aug 22, 2014 8:13 pm
- Katant308
- Posts: 20
- Joined: Sat Aug 16, 2014 7:49 pm
Re: Tech Article-Fitting Fog Lights and GLXR Fog Switch to a
![]() by andriesvdv on Fri Aug 22, 2014 8:25 pm
by andriesvdv on Fri Aug 22, 2014 8:25 pm
- andriesvdv
- Posts: 40
- Joined: Sat Jun 01, 2013 10:22 pm
- Location: Kellyville, NSW
Re: Tech Article-Fitting Fog Lights and GLXR Fog Switch to a
![]() by Katant308 on Sat Aug 23, 2014 6:31 am
by Katant308 on Sat Aug 23, 2014 6:31 am
- Katant308
- Posts: 20
- Joined: Sat Aug 16, 2014 7:49 pm
Re: Tech Article-Fitting Fog Lights and GLXR Fog Switch to a
![]() by Katant308 on Sat Aug 23, 2014 11:48 am
by Katant308 on Sat Aug 23, 2014 11:48 am
- Katant308
- Posts: 20
- Joined: Sat Aug 16, 2014 7:49 pm
Re: Tech Article-Fitting Fog Lights and GLXR Fog Switch to a
![]() by Gregory on Fri Sep 19, 2014 1:19 pm
by Gregory on Fri Sep 19, 2014 1:19 pm
Greg
- Gregory
- Posts: 63
- Joined: Wed Jan 15, 2014 10:44 am
- Location: Derby, WA
Who is online
Users browsing this forum: No registered users and 2 guests
![]()