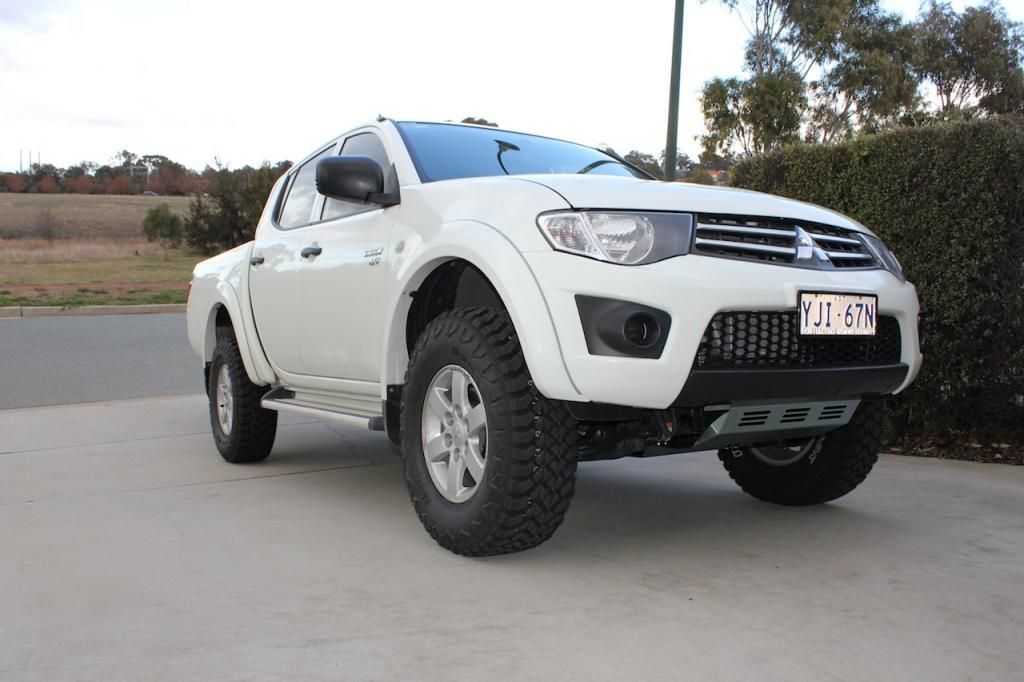
My MN Triton......another white GLX

Want to show off what you've done to your rig? or have a custom project to show? Post it up here!

Re: My MN Triton......another white GLX

Postby Amaroo on Tue Aug 13, 2013 8:28 am

Cheers Juggz, I'm happy with the small upgrades so far.

A better shot of the front end.....

Click to view larger picture

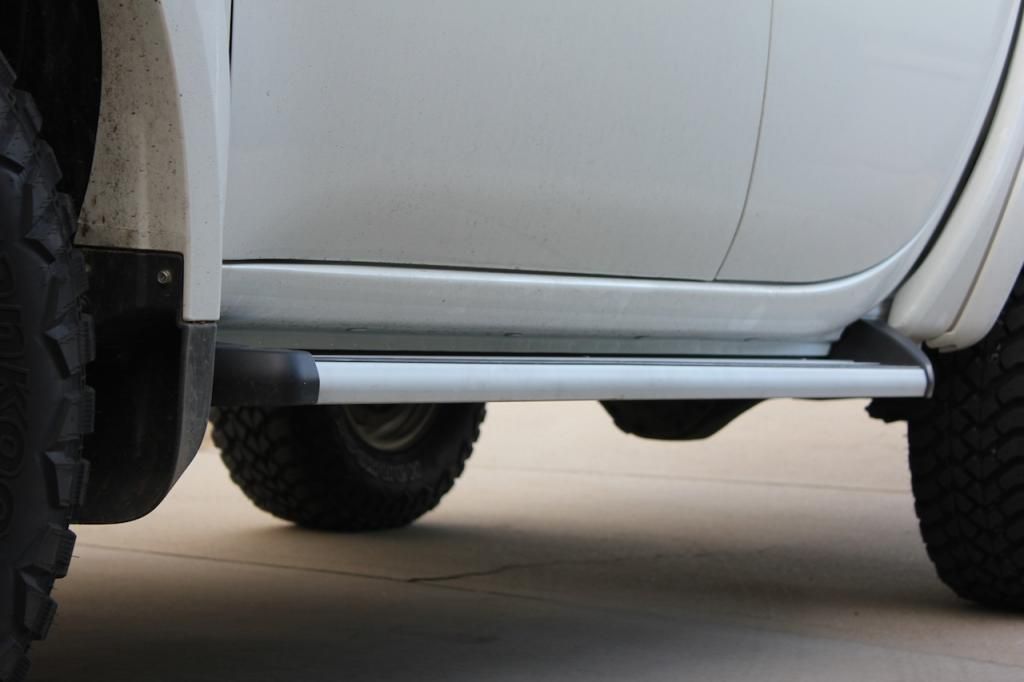
After seeing a forum member on here had raised his GLXR sides steps I had a look to see how far I could raise mine on the GLX and it turns out they can be lifted 40mm and retain a factory look. See below.....

Click to view larger picture

A comparison of stock Vs raised......

Click to view larger picture

Click to view larger picture

It might not look or sound like much but it raises the bracketry and step to inline or just above the bottom of the chassis rail instead of hanging well below it.

Benefits are improved ramp over angle, less likely to snag the brackets and/or damage the flimsy aluminium steps and of course most importantly of all it looks better ;)

I'll post up pics later of the cut and shut job on the brackets etc.
Amaroo
 
Posts: 379
Joined: Fri Feb 08, 2013 6:53 pm


Re: My MN Triton......another white GLX

Postby Calblitzen on Tue Aug 13, 2013 1:32 pm

I like. Look forward to your write up on how you did this.
No matter what life throws at you, SMILE.

Better to be looking at it, than looking for it.
User avatar
Calblitzen
 
Posts: 1054
Joined: Mon Oct 29, 2012 7:15 pm
Location: Sydney (south)

Re: My MN Triton......another white GLX

Postby lachiem on Tue Aug 13, 2013 2:19 pm

Fantastic I noticed the raised steps too but wasnt sure if they would look any good on the GLX, but your effort looks perfect mate.
Thats my job for the weekend weather permitting.
Something profound
Something funny
User avatar
lachiem
 
Posts: 406
Joined: Tue Jun 25, 2013 2:38 pm
Location: Wodonga VIC

Re: My MN Triton......another white GLX

Postby Amaroo on Tue Aug 13, 2013 5:59 pm

So as mentioned earlier I raised my side steps to gain a little more ramp over angle, lessen the chance of snagging and damaging the side steps and last but not least make the Triton look higher ;)

For anyone thinking of doing the same you will need to make sure you carefully measure the distance between the top of your treadboard and the very bottom of the sill. This distance will be the limiting factor in raising your steps. On mine I found that I had 47mm gap the entire distance on the passenger side but on the drivers side it varied from 47mm at the front to 44mm at the rear. Wanting to have a final gap of about 5-6mm I opted to lift them 40mm.

The amount you remove is up to you but just keep in mind your final spacing between the treadboard and the sill ;)

Obviously the first step is to remove the side steps, a simple matter of undoing the 6 x 12mm nuts and bolts on each side of the vehicle.

Once removed you can take the plastic ends off and slide the rubber strip out to reveal the 3 hidden screws for the brackets. Now unscrew the brackets. I marked all three brackets from each side step so I knew there original positions (not particularly crucial but I've been caught out before with things that all "appeared to be the same"). More important than marking whether they were front, middle or rear positioned is to mark each end with an identifier so that when you cut them you won't mix a top and bottom of a cut pair up - this will become clear as to why later.

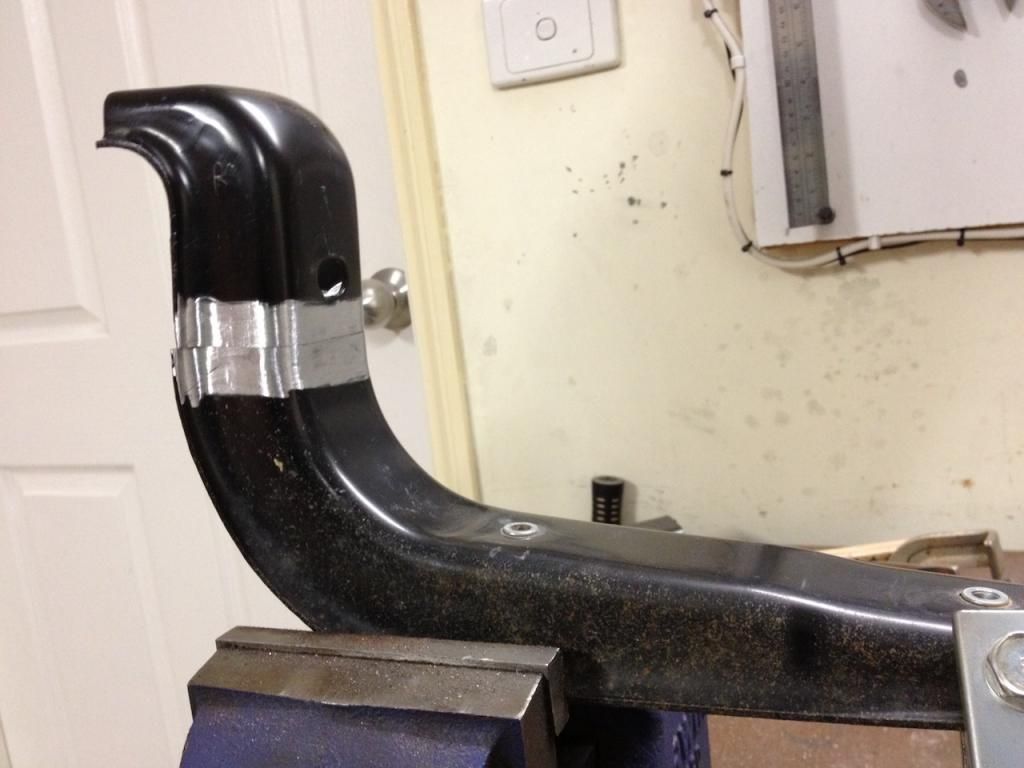
Now that the brackets are off and clean it's time to scribe the lines in where you will cut them. I scribed the top line 13mm below the bottom of the lower mounting bolt hole, this means the weld won't interfere with the mounting face on the vehicle. Once this line is scribed squarely around the outside the next line is scribed 40mm around directly below as shown in the following pics:
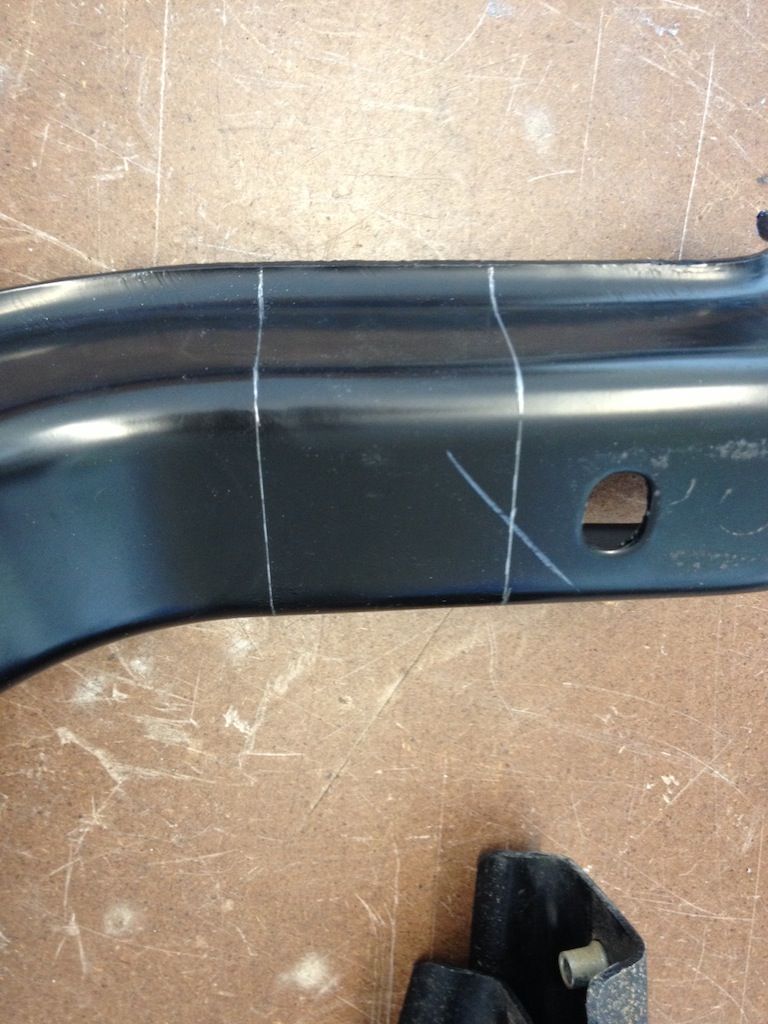
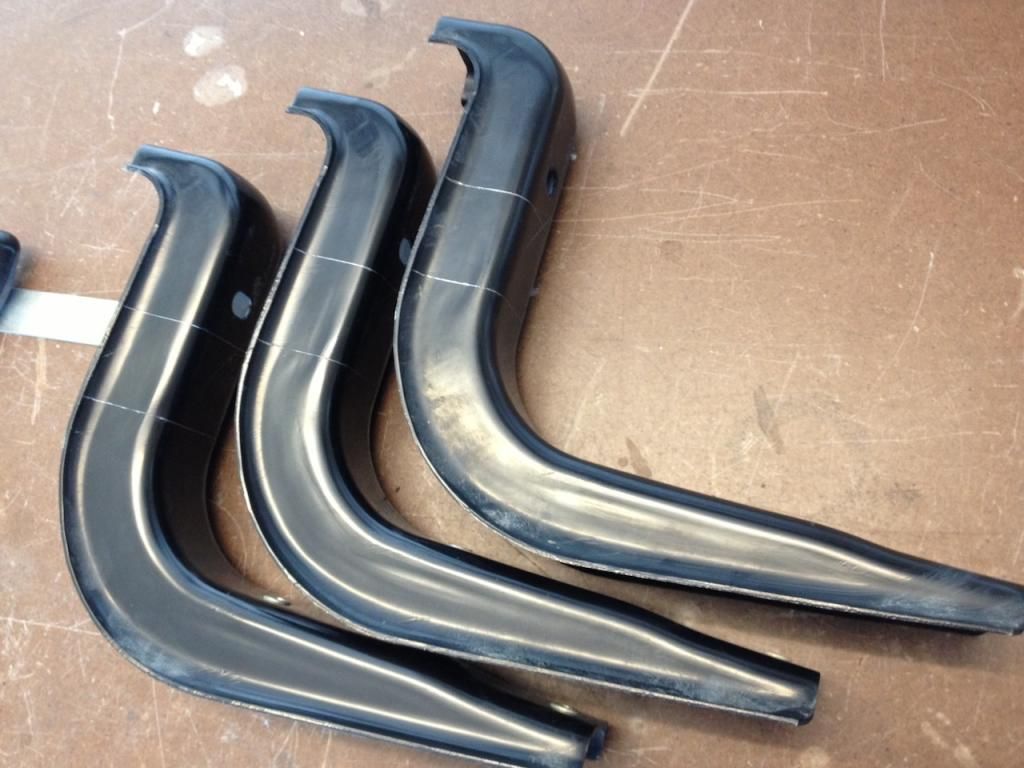
Click to view larger picture

Click to view larger picture

To get the lines square with the body of the bracket I used a small set-square. More important than being exactly square though is that both scribed lines are identical. This is so that when you cut out the middle sections they marry up well. This is also why the parts all need to be marked so that nothing gets mixed up ;)

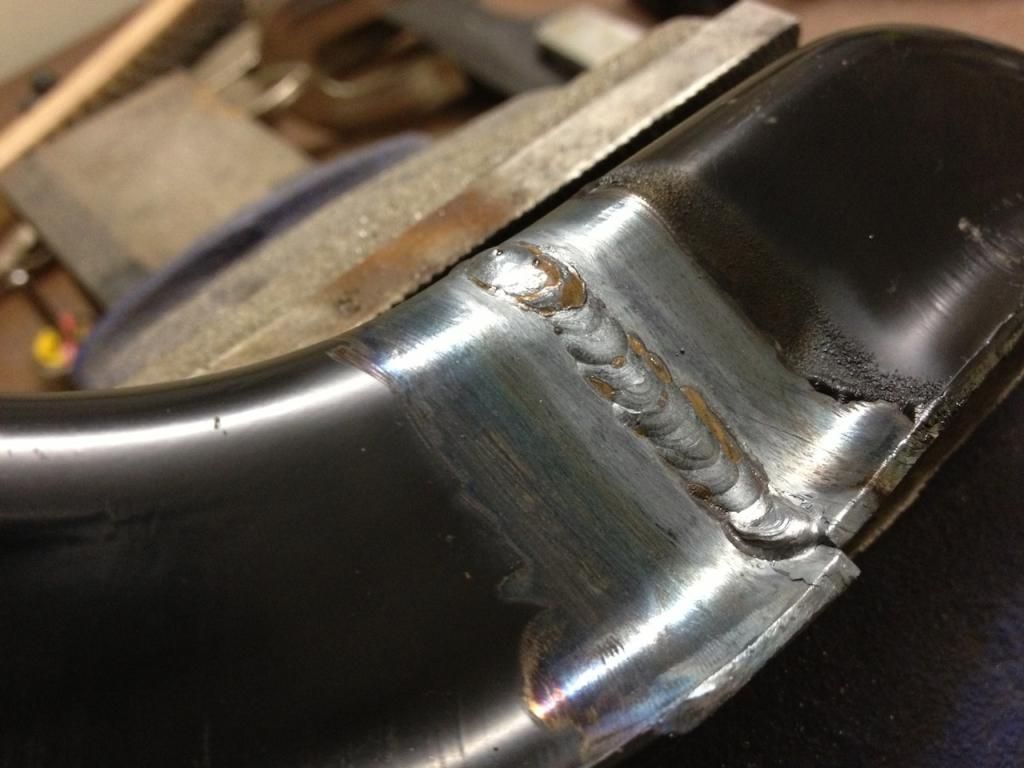
The two cut halves should match up perfectly if you took care cutting and marking:
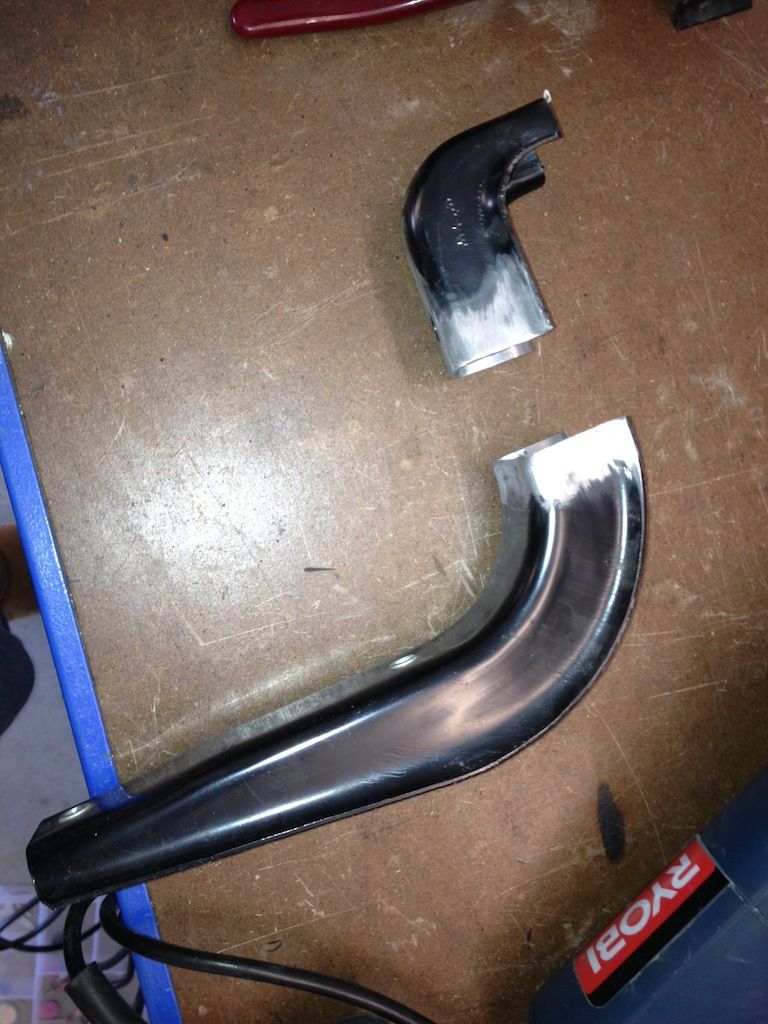
Click to view larger picture

Click to view larger picture

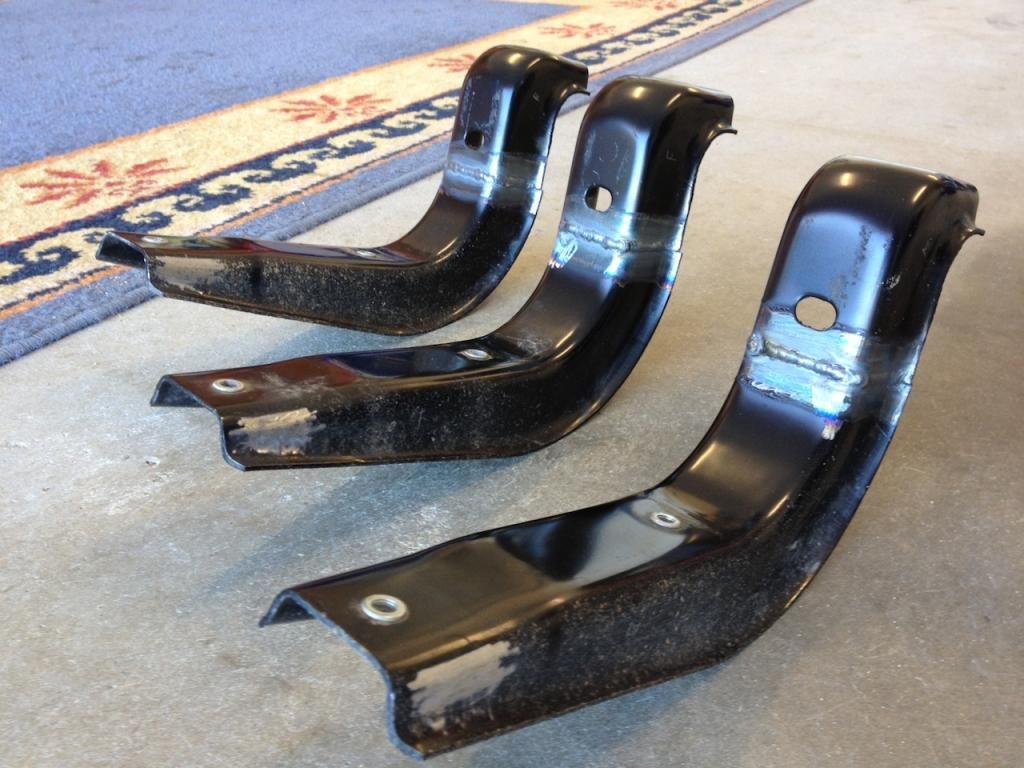
Once aligned I tacked them together and then welded them all:
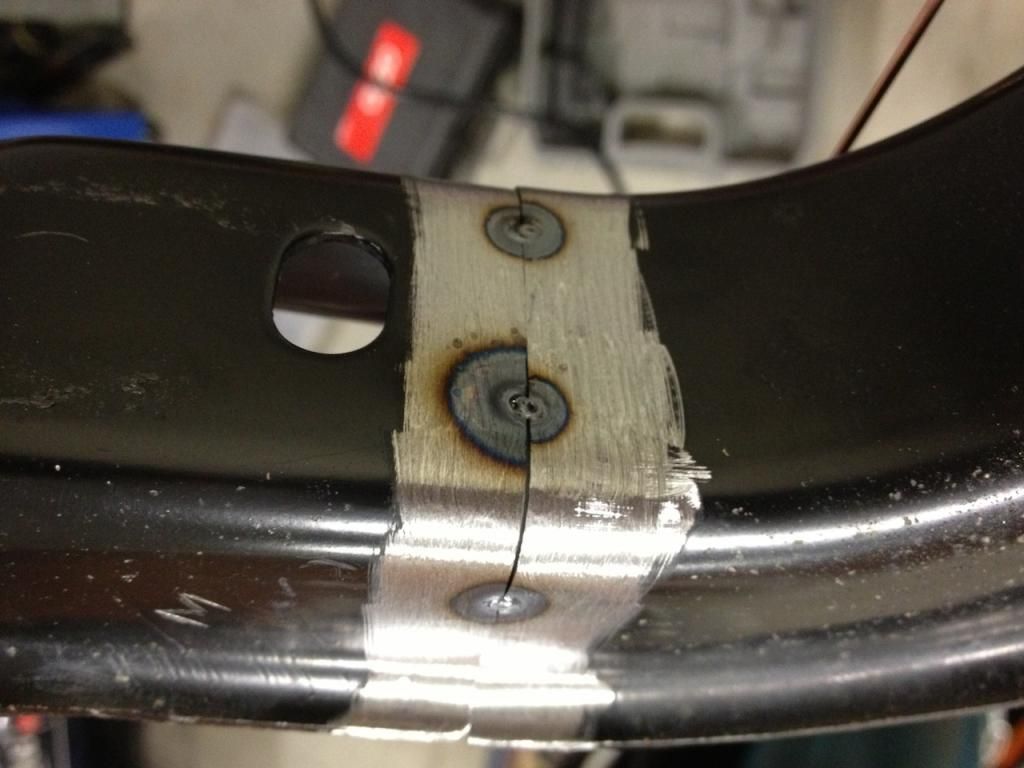
Click to view larger picture

Click to view larger picture

Click to view larger picture

I let them cool off and then gave them a lick of black paint.

Next was to take 40mm off the back of the treadboard where it sits up behind the sill. You just take off whatever amount you take off the length of the brackets, I took 40mm off them and wished to retain the factory clearances so took 40mm off the treadboard too.

Mark a line the length of the tread board to guide the cut. I just used an adjustable set-square to hold the texta in the correct position and then ran it down the length of the board:
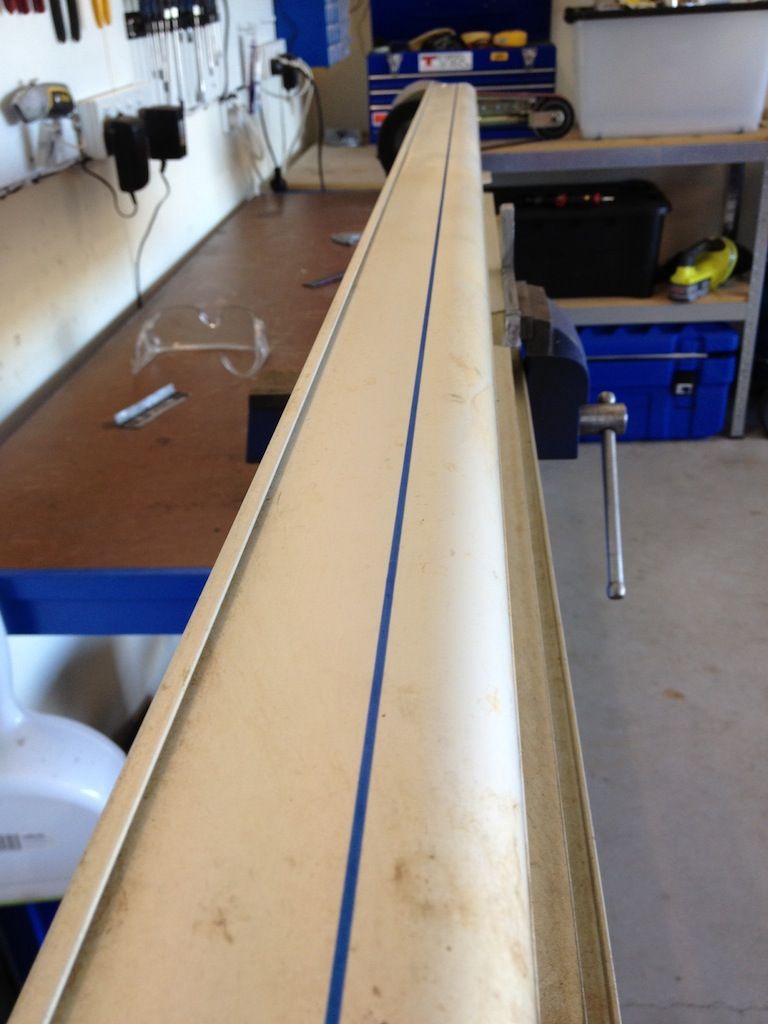
Click to view larger picture

Then cut it off with the appropriate cutting tool. I just used a 100mm angle grinder with a cutting blade. All cut:
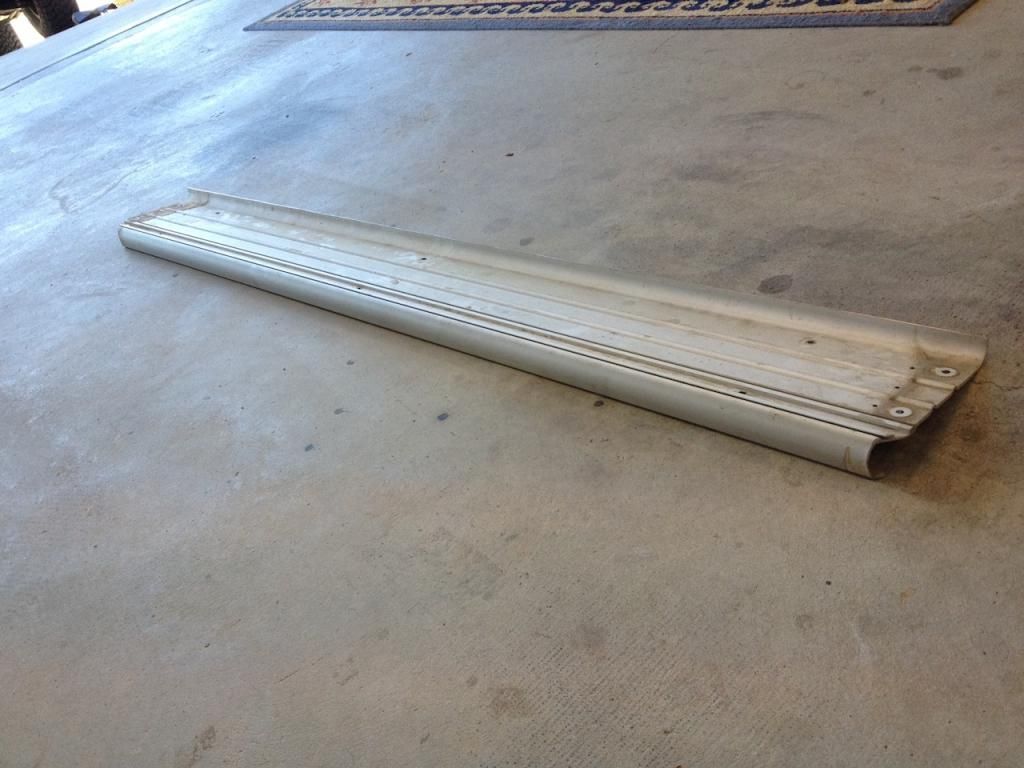
Click to view larger picture

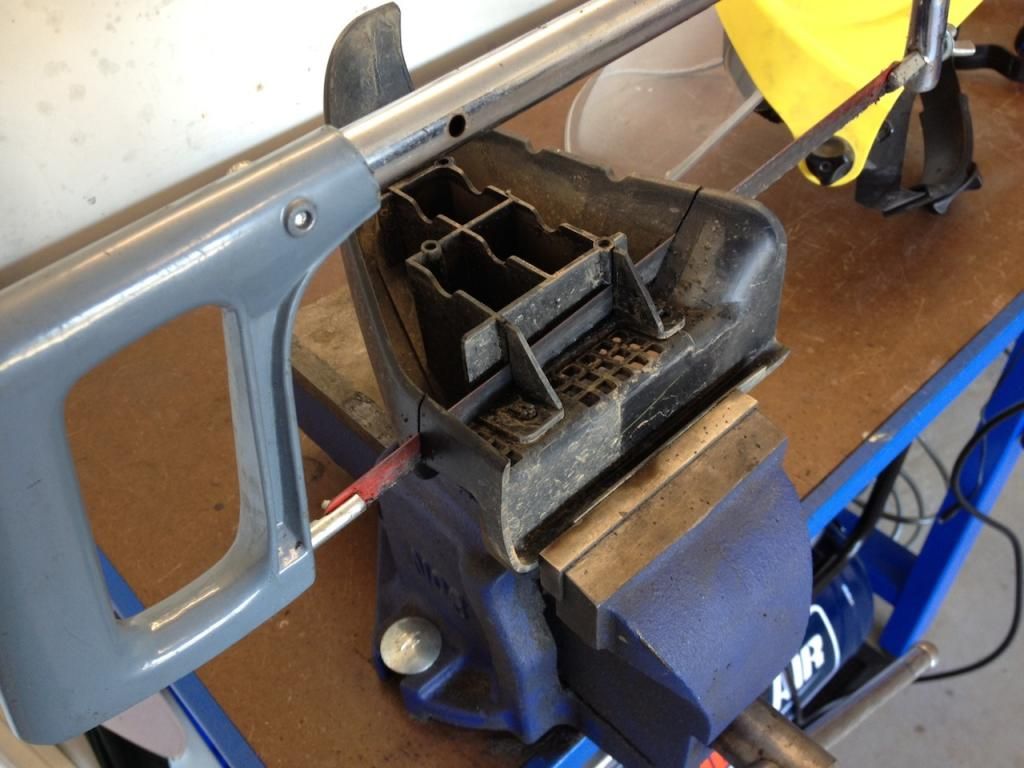
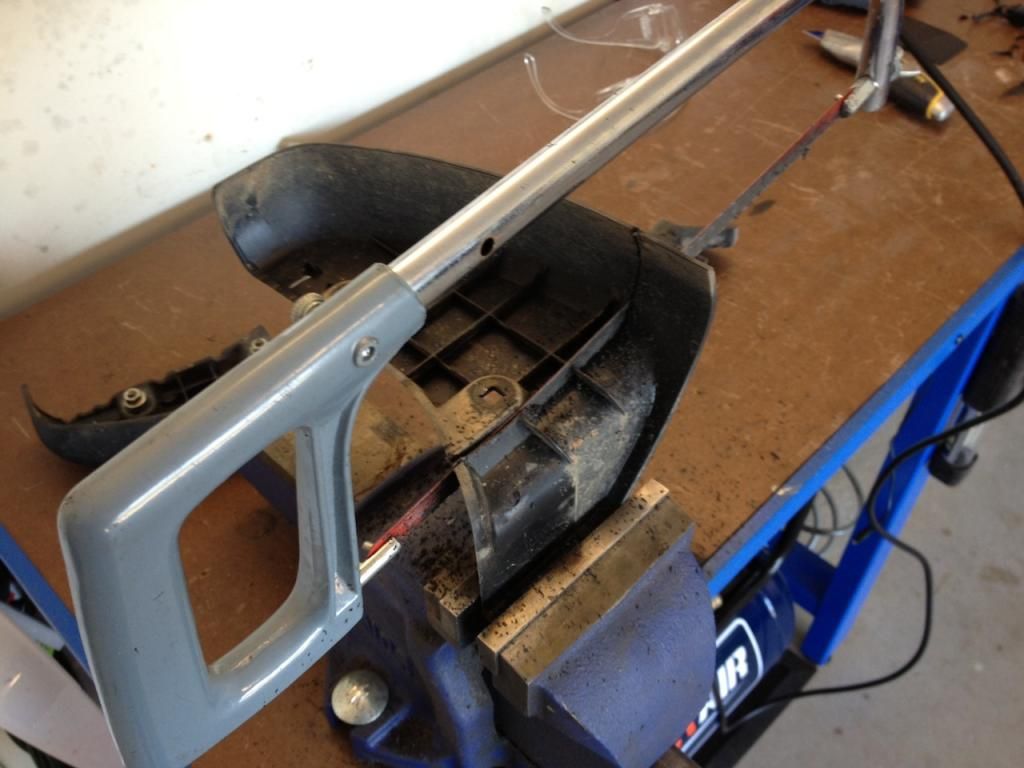
The final job is the cut the plastic end caps so they don't foul on the sills. These photos give a guide for where I cut mine but giving an actual measurement is more difficult. The rear one may need some filing to suit the stamped shape of the sill at the rear end. It's very easy to cut and from all viewing angles mine looks completely factory when reinstalled.

Front cut:
Click to view larger picture

Rear cut:

Click to view larger picture

Then it's just a matter of reassembling them and fitting them to the car. I did find that fitting the plastic end caps after bolting the sidesteps to the car was the easiest way to fit them.

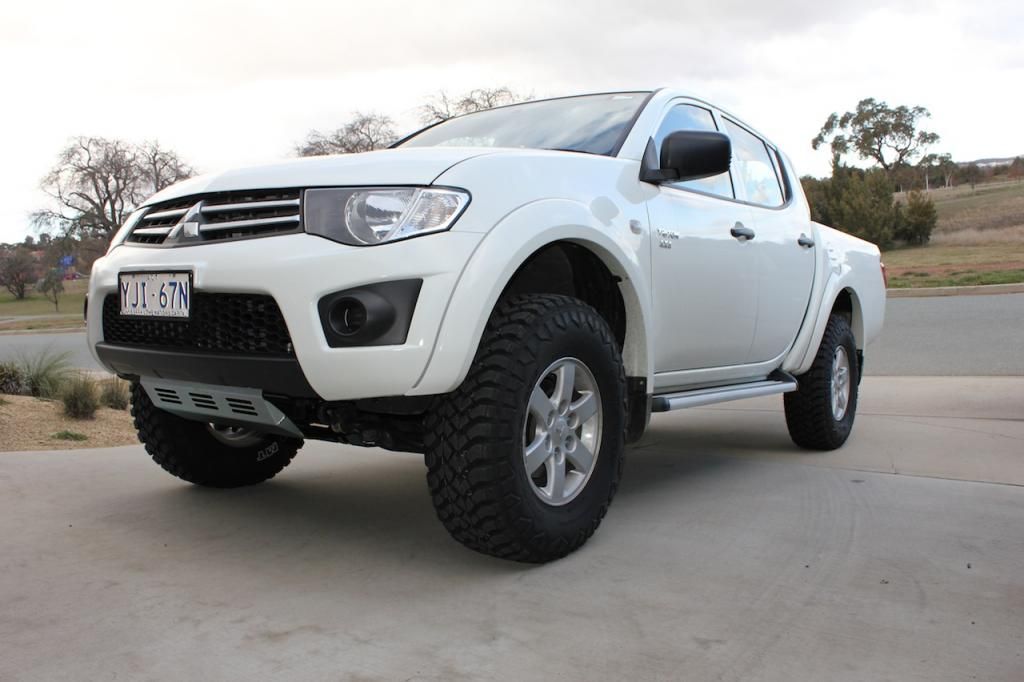
Final fitment:
Click to view larger picture

Hope that little writeup is useful to someone :)
Amaroo
 
Posts: 379
Joined: Fri Feb 08, 2013 6:53 pm

Re: My MN Triton......another white GLX

Postby Juggz on Tue Aug 13, 2013 6:49 pm

It sits so much nicer on the new rubber, the steps make the wheels look bigger again.
User avatar
Juggz
 
Posts: 405
Joined: Sun Jun 16, 2013 2:20 pm
Location: Canberra

Re: My MN Triton......another white GLX

Postby XSQ376 on Mon Sep 02, 2013 9:04 pm

Great write up wish I'd looked into lifting my side steps before I bent them on the weekend
Have you spoken to your mate about the seat spacers I'm keen for a set
XSQ376
 
Posts: 21
Joined: Wed Apr 25, 2012 10:16 am
Location: GEELONG

Re: My MN Triton......another white GLX

Postby Amaroo on Mon Sep 02, 2013 9:09 pm

Still haven't seen him to ask about seat spacers, I might have to track down his number and give him a call.
Amaroo
 
Posts: 379
Joined: Fri Feb 08, 2013 6:53 pm

Re: My MN Triton......another white GLX

Postby XSQ376 on Mon Sep 02, 2013 9:11 pm

If his keen to make them I'm sure there would be a group buy
XSQ376
 
Posts: 21
Joined: Wed Apr 25, 2012 10:16 am
Location: GEELONG

Re: My MN Triton......another white GLX

Postby Lunny on Tue Sep 03, 2013 5:54 am

Really like the side step lift, might us that
Lunny
User avatar
Lunny
 
Posts: 1708
Joined: Mon Mar 11, 2013 5:39 pm
Location: North Brisbane, QLD

Re: My MN Triton......another white GLX

Postby Amaroo on Mon Sep 09, 2013 9:00 pm

A couple more small mods to the Triton last week with some Narva +120 globes for the headlights going in to replace the standard candles and I fitted up the snorkel I bought from eBay.

The globes took all of about 2 minutes to fit and are a significant upgrade over the stock globes, well worth the cash in my opinion. Especially for me as I don't have any other additional lighting yet.

The snorkel fit up went really well, I realised straight up that the template supplied was wayyyyy off so I used blue-tac to stick the template to the snorkel and mark all the correct positions of everything. Then proceeded to butcher the car :twisted:

I won't waste time with a write up on the snorkel fit up as plenty of people on here have already done great installation write ups. I will just comment on the particular snorkel I bought though.

I purchased mine on eBay from the seller 'Jule4x4' and it is a great bit of gear. Everything fitted up well, looks great on the car and appears to be pretty strong. Only time will tell but I am confident this cheap purchase will be fine. Great thing about this one is that it comes with a neat replacement radiator overflow bottle.

I'll get some more detailed pics of the bottle etc next time I am outside with the camera. It's all very neat in the engine bay, which is what I like ;)

Only pic I have since fitting the snorkel which was taken by emjayar.

Click to view larger picture
Amaroo
 
Posts: 379
Joined: Fri Feb 08, 2013 6:53 pm

Re: My MN Triton......another white GLX

Postby brodical on Mon Sep 09, 2013 9:30 pm

How much we're the new globes?
Choices we make not the chances we take determine who we are...
User avatar
brodical
 
Posts: 976
Joined: Mon Dec 05, 2011 5:49 pm
Location: Gippsland vic

Re: My MN Triton......another white GLX

Postby tritonvx80 on Tue Sep 10, 2013 2:04 am

Hi Amaroo, nice info you are writing. i am currently doing your diff, gearbox, transfer breather set up.

I was looking at your seat solution. and i was wondering, do you only put the 25mm spacers in the front? i assume so, but i just ask to make sure.

Thanks
tritonvx80
 
Posts: 62
Joined: Sat Sep 07, 2013 5:31 am

Re: My MN Triton......another white GLX

Postby Amaroo on Tue Sep 10, 2013 5:55 am

brodie wrote:How much we're the new globes?


I think they were about $70 retail and then supercheap auto had 20% off that.
Amaroo
 
Posts: 379
Joined: Fri Feb 08, 2013 6:53 pm

Re: My MN Triton......another white GLX

Postby Amaroo on Tue Sep 10, 2013 5:57 am

tritonvx80 wrote:Hi Amaroo, nice info you are writing. i am currently doing your diff, gearbox, transfer breather set up.

I was looking at your seat solution. and i was wondering, do you only put the 25mm spacers in the front? i assume so, but i just ask to make sure.

Thanks


Cheers, I have had a look at your Triton and its very impressive and looks insane!

With the spacers you are correct, they are only fitted at the front.
Amaroo
 
Posts: 379
Joined: Fri Feb 08, 2013 6:53 pm

Re: My MN Triton......another white GLX

Postby tritonvx80 on Tue Sep 10, 2013 3:11 pm

thanks, your car looks very good, and for sure drives better on the highway then mine.
tritonvx80
 
Posts: 62
Joined: Sat Sep 07, 2013 5:31 am

Re: My MN Triton......another white GLX

Postby FredSmith on Tue Sep 10, 2013 5:48 pm

Amaroo wrote:
brodie wrote:How much we're the new globes?


I think they were about $70 retail and then supercheap auto had 20% off that.


I bought some gear on Friday last week and thought that I had missed the sale.( I was up at Teewah beach with the New Triton crew on Saturday). Well I recieved an email from SCA and I get nearly $30.00 credit. 8-) 8-) New lights will be purchased tomorrow :D :mrgreen: as I off to Africa on the weekend for 6 weeks with work :cry: :cry: .
FredSmith
Platinum Subscriber
 
Posts: 217
Joined: Sun Jun 23, 2013 2:28 pm
Location: Oakey Qld.

Re: My MN Triton......another white GLX

Postby Lostu2 on Sun Sep 15, 2013 6:40 pm

Amaroo,

You are a ledgend :D .Loving your post and mods ;)

Can it get any better :?:
User avatar
Lostu2
 
Posts: 53
Joined: Sat Dec 31, 2011 11:00 am

Re: My MN Triton......another white GLX

Postby Amaroo on Sun Sep 15, 2013 8:36 pm

As promised here are a few pics from the snorkel instal, not going over the whole instal as it has already been covered but just a few little things I did and some pics of the parts people who are shopping for snorkels might be interested in.

It all fitted up neat and follows the body panels perfectly. When sitting in the drivers seat I can't see any of the snorkel except if I look up I can just see the front of the snorkel head. This is great as it means the snorkel has not obstructed any of my view of the road at all.

Click to view larger picture

The overflow bottle that comes in the kit is a great fit and looks completely factory once installed.

Click to view larger picture

I used riv-nuts (nutserts) to fix the overflow bottle to the body and it also has the same locating dowel on the bottom of the bottle as the factory bottle to locate the base and make it a rock solid fitment.

Speaking of riv-nuts, I used them to attach the bracket to the A-piller too, I just felt more comfortable with them than rivets in this application.

The only modification I made to the overflow bottle was to fit a hose barb in the overflow hole. I don't like the idea of coolant splashing out into the engine bay and leaving little green dots on the paintwork. I tapped the hole out to a 1/8"NPT and screwed in a plastic barb to which I would fit a length of hose so any coolant that splashes or overflows from the bottle just ends up on the ground. The barb was fitted to the bottle using a Permatex thread sealant so that it won't leak or come loose.

It was hard to get a clear shot of the barb and line but you can make it out in the photos below. It exits just behind the drivers side front wheel off the chassis rail.

Click to view larger picture

Click to view larger picture

Another thing I did that differed from the instructions was to retain the hose fitting on the air box intake. The instructions indicate that you should cut this off and fit the supplied aluminium hose fitting to the air box with sealant and use rivets to secure.

I'm sure this is probably fine but looking at the amount of material left around the bottom of the air box which would need to seal against the supplied aluminium fitting I wasn't confident there would be much interface between the two. So instead I took to the aluminium fitting with the dremel and removed approximately 1.5mm of material from the inside diameter which then made it a neat fit onto the airbox and hose fitting still on the airbox. This was then sealed up with sikaflex between the two parts and riveted in placed. The face of the box needs some minor tidying with a razor blade to ensure the surface is nice and flat too.

The snorkel was a cheap ebay one from Julelife4x4 if anyone is interested.
Amaroo
 
Posts: 379
Joined: Fri Feb 08, 2013 6:53 pm

Re: My MN Triton......another white GLX

Postby Amaroo on Sun Sep 15, 2013 8:38 pm

Lostu2 wrote:Amaroo,

You are a ledgend :D .Loving your post and mods ;)

Can it get any better :?:


Cheers mate, I haven't really done much to my Triton though and what I have done is pretty minor compared to what some others on here are doing or have done but I am happy to hear you are finding the thread a good read. :)
Amaroo
 
Posts: 379
Joined: Fri Feb 08, 2013 6:53 pm

Re: My MN Triton......another white GLX

Postby Amaroo on Mon Sep 23, 2013 8:45 pm

Another item installed on the Triton before last weeks trip was a flush fit tonneau cover. It's a genuine Mitsubishi item and was a piece of cake to instal.

Click to view larger picture

On the weekend my wife, son and I headed off for a couple of nights staying in a cottage in the Deua National Park. It's a really nice bit of country and is a very relaxing place to get away.

One thing we planned to do while away was to drive some of the Merricumbene trail as we were staying only a couple of minutes from where one end of it begins at the Dry Creek campground crossing. Only problem was it was closed, I assume after the huge rains they had last week. The river had dropped back down when I walked down to have a look but I decided to give it a miss anyway.

The track was closed about 50m up from where it crosses the river.

Click to view larger picture

So I checked out some other tracks in the area and this one looked like it had some potential.

Click to view larger picture

Started off pretty tame and then went up pretty sharply onto the ridge line. You can follow this through to Monga National Park. I tried to capture how steep some sections were in this shot. The trees in the background indicate the angle. Felt steeper than it looks, as it always does.

Click to view larger picture

The Triton ran great all weekend and when I got back I gave it a wash to get all the dust off and gave it a half service interval service with a new oil filter and oil. Also fitted my new Fumoto valve while I was doing the service to make it easier for next time.

Might order a bonnet protector this week as it picked up a couple of stone chips on the bonnet during the 500km round trip as a lot of it was on gravel.

Not sure what the next mod or mods will be as it's starting to get into the big gear. After all the corrugations on the weekend I reckon I could appreciate some new suspension front and rear ;)

Also need to do my compressor installation so airing up is a more simple affair out on the tracks.
Amaroo
 
Posts: 379
Joined: Fri Feb 08, 2013 6:53 pm

Re: My MN Triton......another white GLX

Postby jdtopping on Tue Sep 24, 2013 8:06 am

Amaroo

Just wanted to thank you for the effort you went to with the photos and description for the diff breather installation. I am not overly mechanically minded (consequently tend to pay others to do it for me) but had no difficulty following your directions, with the photos making it a whole lot easier. Once again many thanks, now completed a job that no 4wd specialist wanted to touch, you are a champion!
User avatar
jdtopping
 
Posts: 2
Joined: Tue Dec 11, 2012 3:05 pm
Location: South Coast NSW

Re: My MN Triton......another white GLX

Postby Amaroo on Sun Oct 13, 2013 9:12 am

That's great to hear mate, the satisfaction of doing it yourself is pretty cool too hey ;)

Planning a couple of trips soon and decided to upgrade from our dome style tent to an Oz tent RV4 and the matching tag-along tent. Set them both up at home and they seem like a great bit of gear and soooooo quick and easy to set up and pack up.

Any one who knows these tents knows the downside is that they are incredibly long when packed in the bag. So the solution to storing this and a couple of other things like our queen size self inflating matress was to purchase a roof platform.

I went with the track mount system from Rhino Racks and also bought the Pioneer platform to suit. Will try and fit it next weekend if I get a chance. Looks to be pretty well made and I'll take some photos of the installation along the way.

I have knocked over two other small tasks recently.

I fitted up a tinted genuine bonnet protector aka the monobrow and mounted my highlift jack to the head board on the tray. My reason for mounting it on the tray was to keep the weight off the roof rack and it's just wasted space on the head board anyway.

Great thing is that the distance between the two bolts on the head board aligns perfectly with the holes in the high lift!

So all I did was remove the two flip up brackets and then drill the holes out to accept a 12mm bolt.

I then cut down a crush tube for each side and cold gal'd the holes I had drilled in the head board.

I used a 25mm spacer on each side to space the jack away from the head board so nothing fouls on anything. The spacer threads onto the bolts, all the parts can be seen below....

Click to view larger picture

Then all I had to do was bolt it all together and fit the jack....

Click to view larger picture

Click to view larger picture

Done :)

Fitting the track mounts for the roof rack looks a little more time consuming but not hard at all so I'll post up how I go ;)
Amaroo
 
Posts: 379
Joined: Fri Feb 08, 2013 6:53 pm

Re: My MN Triton......another white GLX

Postby Juggz on Sun Oct 13, 2013 9:50 am

It's always fun to see the little things you're constantly changing, I just noticed your chain in the tub :lol:
User avatar
Juggz
 
Posts: 405
Joined: Sun Jun 16, 2013 2:20 pm
Location: Canberra

Re: My MN Triton......another white GLX

Postby Amaroo on Sun Oct 13, 2013 10:14 am

Juggz wrote:It's always fun to see the little things you're constantly changing, I just noticed your chain in the tub :lol:


That's part of my mobile rape dungeon kit ;)
Amaroo
 
Posts: 379
Joined: Fri Feb 08, 2013 6:53 pm

Re: My MN Triton......another white GLX

Postby Juggz on Sun Oct 13, 2013 10:39 am

Amaroo wrote:
Juggz wrote:It's always fun to see the little things you're constantly changing, I just noticed your chain in the tub :lol:


That's part of my mobile rape dungeon kit ;)


I was wondering how to secure them at 4 points that accommodate for any size. Thanks mate!
User avatar
Juggz
 
Posts: 405
Joined: Sun Jun 16, 2013 2:20 pm
Location: Canberra

PreviousNext

Return to Member Build Ups

Who is online

Users browsing this forum: No registered users and 142 guests