SLIMax's Break It and Build It Thread

Want to show off what you've done to your rig? or have a custom project to show? Post it up here!

Re: SLIMax's Break It and Build It Thread

Postby srb on Fri Jul 17, 2015 3:47 pm

Yeah I changed mine out for HD too. Standard clutch only had 30k on it and only minor wear, however it started slipping bad when under heavy load, engine is chipped and custom tuned though.

My HD clutch is call a 'extreme outback' from Australian clutch services.
Has been to hell and back with no dramas, has never looked like slipping. Clutch has done nearly 100k km's now.

Don't get this clutch if you have a weak leg. 'Peddle feel' is very heavy compared to standard.
TO SEE HOW TO HAVE A TRIP OF A LIFE TIME v
http://www.exploroz.com/Members/281229. ... x#mptabs=2
http://www.flickr.com/photos/exploroz/

Only those who will risk going too far can possibly know how far they can go.
User avatar
srb
Platinum Subscriber
 
Posts: 1737
Joined: Sun Feb 06, 2011 6:10 pm
Location: Sydney


Re: SLIMax's Break It and Build It Thread

Postby biggibbo on Fri Jul 17, 2015 4:23 pm

swapped mine at 120,000, with an aftermarket standard clutch which lasted 25,000km. Replaced it again at 145,000 with an excedy HD clutch. Pedal feel is the same as OEM and has never looked like slipping. Been in for 85,000 km now and still going strong.
User avatar
biggibbo
 
Posts: 2165
Joined: Mon Jun 07, 2010 9:20 am
Location: Newcastle. NSW

Re: SLIMax's Break It and Build It Thread

Postby SLIMaxPower on Fri Jul 17, 2015 4:45 pm

srb wrote:Yeah I changed mine out for HD too. Standard clutch only had 30k on it and only minor wear, however it started slipping bad when under heavy load, engine is chipped and custom tuned though.

My HD clutch is call a 'extreme outback' from Australian clutch services.
Has been to hell and back with no dramas, has never looked like slipping. Clutch has done nearly 100k km's now.

Don't get this clutch if you have a weak leg. 'Peddle feel' is very heavy compared to standard.


price. sounds like something i want
User avatar
SLIMaxPower
Platinum Subscriber
 
Posts: 500
Joined: Thu Nov 27, 2014 10:56 am

Re: SLIMax's Break It and Build It Thread

Postby biggibbo on Fri Jul 17, 2015 6:31 pm

Mine was $1350 fitted inc machining
User avatar
biggibbo
 
Posts: 2165
Joined: Mon Jun 07, 2010 9:20 am
Location: Newcastle. NSW

Re: SLIMax's Break It and Build It Thread

Postby viking shippy on Fri Jul 17, 2015 7:52 pm

You can add another $ 700 for a new flywheel if it is dual mass clutch...as you cannot machine the fly wheel...most are converting to a single mass for the same price..for a conversion from Aust clutches in SA...
User avatar
viking shippy
 
Posts: 3233
Joined: Sun Sep 19, 2010 5:16 pm

Re: SLIMax's Break It and Build It Thread

Postby SLIMaxPower on Fri Jul 17, 2015 8:29 pm

cheers guys thx for the info
User avatar
SLIMaxPower
Platinum Subscriber
 
Posts: 500
Joined: Thu Nov 27, 2014 10:56 am

Re: SLIMax's Break It and Build It Thread

Postby viking shippy on Fri Jul 17, 2015 10:51 pm

My 07 ml single mass clutch is an pink exceedy hd unit with plenty of grab and a lighter pedal than ome.( go figure it's to do with the fulcrum settings of the presure plate springs)...$1300 inc spigot bearing and flywheel Machining..
User avatar
viking shippy
 
Posts: 3233
Joined: Sun Sep 19, 2010 5:16 pm

Re: SLIMax's Break It and Build It Thread

Postby biggibbo on Sat Jul 18, 2015 5:19 am

Don't be scared by the dual mass flywheel. I'm pretty sure all MN and ML tritons had single mass. The new MQ on the other hand has a dual mass I'm lead to believe.
User avatar
biggibbo
 
Posts: 2165
Joined: Mon Jun 07, 2010 9:20 am
Location: Newcastle. NSW

Re: SLIMax's Break It and Build It Thread

Postby viking shippy on Sat Jul 18, 2015 11:40 am

biggibbo wrote:Don't be scared by the dual mass flywheel. I'm pretty sure all MN and ML tritons had single mass. The new MQ on the other hand has a dual mass I'm lead to believe.


Nope sorry mate not true.... the only way to find out if your mn or ml has a dual mass clutch...is to quote your vin number to your dealer...roughly a year before and after model change over they had them.I know of both mn and ml that have this stupid tech...and all the clutches do supposedly is stop gearbox roll over noise and a little drive line vibration.......and now they carry over to the mq.....I don't like the fact that mits seems to be leaning towards car like even more...nowdays....to the detriment of serviceability and longevity...in the outback and having to replace the flywheel is a real PITA..boys if your mrs drives your ute....don't let her fill out new car feedback forms or winge on mits web pages that it's hard to drive..a ute is a ute....
User avatar
viking shippy
 
Posts: 3233
Joined: Sun Sep 19, 2010 5:16 pm

Re: SLIMax's Break It and Build It Thread

Postby SLIMaxPower on Wed Jul 29, 2015 8:20 pm

So starting my water storage.

Basically copied ingredients from other posts that I am too lazy to search.

Here are a few pics getting it together.

First pic shows everything together apart from the hose and tap plumbed in.

I am still deciding whether to use metal or pvc for the outlet from the tank.

The flexible coupling is only used as that part of the pipe will rest on the towbar frame.

I am use 10mm airline and connectors for the breather.

Instead of drilling I am going to weld metal supports for the brackets.

Will have to cut the lever and re-weld the handle to lower the spare as the tank blocks access to the port.


2015-07-29 18.42.40.jpg


2015-07-29 18.42.40.jpg


2015-07-29 18.42.54.jpg
You do not have the required permissions to view the files attached to this post.
User avatar
SLIMaxPower
Platinum Subscriber
 
Posts: 500
Joined: Thu Nov 27, 2014 10:56 am

Re: SLIMax's Break It and Build It Thread

Postby Snooozy on Wed Jul 29, 2015 9:15 pm

looks slightly familiar ;)
very handy mod that one. Looks like you will get a few extra litres in that with the extra pipe

went away for 2 weeks recently, we mainly use our tank for handwashing & it lasted the whole time with plenty to spare.

will be interested to see how your mounting is done.
I have been quite happy with my mounting brackets as they have not moved even after some outback corrugations.
User avatar
Snooozy
Platinum Subscriber
 
Posts: 3860
Joined: Sat Jun 27, 2009 12:27 am
Location: Victoria

Re: SLIMax's Break It and Build It Thread

Postby SLIMaxPower on Fri Jul 31, 2015 3:38 pm

So all finished. 24 litres.

A few teething problems. Is quite an effort assembling with a lift kit.

Welding all the brackets to the chassis and sprayed primer once done.


My little helper
2015-07-31 12.35.30.jpg


2015-07-31 12.34.48.jpg


2015-07-31 12.34.20.jpg


No leaks so far, although I am going scrub bashing this arvo so we will see how it holds up.
You do not have the required permissions to view the files attached to this post.
User avatar
SLIMaxPower
Platinum Subscriber
 
Posts: 500
Joined: Thu Nov 27, 2014 10:56 am

Re: SLIMax's Break It and Build It Thread

Postby SLIMaxPower on Sun Sep 13, 2015 8:27 pm

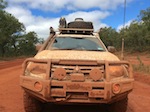
A few updated pics here. Sorry Tony I couldn't get Red vacuum hose so had to go blue :( All your goodies perform awesome though !!


I still have one run of blue vacuum that goes from the dawes to MAP - should be in tomorrow.

The DRL lights was a PITA + I was trying to use the materials I had access to at home. I swear a did a test run using the multi=meter and it seem fine, explaining to my 13yr old boy that you shouldn't heatshrink/tape/conduit until tested after install, even though I was doing it. sigh

I soldered all wire connections + heatsrink + leccy tape + cable-tie + conduit if appropriate.
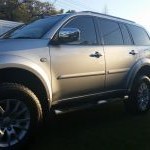
2015-09-13 17.44.30.jpg

Eventually took power from the driver wiper IGN wire. Had to scrape 4 wires due to conflicting information I had read. P.I.T.A Need to get a clamp meter for future endeavours.

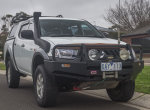
The dots are proposed button leds that I have already and tested with current configuration.
Rectangle DRL in front bar comes on with ACC and turns off when low beam+ is on.

When low-beam comes on the dot DRL's will come on.

2015-09-13 17.44.17.jpg


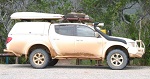
Donaldson's 3UM Secondary Filter Installed.
Added some silver braided hose's for some of the fuel system. What pressure is the fuel system in a MN Trition ? normal, low, high....

2015-09-13 17.44.55.jpg


Chrome on turbo pipes is a no no right ? Or can I replace all rubber hoses with braided/chrome varieties.
You do not have the required permissions to view the files attached to this post.
User avatar
SLIMaxPower
Platinum Subscriber
 
Posts: 500
Joined: Thu Nov 27, 2014 10:56 am

Re: SLIMax's Break It and Build It Thread

Postby tommydadog on Sun Sep 13, 2015 8:42 pm

Nice work with the DRL, they look good :)

Not too sure on the dot leds though, maybe a little too much? also wouldn't that be considered 2 sets of DRL? also seems counter intuitive to have DRL off when headlights are on but dots come on...
tommydadog
 
Posts: 101
Joined: Sun Jul 19, 2015 5:14 am
Location: New Zealand

Re: SLIMax's Break It and Build It Thread

Postby SLIMaxPower on Sun Sep 13, 2015 9:04 pm

The small button lights are nowhere near DRL - more like a cosmetic light that comes on with headlights :)
Have a heap of led strips for under the doors and underneath the chassis for those night time runs when you need to see.
User avatar
SLIMaxPower
Platinum Subscriber
 
Posts: 500
Joined: Thu Nov 27, 2014 10:56 am

Re: SLIMax's Break It and Build It Thread

Postby kevin on Tue Nov 17, 2015 6:42 pm

SLIMaxPower wrote: Eventually took power from the driver wiper IGN wire. Had to scrape 4 wires due to conflicting information I had read. P.I.T.A Need to get a clamp meter for future endeavours.


Which wire was it? (sent PM with same question)

I too know all about getting the wrong wires :roll:

(BTW - I have found dressmaker's pins very useful to trace wires. Use the alligator clip off the multi-meter connected to the pin and push gently into the wire. The rounded head stops the back of the pin going thru your thumb!@)
MY'10 MN GLX-R auto
MY'03 Forester XS
https://www.offroadsubarus.com/
User avatar
kevin
 
Posts: 441
Joined: Sat May 01, 2010 7:58 am
Location: Sydney

Re: SLIMax's Break It and Build It Thread

Postby coughy on Tue Nov 17, 2015 7:52 pm

kevin wrote:
SLIMaxPower wrote: Eventually took power from the driver wiper IGN wire. Had to scrape 4 wires due to conflicting information I had read. P.I.T.A Need to get a clamp meter for future endeavours.


Which wire was it? (sent PM with same question)

I too know all about getting the wrong wires :roll:

(BTW - I have found dressmaker's pins very useful to trace wires. Use the alligator clip off the multi-meter connected to the pin and push gently into the wire. The rounded head stops the back of the pin going thru your thumb!@)


it is the blue with a black trace m8 easy to find
Read this First ;) ;)Then still cant find what you are after
Use this Second ;) ;)Then still no Joy Go Here
Look in this thread 8-) 8-)
User avatar
coughy
Platinum Subscriber
 
Posts: 1587
Joined: Fri Jun 20, 2014 3:18 pm
Location: Bayside ,Brisbane ,QLD

Re: SLIMax's Break It and Build It Thread

Postby kevin on Wed Nov 18, 2015 4:42 am

^ great - thanks coughy
MY'10 MN GLX-R auto
MY'03 Forester XS
https://www.offroadsubarus.com/
User avatar
kevin
 
Posts: 441
Joined: Sat May 01, 2010 7:58 am
Location: Sydney

Re: SLIMax's Break It and Build It Thread

Postby kevin on Sun Nov 22, 2015 7:11 am

Found it and have tapped into it thanks guys. For clarity, it's actually activates with ACC not just IGN.
MY'10 MN GLX-R auto
MY'03 Forester XS
https://www.offroadsubarus.com/
User avatar
kevin
 
Posts: 441
Joined: Sat May 01, 2010 7:58 am
Location: Sydney

Re: SLIMax's Break It and Build It Thread

Postby SLIMaxPower on Wed Mar 02, 2016 8:51 pm

Finally got rid of the crappy pureandroid headunit and installed a Kenwood DDX5015DAB.

What a VAST improvement. Should of done it in the first place.
User avatar
SLIMaxPower
Platinum Subscriber
 
Posts: 500
Joined: Thu Nov 27, 2014 10:56 am

Re: SLIMax's Break It and Build It Thread

Postby SLIMaxPower on Thu May 05, 2016 12:25 pm

Getting some custom pipes made right now. woohoo. poor truck has been limping all over Perth. Been scared the hose was going to give in. Will post some pics soon

Powered by MaxPower
User avatar
SLIMaxPower
Platinum Subscriber
 
Posts: 500
Joined: Thu Nov 27, 2014 10:56 am

Re: SLIMax's Break It and Build It Thread

Postby SLIMaxPower on Tue May 10, 2016 8:47 pm

So bought the gear off fleabay that you suggested coughy:

Re: Can't find it? Ask here FIRST, before you start a new th
Postby coughy on Wed May 04, 2016 8:19 pm

you need these max

http://www.ebay.com.au/itm/4x4-Triton-i ... 1c6659aaca

unfortunately the pipe from the turbo to intercooler is too long.
the second pipe pipe fits fine.

so i will keep using the pipe I had made locally. I can still hear a little air escaping somewhere but cant see any oil leaking yet.

The pipe under the grill - out of the intercooler - will that need replacing ?
User avatar
SLIMaxPower
Platinum Subscriber
 
Posts: 500
Joined: Thu Nov 27, 2014 10:56 am

Re: SLIMax's Break It and Build It Thread

Postby coughy on Wed May 11, 2016 7:26 pm

im still waiting on that one to be made from that mob

and the pipes arnt to long you just not trying hard enough
it is easy fit
slide on the rubber pipe first then fit pipe then slide up rubber pipe easy as m8 :geek:
Read this First ;) ;)Then still cant find what you are after
Use this Second ;) ;)Then still no Joy Go Here
Look in this thread 8-) 8-)
User avatar
coughy
Platinum Subscriber
 
Posts: 1587
Joined: Fri Jun 20, 2014 3:18 pm
Location: Bayside ,Brisbane ,QLD

Re: SLIMax's Break It and Build It Thread

Postby SLIMaxPower on Wed May 11, 2016 8:27 pm

coughy wrote:im still waiting on that one to be made from that mob

and the pipes arnt to long you just not trying hard enough
it is easy fit
slide on the rubber pipe first then fit pipe then slide up rubber pipe easy as m8 :geek:


trust me i am. The pipe I had made was hard enough. Without the silicone hose the pipe is flush with the intercooler pipe and goes up to the turbo flange at the top. There is no way it is going to fit.
User avatar
SLIMaxPower
Platinum Subscriber
 
Posts: 500
Joined: Thu Nov 27, 2014 10:56 am

Re: SLIMax's Break It and Build It Thread

Postby SLIMaxPower on Mon Jun 27, 2016 5:52 pm

New Wheels

2016-06-27 13.43.13.jpg


2016-06-27 13.43.17.jpg


2016-06-27 16.40.21.jpg


Have some Jungle Flares on the way.
You do not have the required permissions to view the files attached to this post.
User avatar
SLIMaxPower
Platinum Subscriber
 
Posts: 500
Joined: Thu Nov 27, 2014 10:56 am

PreviousNext

Return to Member Build Ups

Who is online

Users browsing this forum: No registered users and 26 guests