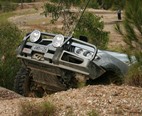
A few pics of my new girl as she stands at present....
http://s738.photobucket.com/user/Graeme-1957/library/?sort=3&page=1
Still a way to go, but the budget only stretches so far in one hit.....
G.
Lil Red Wagon -MY15 MN GLX
3 posts
• Page 1 of 1
Lil Red Wagon -MY15 MN GLX
![]() by Graeme1957 on Sat Oct 24, 2015 2:51 pm
by Graeme1957 on Sat Oct 24, 2015 2:51 pm
MY15 MN GLX TRITON Diesel Dual cab with a few bits and a never ending list.
"If that's all there is my friend, then let's keep dancing.
Let's break out the booze and have a ball."
"If that's all there is my friend, then let's keep dancing.
Let's break out the booze and have a ball."
-

Graeme1957 - Platinum Subscriber
- Posts: 238
- Joined: Sun Oct 04, 2015 9:16 am
- Location: East Cannington (Perth Foothills) West Aust.
Re: Lil Red Wagon -MY15 MN GLX
![]() by 4wd26 on Sat Oct 24, 2015 3:17 pm
by 4wd26 on Sat Oct 24, 2015 3:17 pm
love the roof rack
one of a kind
does it make any noise (abnormal) due to the braces being outside the ute body?
how sturdy is it?
I was thinking about something very similar, but going right down to the ARB rear bar at the rear and sliders at the front
Looking at what you have done has convinced me, as it is the first time I have seen something like it done, and I wasn't sure how it would look
-
4wd26 - Moderator
- Posts: 8299
- Joined: Tue Dec 18, 2007 3:00 pm
- Location: Bayside Bundy and Monto
Re: Lil Red Wagon -MY15 MN GLX
![]() by Graeme1957 on Sun Oct 25, 2015 10:06 am
by Graeme1957 on Sun Oct 25, 2015 10:06 am
4wd26 wrote:love the roof rack one of a kind .....
Looking at what you have done has convinced me, as it is the first time I have seen something like it done, and I wasn't sure how it would look
Hi 4wd26, thanks for the vote of confidence - I must admit, I have had my doubts about the whole exo-skeleton thing. but it seems to be working out...
OK... (and sorry for the lengthy reply, I tend to get a touch verbose....
Noise: none that I have noticed, the main support bars are all behind the main cabin, so any air turbulence from them is literally out of earshot and the leading front edge of the rack has a factory inbuilt deflector to soften the blow against the leading pipe. So that is negligible too.
Sturdiness: the "MAXI rack" rack is rated/warranted by JARRAM to carry a 200kg load. (Note:This rating is for a "when travelling" load, unlike other racks that rate their capacity ONLY when the vehicle is static/standing still.) It's a custom modifed, heavy duty "tradesman's" type rack (used to carry ladders, pipes, carpet rolls etc. (See link below)
MAXI-rack web page.. http://www.jaram.com.au/product/maxi-ra ... well-body/
(Note to Forum Admin: The above link is NOT intended as an advertisement.)
As for extending the legs down to your existing barwork, I'm not sure what purpose it would serve (other than to act as a lightweight roll cage..) and the added length may actually make the rack weaker and unstable (due to the leg length) also if you did bend or damage a slider/rear bar/side bar that the rack was attached to, that damage would affect the rack (and hence the load) above the truck possibly throwing everything dangerously out of balance.
My adaptation idea (done by JARRAM) was to remove the rearmost section of side rails from their stock unit to suit my tent's base, weld in gussets to bolt the awning onto and weld in a partial mesh floor to the front.
Getting their engineers to approve and carry out the mods has kept the warranty valid. (and it's given them a new line of racks to sell.. *win win*.
One thing they DON'T recommend is drilling through the tubing to create mounting points. So if anyone has a quick release mounting system for a roof tent - I would LOVE to hear about it, the current "two bolt and cross plate" idea is a pain!!
The front section is still strong enough to carry the usual "upstairs" stuff.. Swag, recovery kit, small Gen-set or even extra fuel/ spare wheel.
One more mod I would like to do is install drawer runners under the leading edge of the rack to fit a solar panel.(slide under flat for driving, out and tilt for charging - but still gets some sun if the mesh rack is empty)
Fitment: When installed with a canopy, the mounting of the rack is incorporated into the base frame of the canopy, reaching up over and down the outside, effectively making it one complete "harness" under the internal top edge of the tub tying the whole thing together, giving it a similar setup to a "full rail" gutter mount as opposed to individual leg type racks.
With it mounting to the tub over the edge but underneath the canopy where the rubber seal is, it also negates the need to carve holes in our expensive f/g or metal canopy roofs to fit mounting points. Oh yeah...Side note..if fitting a canopy vent, do it BEFORE putting the rack on. The mesh floor gets in the way. Doh!
When installed without a canopy then the mounts bolt onto the inside tub lip and reach up over and down the outside as before. (A steel side rail re-reinforcement inside the lip can be used as well, and I would advise this.)
The mounts are laser-cut, anodised, 1/4" thick high tensile steel plate.
On both installations, a neoprene wear pad is located under each "foot" to protect paint and panels from rubbing (and they will)...
MY15 MN GLX TRITON Diesel Dual cab with a few bits and a never ending list.
"If that's all there is my friend, then let's keep dancing.
Let's break out the booze and have a ball."
"If that's all there is my friend, then let's keep dancing.
Let's break out the booze and have a ball."
-
Graeme1957 - Platinum Subscriber
- Posts: 238
- Joined: Sun Oct 04, 2015 9:16 am
- Location: East Cannington (Perth Foothills) West Aust.
3 posts
• Page 1 of 1
Who is online
Users browsing this forum: No registered users and 18 guests
![]()