Rig Jnr's Build
Re: Rig Jnr's Build
![]() by c-dale on Wed May 21, 2014 1:08 pm
by c-dale on Wed May 21, 2014 1:08 pm
All good CD, its worth considering especially given my front bar :S Have driven past a few QLD Transport guys with no drama thus far but if the lights get their attention and they pull me over for a check it'll get a little akward. No where near as akward as the conversation I'll then have to have with the missus explaining my sudden need of an xrox 

My Build Thread: http://www.newtriton.net/phpbb/viewtopic.php?f=51&t=8715
-
c-dale - Platinum Subscriber
- Posts: 1119
- Joined: Wed Dec 30, 2009 3:29 pm
- Location: Bracken Ridge, Brisbane, QLD
Re: Rig Jnr's Build
![]() by c-dale on Sat Jun 07, 2014 5:13 pm
by c-dale on Sat Jun 07, 2014 5:13 pm
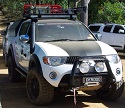
FRDESP, heres the shots of the roof light.
Control

Roof Lights outside car

Inside car. Not too much glar to be honest.

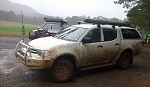
Parked up at my parents place

Control
Roof Lights outside car
Inside car. Not too much glar to be honest.
Parked up at my parents place
My Build Thread: http://www.newtriton.net/phpbb/viewtopic.php?f=51&t=8715
-
c-dale - Platinum Subscriber
- Posts: 1119
- Joined: Wed Dec 30, 2009 3:29 pm
- Location: Bracken Ridge, Brisbane, QLD
Re: Rig Jnr's Build
![]() by c-dale on Mon Jun 23, 2014 10:02 pm
by c-dale on Mon Jun 23, 2014 10:02 pm
Finally had a chance to get out to mum and dads a few weekends ago and do the final tidy up on the draws. They got another lick of paint to freshen them up and then alloy trimming to tidy all the edges. Choose to go this way as I wanted them to look good and really didn’t trust myself to do job I would be happy with in carpet. I am very happy with how they have turned out. Once I was back home the draws were out again so I could do the canopy lighting. I was rushed with my first attempt and really not happy with how they were wired as it was just messy and not overly useful, some of the led strips were not working and all in all it was a disappointing outcome. I had a plan to replace all the split conduit hiding the wires with alloy box section so bought some 12mmx12mm alloy box section, ripped out the existing lights, cut the box section to size and glued it is place. The lights were then all wired up, sadly in a hurry again, but are working a treat and I am also very happy with the outcome. The Alloy box section hides and protects the wires nicely and ties in really well with the trimming on the draws.
The reason the lights were rushed, again, was a late change of plans which freed up a weekend. Given my wife is 31 weeks pregnant it might be the last time in a while we get to go camping so was too good an opportunity to pass up. Lights were all done after I had put the kids to bed and then the draws returned to the back of the car and all packed up on Saturday morning ready to depart for Elanda Point.
The set up I have is planned to be our weekend set up and road trip set up, so short trips or trips like the cape that are shorter stays in lots of places. The camper trailer will be for the long stay trips. Given that everything would need to fit in the tray I needed everything to have its place. Happy to say that it’s worked out quite well. The draw needs a little more use to find out what fits best where but otherwise it’s pretty good.
The draws consist of 5 main parts, section 1 is always mounted in the tray and houses the water tank, switches, hi lift jack and polls for the rear awning. Section 2 is the fridge box and base. Section 3 is the draw, section 4 a slide out shelf and finally section 5 the tap and side cover. To complement the draw system I have the side Ironman awning 2x2.5m and a rear Tigerz11 awning 1.4x2.5m.


Our stainless steel camp kitchen

The Draws - all sections


Section 1 – Water tank, switches and Hi Lift Jack housing


Section 2 and 4 – Draw and Pull out Stainless Steel Shelf

The shelf is held in place with velco on the tailgate and adjustable poles end and is surprisingly stable.

Section 5 – Water tap with stainless steel splash back and cover (3 burner stove, hotplate and bbq utensil housing)


Section 1 detail – seat storage (4 seats)

As you can see from the pics most things have their place. The chairs, stove, fridge, tent (on top of fridge box), poles (on top of section 5) all have a home. The area next to the draw has been left free as either 2 jerry cans or our table and ground sheet fit nicely in that space.
Lights:
5 switches, all run a different circuit of LED light strips.
Switch 1: interior light

Switch 2: Side doors
Switch 3: Rear door

All the above a cool white LED light strips
Switch 4: Side Awning
Switch 5: Rear awning
Both awnings are warm white LED light strips (reduce the bugs )
)
As far as the set up goes I was really happy with how it performed. As this was the first trip out there are a few little bugs to iron out but that will happen over coming trips. Elanda point is also a great place to stay, heaps of rooms and relatively quiet on the weekends. Being Queensland the winter nights were cool but come day time it was warm enough for the kids to play in the lake. I dare say it will be one of our first camps away once the baby has joined the family as it’s a relaxing spot with all the facilities required to keep the missus happy.
Camp Ground

Lake

Love a QLD Winter

The reason the lights were rushed, again, was a late change of plans which freed up a weekend. Given my wife is 31 weeks pregnant it might be the last time in a while we get to go camping so was too good an opportunity to pass up. Lights were all done after I had put the kids to bed and then the draws returned to the back of the car and all packed up on Saturday morning ready to depart for Elanda Point.
The set up I have is planned to be our weekend set up and road trip set up, so short trips or trips like the cape that are shorter stays in lots of places. The camper trailer will be for the long stay trips. Given that everything would need to fit in the tray I needed everything to have its place. Happy to say that it’s worked out quite well. The draw needs a little more use to find out what fits best where but otherwise it’s pretty good.
The draws consist of 5 main parts, section 1 is always mounted in the tray and houses the water tank, switches, hi lift jack and polls for the rear awning. Section 2 is the fridge box and base. Section 3 is the draw, section 4 a slide out shelf and finally section 5 the tap and side cover. To complement the draw system I have the side Ironman awning 2x2.5m and a rear Tigerz11 awning 1.4x2.5m.
Our stainless steel camp kitchen
The Draws - all sections
Section 1 – Water tank, switches and Hi Lift Jack housing
Section 2 and 4 – Draw and Pull out Stainless Steel Shelf
The shelf is held in place with velco on the tailgate and adjustable poles end and is surprisingly stable.
Section 5 – Water tap with stainless steel splash back and cover (3 burner stove, hotplate and bbq utensil housing)
Section 1 detail – seat storage (4 seats)
As you can see from the pics most things have their place. The chairs, stove, fridge, tent (on top of fridge box), poles (on top of section 5) all have a home. The area next to the draw has been left free as either 2 jerry cans or our table and ground sheet fit nicely in that space.
Lights:
5 switches, all run a different circuit of LED light strips.
Switch 1: interior light
Switch 2: Side doors
Switch 3: Rear door
All the above a cool white LED light strips
Switch 4: Side Awning
Switch 5: Rear awning
Both awnings are warm white LED light strips (reduce the bugs
As far as the set up goes I was really happy with how it performed. As this was the first trip out there are a few little bugs to iron out but that will happen over coming trips. Elanda point is also a great place to stay, heaps of rooms and relatively quiet on the weekends. Being Queensland the winter nights were cool but come day time it was warm enough for the kids to play in the lake. I dare say it will be one of our first camps away once the baby has joined the family as it’s a relaxing spot with all the facilities required to keep the missus happy.
Camp Ground
Lake
Love a QLD Winter
My Build Thread: http://www.newtriton.net/phpbb/viewtopic.php?f=51&t=8715
-
c-dale - Platinum Subscriber
- Posts: 1119
- Joined: Wed Dec 30, 2009 3:29 pm
- Location: Bracken Ridge, Brisbane, QLD
Re: Rig Jnr's Build
![]() by Lunny on Tue Jun 24, 2014 5:26 am
by Lunny on Tue Jun 24, 2014 5:26 am
c-dale wrote:All good CD, its worth considering especially given my front bar :S Have driven past a few QLD Transport guys with no drama thus far but if the lights get their attention and they pull me over for a check it'll get a little akward. No where near as akward as the conversation I'll then have to have with the missus explaining my sudden need of an xrox
on the light subject, you can only have a maximum of 4 forward facing aux lights..
can be on bullbar or the roof.. but must not be on top of a bullbar.
Lunny
-
Lunny - Posts: 1708
- Joined: Mon Mar 11, 2013 5:39 pm
- Location: North Brisbane, QLD
Re: Rig Jnr's Build
![]() by c-dale on Tue Jun 24, 2014 7:17 am
by c-dale on Tue Jun 24, 2014 7:17 am
Cheers Lunny,
Guess its lucky the two smaller roof lights are angled to the side then
Guess its lucky the two smaller roof lights are angled to the side then
My Build Thread: http://www.newtriton.net/phpbb/viewtopic.php?f=51&t=8715
-
c-dale - Platinum Subscriber
- Posts: 1119
- Joined: Wed Dec 30, 2009 3:29 pm
- Location: Bracken Ridge, Brisbane, QLD
Re: Rig Jnr's Build
![]() by c-dale on Wed Jul 16, 2014 7:07 am
by c-dale on Wed Jul 16, 2014 7:07 am

My Build Thread: http://www.newtriton.net/phpbb/viewtopic.php?f=51&t=8715
-
c-dale - Platinum Subscriber
- Posts: 1119
- Joined: Wed Dec 30, 2009 3:29 pm
- Location: Bracken Ridge, Brisbane, QLD
Re: Rig Jnr's Build
![]() by c-dale on Wed Jul 16, 2014 9:16 am
by c-dale on Wed Jul 16, 2014 9:16 am
Roof and the 2/3rds of the bonnet (the lower middle section) in satin black 
These guys are next to my mechanic so have admired their work for a while. Have worked on some very cool cars. As I dropped the Tri off this morning a young bloke dropped off his Austin Martin
These guys are next to my mechanic so have admired their work for a while. Have worked on some very cool cars. As I dropped the Tri off this morning a young bloke dropped off his Austin Martin
My Build Thread: http://www.newtriton.net/phpbb/viewtopic.php?f=51&t=8715
-
c-dale - Platinum Subscriber
- Posts: 1119
- Joined: Wed Dec 30, 2009 3:29 pm
- Location: Bracken Ridge, Brisbane, QLD
Re: Rig Jnr's Build
![]() by Lunny on Wed Jul 16, 2014 9:47 am
by Lunny on Wed Jul 16, 2014 9:47 am
where are they, i might see what they can do with the back sides of my bullbar
Lunny
-
Lunny - Posts: 1708
- Joined: Mon Mar 11, 2013 5:39 pm
- Location: North Brisbane, QLD
Re: Rig Jnr's Build
![]() by c-dale on Wed Jul 16, 2014 10:13 am
by c-dale on Wed Jul 16, 2014 10:13 am
Granite St Geebung, Brisbane.
Facebook has all there details just search 'Vehicle Wraps'.
Facebook has all there details just search 'Vehicle Wraps'.
My Build Thread: http://www.newtriton.net/phpbb/viewtopic.php?f=51&t=8715
-
c-dale - Platinum Subscriber
- Posts: 1119
- Joined: Wed Dec 30, 2009 3:29 pm
- Location: Bracken Ridge, Brisbane, QLD
Re: Rig Jnr's Build
![]() by c-dale on Thu Jul 17, 2014 6:51 am
by c-dale on Thu Jul 17, 2014 6:51 am
Vehicle wraps did an awesome job very happy with the outcome. Personally I think it looks bloody awesome


My Build Thread: http://www.newtriton.net/phpbb/viewtopic.php?f=51&t=8715
-
c-dale - Platinum Subscriber
- Posts: 1119
- Joined: Wed Dec 30, 2009 3:29 pm
- Location: Bracken Ridge, Brisbane, QLD
Re: Rig Jnr's Build
![]() by Ringstinger on Thu Jul 17, 2014 8:03 am
by Ringstinger on Thu Jul 17, 2014 8:03 am
c-dale wrote:Vehicle wraps did an awesome job
Looks good!!!!!!
That's on my to do list, but I'll be doing the whole bonnet, and still deciding whether to do tailgate or not. I'm also thinking of buying the vinyl and DIYing it....could be dangerous.
- Ringstinger
- Posts: 15
- Joined: Mon Nov 04, 2013 10:42 am
- Location: Darwin (Palmerslum)
Re: Rig Jnr's Build
![]() by c-dale on Thu Jul 17, 2014 10:38 am
by c-dale on Thu Jul 17, 2014 10:38 am
Thanks mate. I am super happy with the outcome. I've seen a few photos of the Tri's with full bonnet wraps and they look good. I decided to go this way to be a little different and to tie in the grill and nudge bar which I think its achieved nicely.
I looked at DIY and was tempted but I hate prep work and to do it properly takes a fair amount of prep. I took shortcuts painting the canopy and am kicking myself now as I'm not happy with it.
The benefit of the wrap is if you dont like it, peal it off its a couple of hundred dollars wasted material though.
The guys at Vehicle Wraps do quality work and were not that pricey considering the material costs. Plus I got to drool over the Austin Martin when I picked my rig up
I looked at DIY and was tempted but I hate prep work and to do it properly takes a fair amount of prep. I took shortcuts painting the canopy and am kicking myself now as I'm not happy with it.
The benefit of the wrap is if you dont like it, peal it off
The guys at Vehicle Wraps do quality work and were not that pricey considering the material costs. Plus I got to drool over the Austin Martin when I picked my rig up
My Build Thread: http://www.newtriton.net/phpbb/viewtopic.php?f=51&t=8715
-
c-dale - Platinum Subscriber
- Posts: 1119
- Joined: Wed Dec 30, 2009 3:29 pm
- Location: Bracken Ridge, Brisbane, QLD
Re: Rig Jnr's Build
![]() by Cowboy Dave on Thu Jul 17, 2014 12:43 pm
by Cowboy Dave on Thu Jul 17, 2014 12:43 pm
I'm not quite sold on the roof but like the bonnet concept. The leading lines to the grille and bar do their job I reckon. I watched a few demo videos of the work involved and on those they used a special tape that has a very fine wire in it to cut/define the edges. The tape can be removed and re-stuck in much the same was as the other film but basically you get your lines perfect with it and then stick the other stuff over the top and then peel the wire out of the cutting tape and it slices down the edge of the upper film leaving you with the perfect straight edge. Anyway the reason for all of that back story is that on the demos they had an angled panel like that on a bonnet but they added a stripe of the underlying colour not far inside the edge of the new colour. Like a racing stripe I suppose. Anyway just looking at the black on the hood I reckon a thin white strip inside the edge of it would really set it off nicely. I suppose now it's on that would mean adding a thin black strip with a white gap to what's already there so that might be a bit harder than what I saw on the video. I can try and find the video again if you're interested in visualising what I am talking about.
Anyway 10 points for originality mate you've done a few things no one else has even thought of.
Anyway 10 points for originality mate you've done a few things no one else has even thought of.
-

Cowboy Dave - Moderator
- Posts: 18098
- Joined: Tue Dec 29, 2009 9:46 am
- Location: Sydney
Re: Rig Jnr's Build
![]() by c-dale on Thu Jul 17, 2014 5:02 pm
by c-dale on Thu Jul 17, 2014 5:02 pm
Thanks CD, I try to make my cars unique and am pretty happy with how the rig is coming together. Just need more cash
Amazed at what can be achieved with the wraps. The Vehicle Wraps facebook page has some awesome work! It was a few you tube videos that made me decide to let the pros do the work
I tossed up a heap of designs for the bonnet but went with basic becuase of comments my dad made. Shared a few thoughts with him and got a 'you'll look like a wanker' response. 'kids of today  ' The roof was to tie in the canopy and to hide all the marks I couldn't polish out
Amazed at what can be achieved with the wraps. The Vehicle Wraps facebook page has some awesome work! It was a few you tube videos that made me decide to let the pros do the work
I tossed up a heap of designs for the bonnet but went with basic becuase of comments my dad made. Shared a few thoughts with him and got a 'you'll look like a wanker' response.
My Build Thread: http://www.newtriton.net/phpbb/viewtopic.php?f=51&t=8715
-
c-dale - Platinum Subscriber
- Posts: 1119
- Joined: Wed Dec 30, 2009 3:29 pm
- Location: Bracken Ridge, Brisbane, QLD
Re: Rig Jnr's Build
![]() by triton_guru on Thu Jul 17, 2014 5:12 pm
by triton_guru on Thu Jul 17, 2014 5:12 pm
looks good c-dale how much would a full bonnet cost? was thinking of getting the bonnet wrapped rather then buying bonnet protectors so no more stone chips in the bonnet
-
triton_guru - Posts: 865
- Joined: Sat Mar 23, 2013 4:49 pm
Re: Rig Jnr's Build
![]() by c-dale on Thu Jul 17, 2014 5:57 pm
by c-dale on Thu Jul 17, 2014 5:57 pm
Full cost of mine was $600, so at a guess around the $300. Given the cost of materials I was pretty happy with the price.
My Build Thread: http://www.newtriton.net/phpbb/viewtopic.php?f=51&t=8715
-
c-dale - Platinum Subscriber
- Posts: 1119
- Joined: Wed Dec 30, 2009 3:29 pm
- Location: Bracken Ridge, Brisbane, QLD
Re: Rig Jnr's Build
![]() by c-dale on Sun Jul 27, 2014 2:32 pm
by c-dale on Sun Jul 27, 2014 2:32 pm
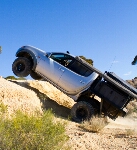
Spent the afternoon putting together a proof of concept for a new window washer bottle. Glad I did as the measurement I took looked alright until the test positioning.

Is fine when wheels are straight but on full lock and tucked up she'll hit good and proper.


Ahh well, will do mark 2 of my pvc tube bottle in the not too distant future. was working a treat till it started leaking
Is fine when wheels are straight but on full lock and tucked up she'll hit good and proper.
Ahh well, will do mark 2 of my pvc tube bottle in the not too distant future.
My Build Thread: http://www.newtriton.net/phpbb/viewtopic.php?f=51&t=8715
-
c-dale - Platinum Subscriber
- Posts: 1119
- Joined: Wed Dec 30, 2009 3:29 pm
- Location: Bracken Ridge, Brisbane, QLD
Re: Rig Jnr's Build
![]() by c-dale on Sat Aug 02, 2014 4:17 pm
by c-dale on Sat Aug 02, 2014 4:17 pm
Well, given the above was not successful I've redone the PVC pipe washer bottle with a few improvements on the past design. I've gone a bigger pipe, bigger hose, added a breather and was careful with where the pump was placed.
Bits and pieces used

The holes in the end cap are two 25mm for the hose fittings and a 22mm for the factory pump.
Put together


In place.


Hose fits the factory inlet also (with a bit of slicing and dicing)


Also refited my bike rack on the canopy


And the mount for the bikes thes dont have the lefty.

Will refit the bash plate tomorrow after I make sure theres no leaks
Bits and pieces used
The holes in the end cap are two 25mm for the hose fittings and a 22mm for the factory pump.
Put together
In place.
Hose fits the factory inlet also (with a bit of slicing and dicing)
Also refited my bike rack on the canopy
And the mount for the bikes thes dont have the lefty.
Will refit the bash plate tomorrow after I make sure theres no leaks
My Build Thread: http://www.newtriton.net/phpbb/viewtopic.php?f=51&t=8715
-
c-dale - Platinum Subscriber
- Posts: 1119
- Joined: Wed Dec 30, 2009 3:29 pm
- Location: Bracken Ridge, Brisbane, QLD
Re: Rig Jnr's Build
![]() by Trax on Sat Aug 02, 2014 11:41 pm
by Trax on Sat Aug 02, 2014 11:41 pm
How's the rust proofing going mate? Thinking about booking mine in to get it done also as I'm a little skeptical of electronic rust protection units, where did you get yours done and is it very expensive?
- Trax
- Posts: 20
- Joined: Mon Jul 21, 2014 9:03 pm
Re: Rig Jnr's Build
![]() by c-dale on Sun Aug 03, 2014 7:44 am
by c-dale on Sun Aug 03, 2014 7:44 am
Hey Trax,
The rust proofing was done at Downey St Rustproofing at Geebung. Cost me $700 in Nov 2012. For that they cleaned the engine bay and under the car till it was spotless. Then sprayed the black stuff they use under the car and also did inside chassis, doors, front arches, engine bay with something else.
Its holding up well as I've had a few beach trips and gravel rd trips since and cant see any major chipping of the black spray.
This is only a secondary means of protection in my mind. Nothing beats a bloody good wash when you get back from a beach trip
My Build Thread: http://www.newtriton.net/phpbb/viewtopic.php?f=51&t=8715
-
c-dale - Platinum Subscriber
- Posts: 1119
- Joined: Wed Dec 30, 2009 3:29 pm
- Location: Bracken Ridge, Brisbane, QLD
Re: Rig Jnr's Build
![]() by Trax on Mon Aug 04, 2014 3:39 pm
by Trax on Mon Aug 04, 2014 3:39 pm
Cheers mate, does the black stuff set hard like a plastic or is it more like the underbody sound deadener?
- Trax
- Posts: 20
- Joined: Mon Jul 21, 2014 9:03 pm
Re: Rig Jnr's Build
![]() by c-dale on Mon Aug 04, 2014 4:22 pm
by c-dale on Mon Aug 04, 2014 4:22 pm
It does set hard but is durable, it doesn't seem to chip easily so must have a bit of give when stuff hits it. The stuff they spray in the door is waxy.
My Build Thread: http://www.newtriton.net/phpbb/viewtopic.php?f=51&t=8715
-
c-dale - Platinum Subscriber
- Posts: 1119
- Joined: Wed Dec 30, 2009 3:29 pm
- Location: Bracken Ridge, Brisbane, QLD
Re: Rig Jnr's Build
![]() by c-dale on Sun Aug 24, 2014 6:52 pm
by c-dale on Sun Aug 24, 2014 6:52 pm
Fitted the wind booster today. Am yet to drive the rig with it in but looking forward to it. For someone who is as mechanically inept as me install was a breeze gotta be happy with that.

My Build Thread: http://www.newtriton.net/phpbb/viewtopic.php?f=51&t=8715
-
c-dale - Platinum Subscriber
- Posts: 1119
- Joined: Wed Dec 30, 2009 3:29 pm
- Location: Bracken Ridge, Brisbane, QLD
Who is online
Users browsing this forum: No registered users and 37 guests
![]()