Stage 1 of Anths cheap custom shelf and drawer build

Bull bars, sliders, wheel carriers etc!

Stage 1 of Anths cheap custom shelf and drawer build

Postby AussieAnth on Tue Jan 20, 2015 2:18 pm

I've had my 2013 GLX Dual Cab for over a year now, and thought it was time building a storage system in the back. Priorities are:

1) Not expensive
2) Modular, so I can adjust it to suit my needs on the day
3) Fully removable
4) Sturdy
5) Simple to use
6) doesnt waste space
7) wont require heavy modificaton of the tray or canopy.
8) not too heavy

So big heavy permanent drawer systems on runners are out.

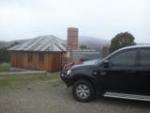
In my old BT-50 I made up something pretty simple, but it was slightly cumbersome at times and designed to allow me and the missus to sleep on it with gear underneath. Not a requirement now as we've now got my young son on the scene, so this is what I've come up with. Its only phase one, so more to come in the next few weeks.

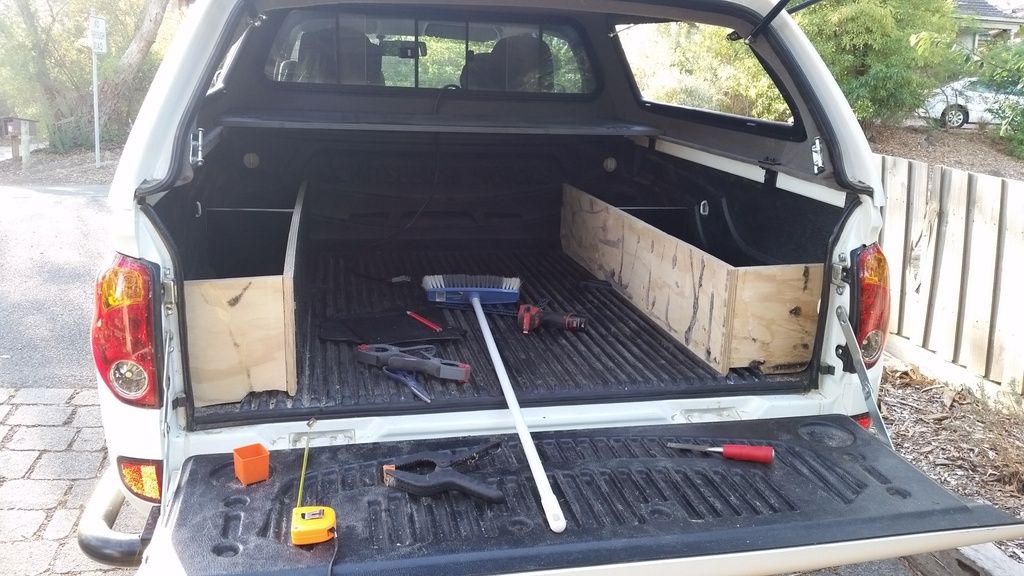
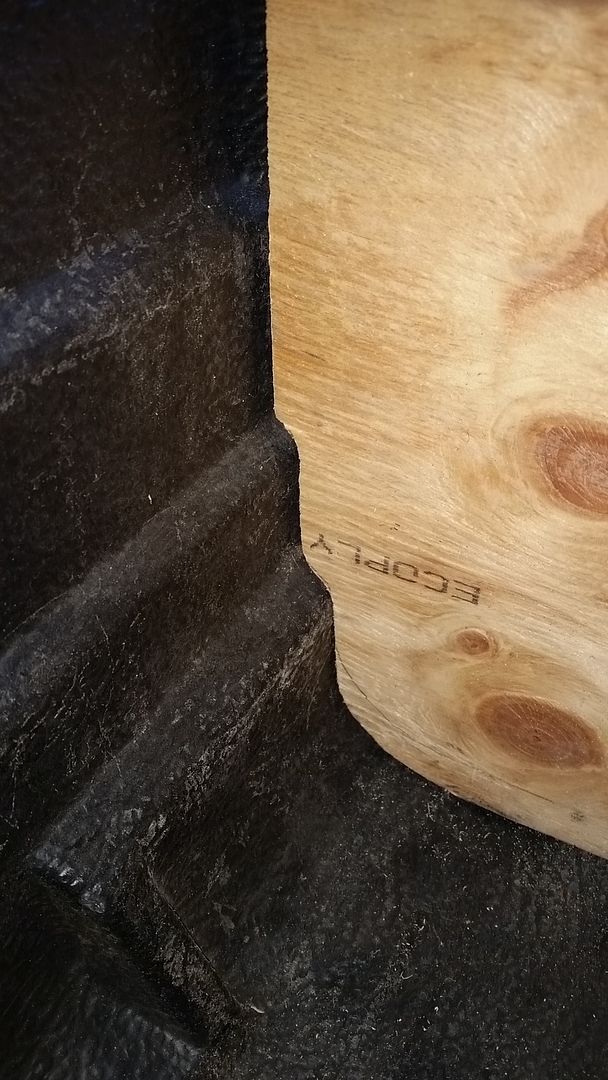
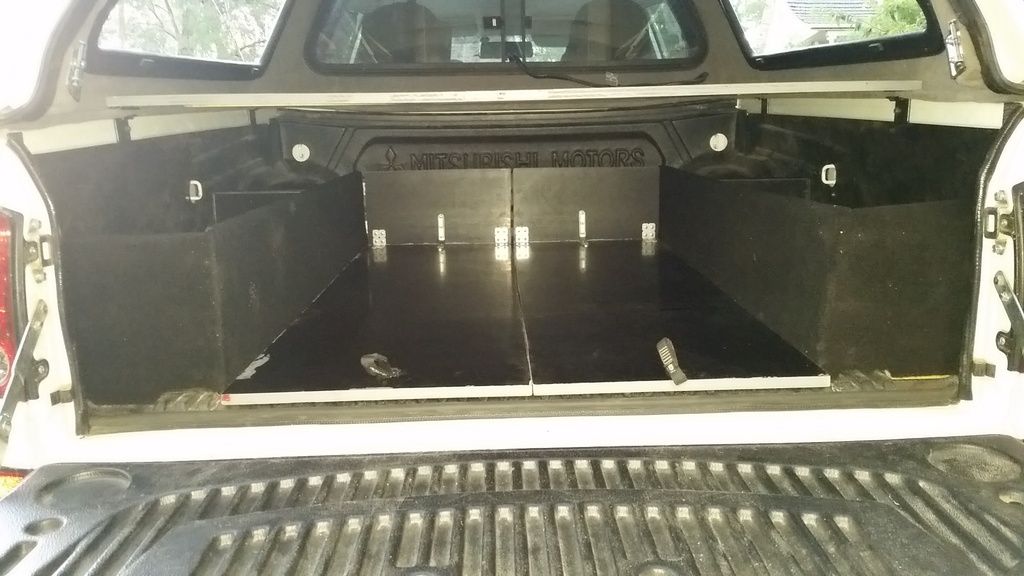
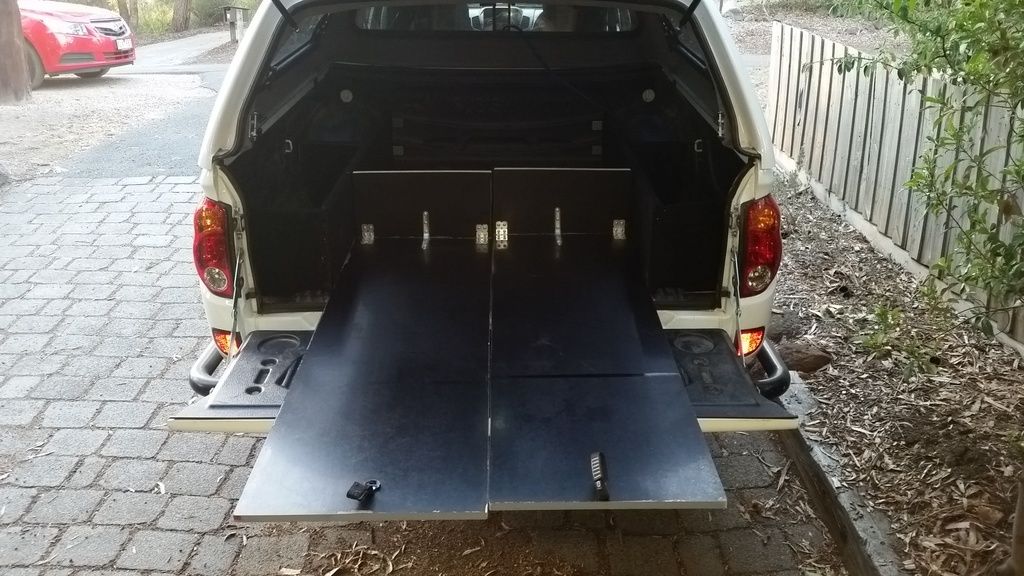
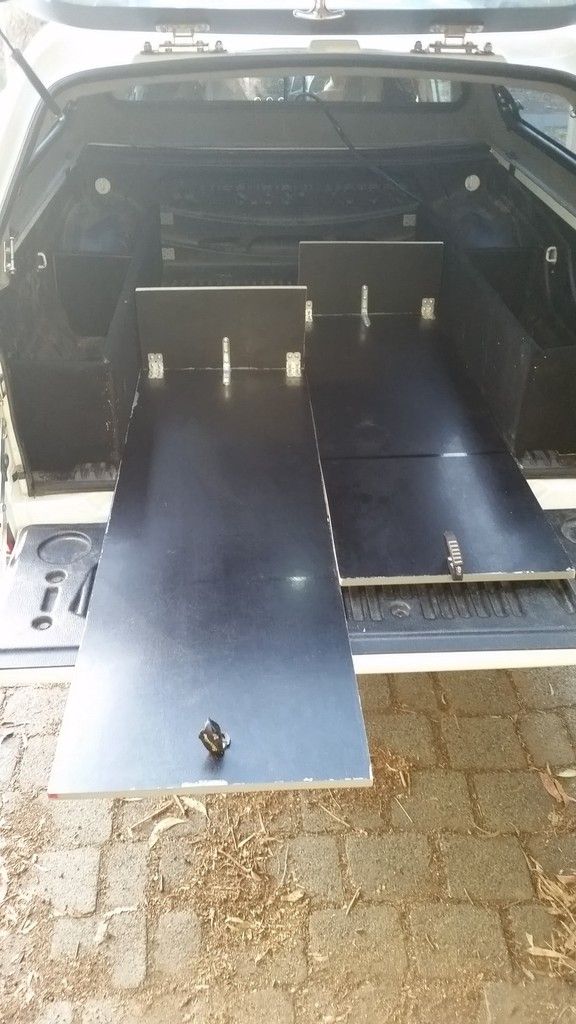
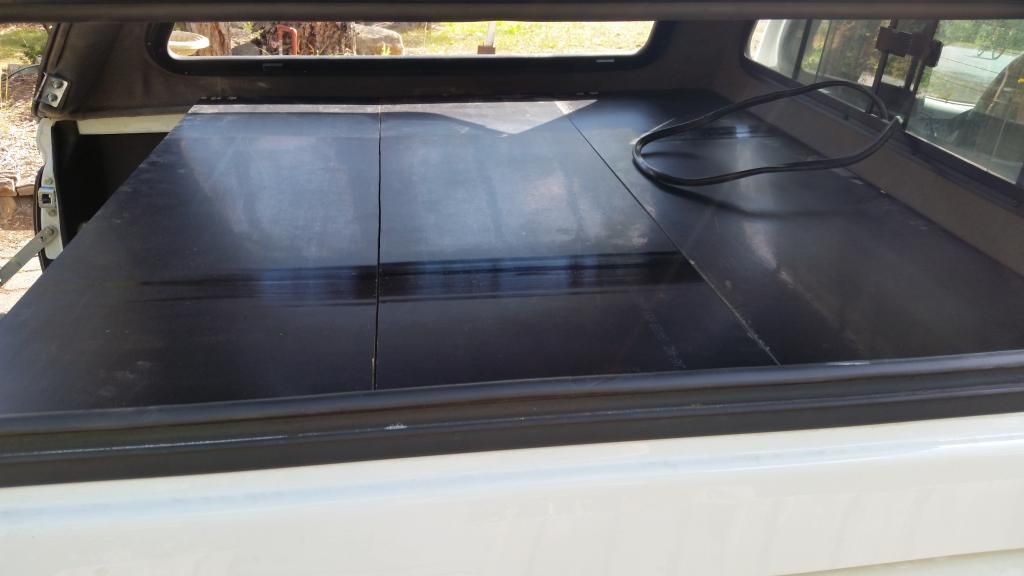
Bought a single piece of 1800mm x 1200mm concrete forming 18mm ply. I chose concrete forming ply over standard outdoor or marine ply because it was cheaper, apparently a bit stronger, and coated in a nice slick black paint thats more like 2 pack or something tough. Must be to allow tradies to make concrete walls with it and re-use the stuff again.

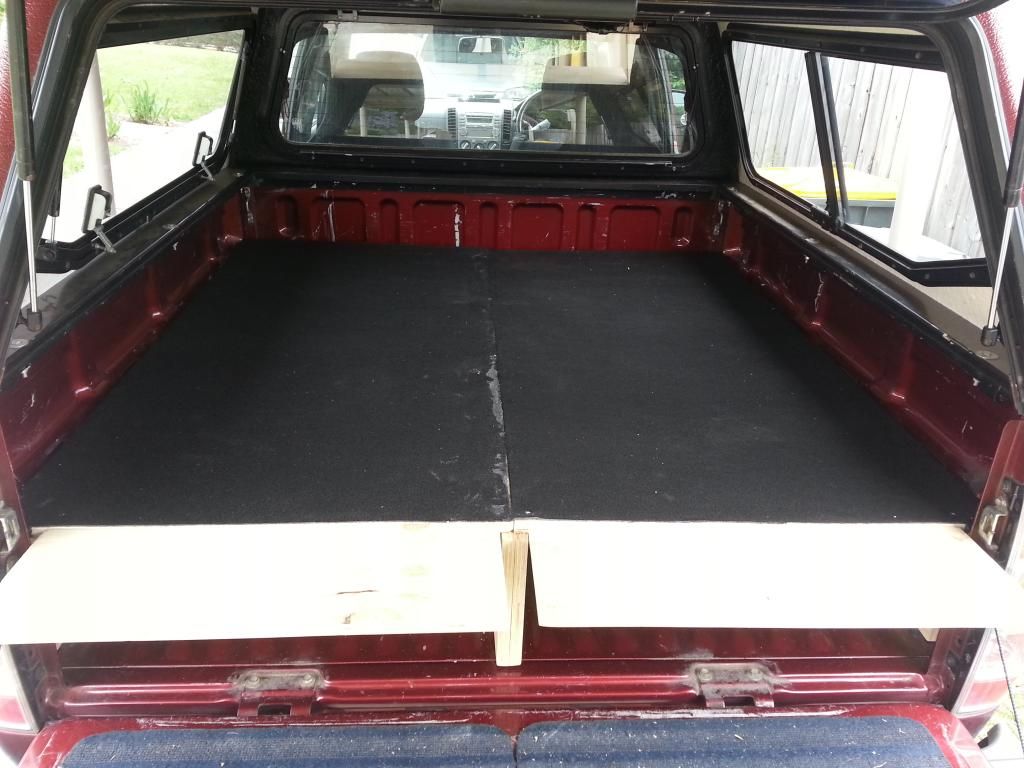
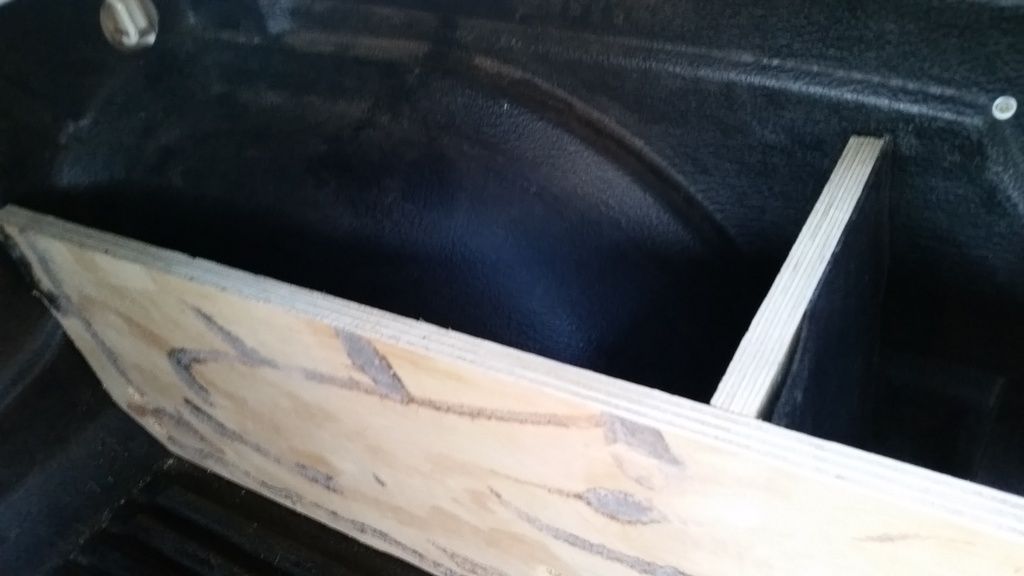
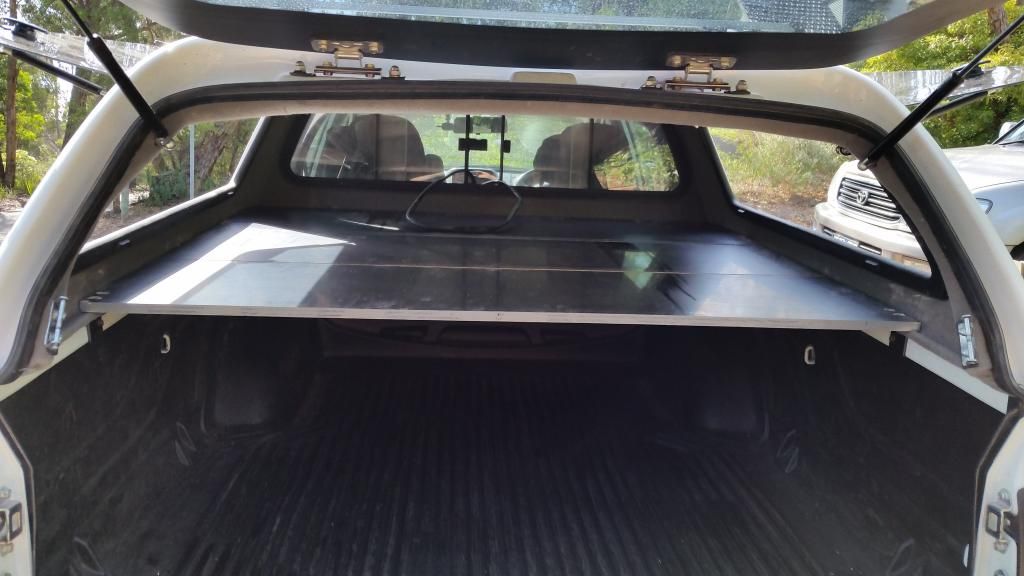
My Ironman canopy is made of the tough 9mm ABS plastic (same as Carry Boy), and covered in carpet. There is an inch wide lip where it sits on the ute tub, which give me a good solid platform to work with.
The side folding windows also allow me to slide large items into place without having to worry about leaning over the tailgate and manouvering big slabs of timber in.

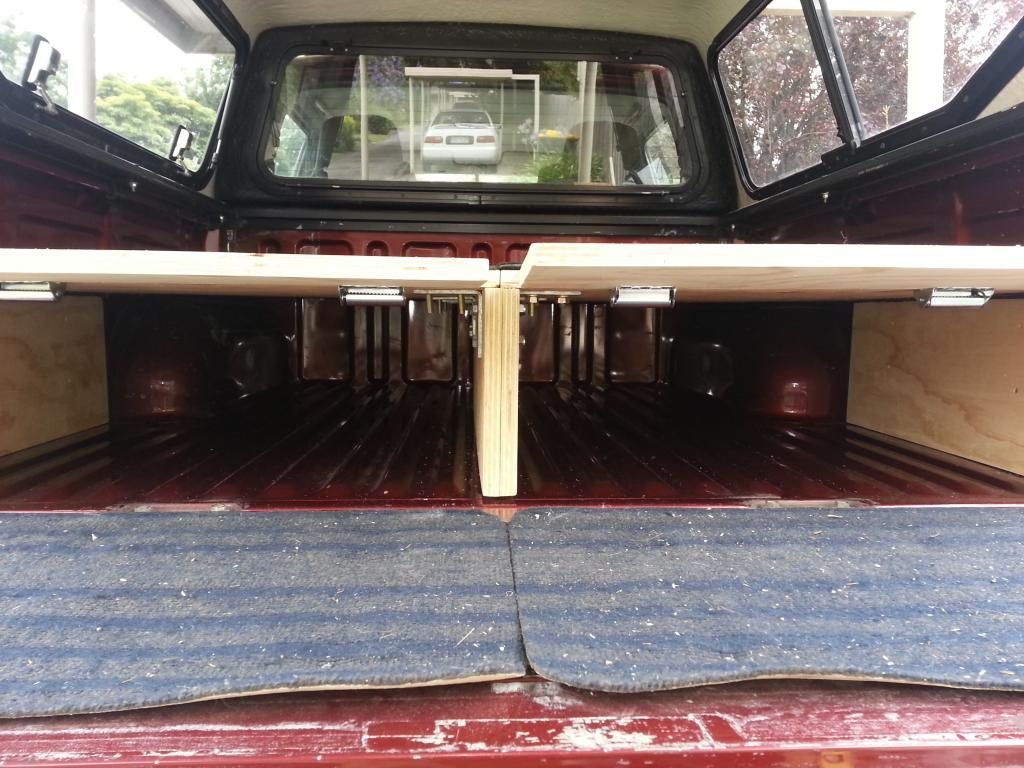
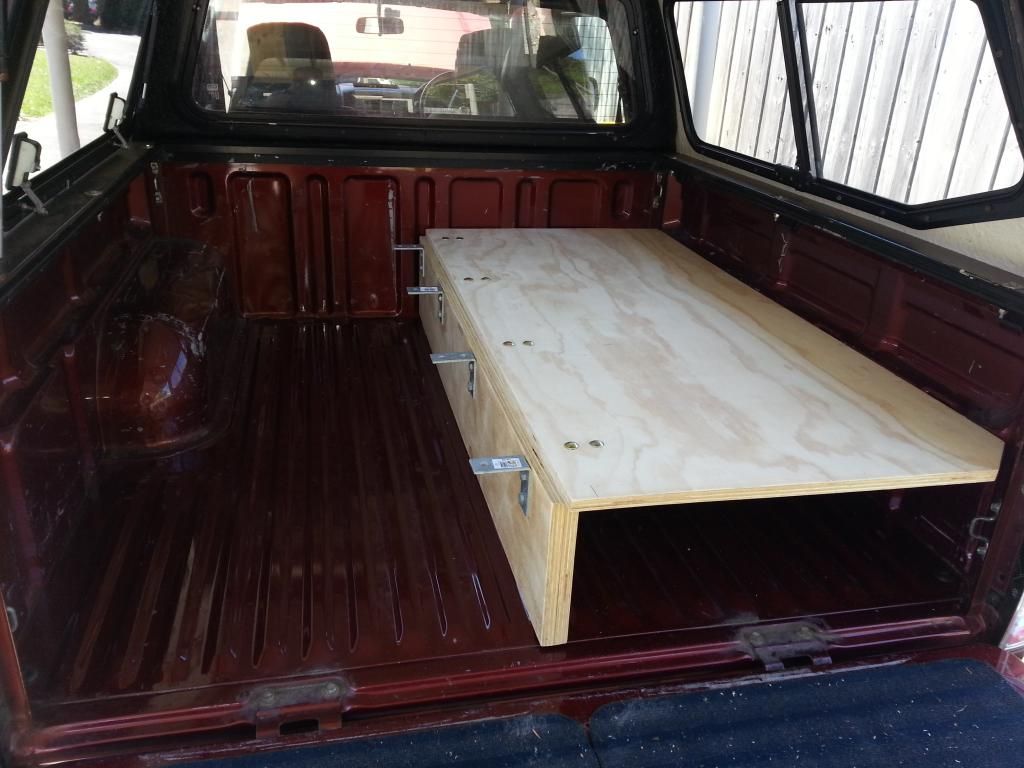
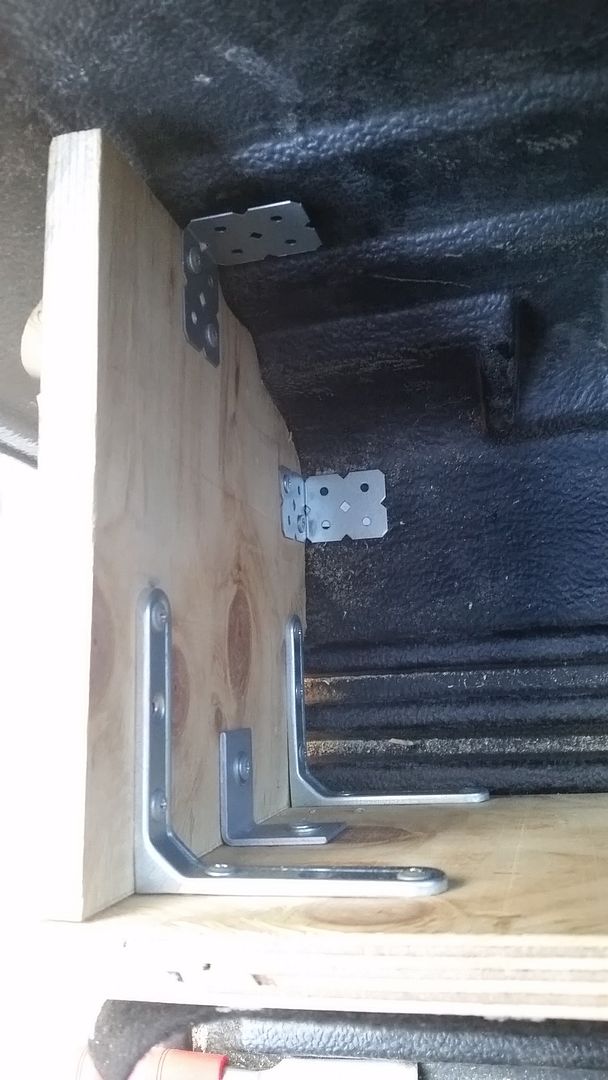
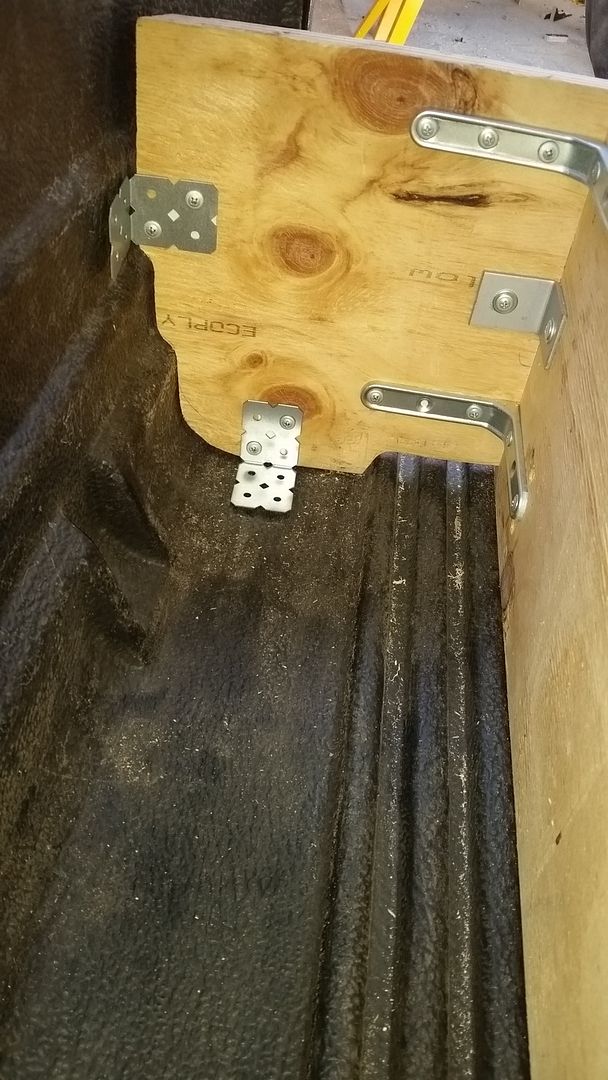
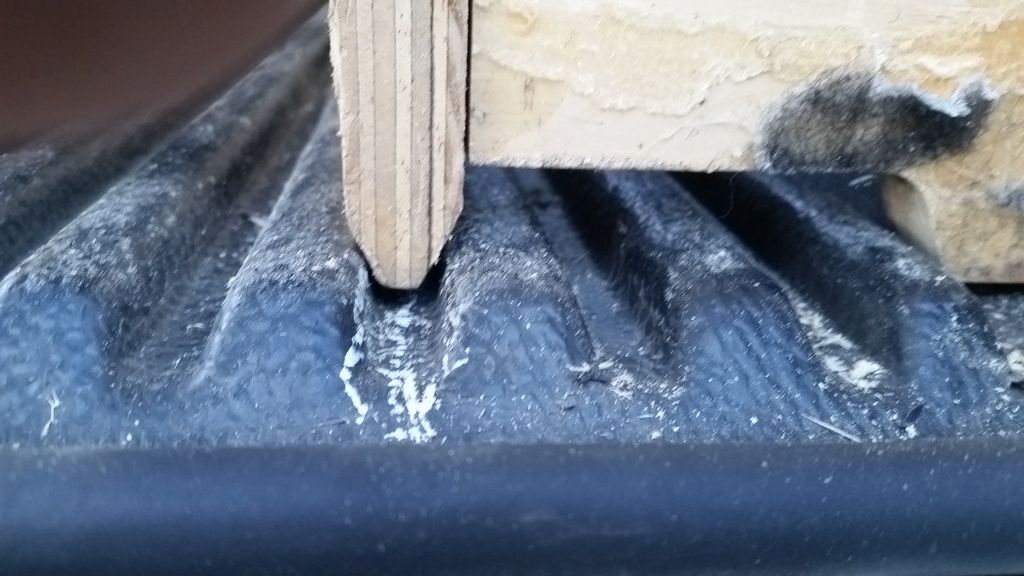
I cut out a 1470 x 1200 piece, then cut that into 3 even pieces of 1470 x 400. Starting with the piece closest to the cabin, I slid it up to the cabin, marked the curved corners so I can trim it to match the contours of the canopy, and marked where bolts from the canopy brackets stick up. I drilled out the holes for the bracket bolts, belt sanded away some space for the bracket as well and trimmed hte corners. Now it sits flush up against the cabin.
Middle piece just sits in place well, and doesnt need to accomodate any bolts or brackets on the canopy lip. The rear one closest to the tailgate has been drilled and sanded for another pair of brackets. The bolts sticking up through the holes stops the panels from moving, and brace it all nicely together.

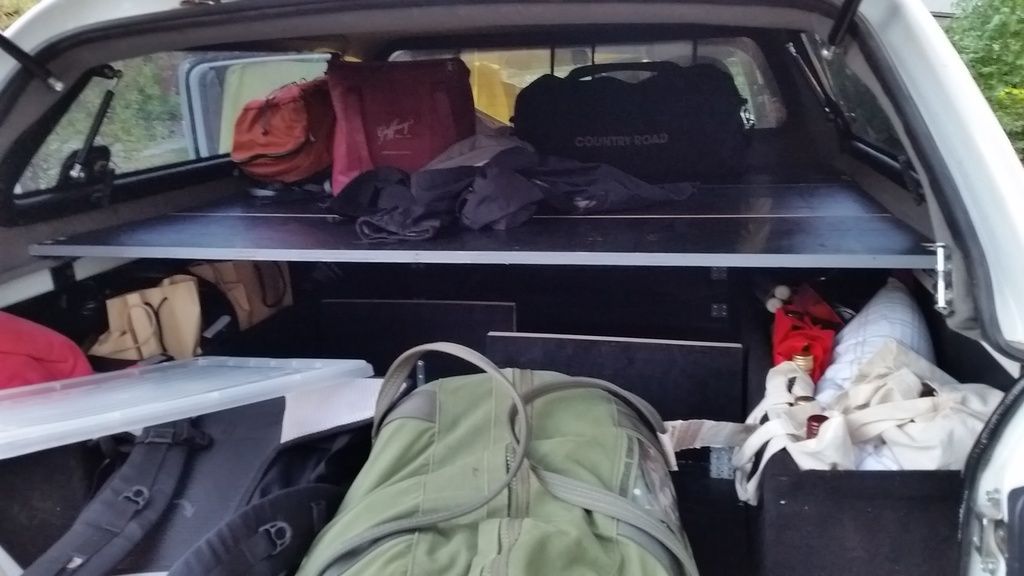
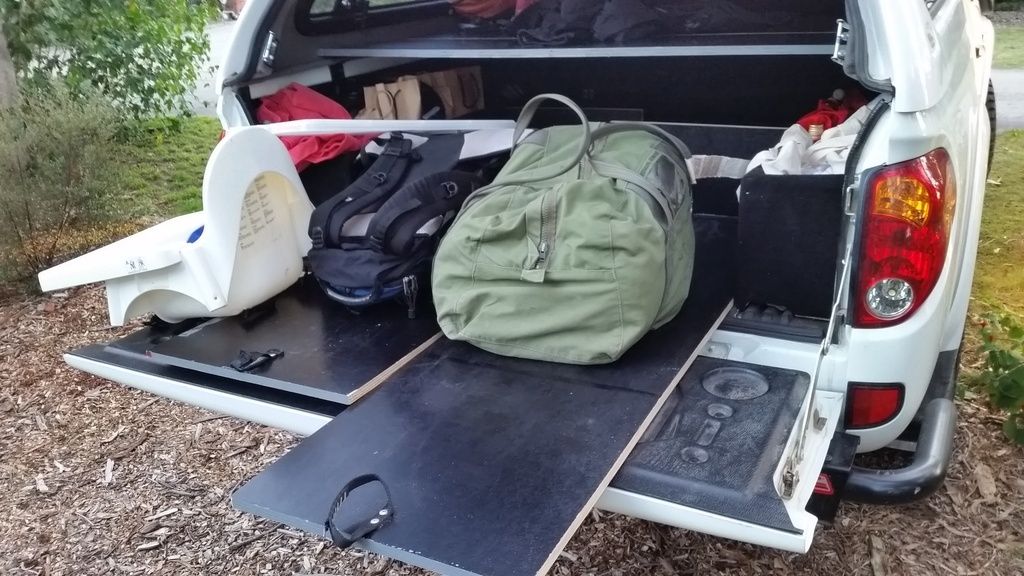
So phase one of the project I now have a modular, light weight, 3 piece shelf I can use to make better use of the canopy space. Heavier stuff will go underneath on the tub, and lighter bulky stuff on top. I can just fit 1, 2 or 3 pieces of the top shelf, in case I have something particularly large, which will go towards the back.

Phase 2 will go something like this:

Add carpet to the tops of the 3 panels, to reduce items moving around. That black paint is pretty slick.

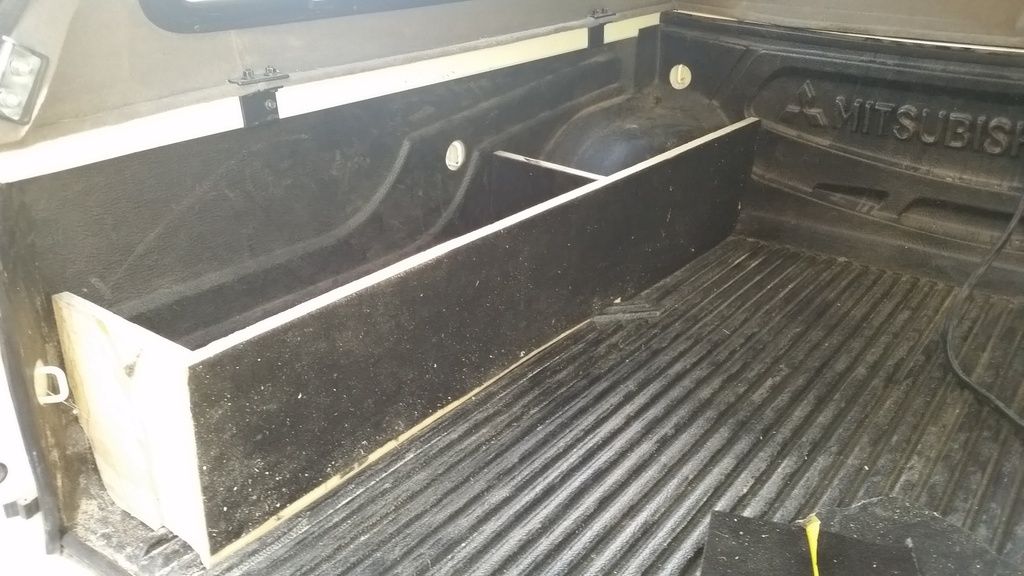
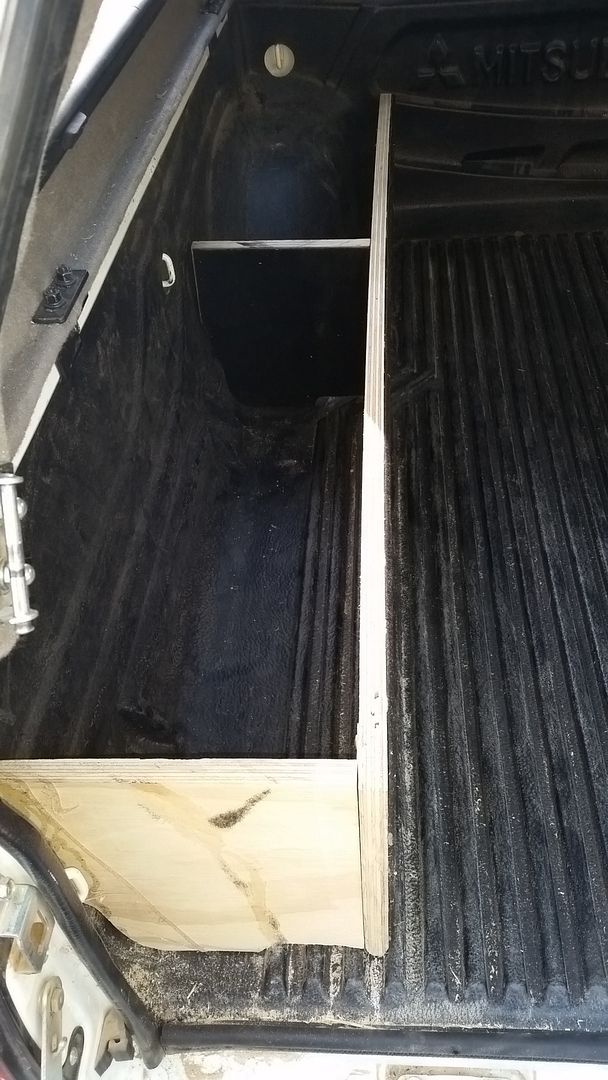
I'll build 2 long skinny boxes, that will encase the wheel arches, but extend all the way to the back of the canopy to the tailgate. I'll build in separators inside, and flip top lids, creating space for things like dual battery, water bladder, recovery gear, tools, etc. As there is a decent space above the wheel arches and below the shelf, there will be room to flip the lids up should I need. Not sure how I'll fix them in, but i have a factory tub liner I could screw into for bracing.

On the tub floor, I'll cut another single sheet of 18mm ply, and cut it to match the entire space between the 2 wheel arch boxes, front of the canopy, and back to the tailgate end. I'll add a handle, so when I drop the tailgate, I can pull the ply floor sheet out, giving me access to everything stored toward the front. I'll probably build a wall at the front end, so things dont slide off when I pull the base out. If need be I'll add extra walls and separators to make compartments. Might leave one side open, and compartments on the other side.

I may even split the base panel into 2, and make 2 separate, open top sliding drawers, if 1 single piece feels too big or heavy. I'll also add a folding leg of some sort, so I can slide it past the tailgate if need be, and it can be supported on the ground.

I've seen a couple of setups with some of these characteristics before, so hopefully I can meld it all together and make it workable and tick all my priority boxes.

More photos to come !

Click to view larger picture

Click to view larger picture

Click to view larger picture

Here's the system from my old BT-50

Click to view larger picture

Click to view larger picture

Click to view larger picture
MY13 GLX Plus pack dual cab Triton.

My MN & ML Triton WORKSHOP MANUAL page on DropBox. Take a look.
https://www.dropbox.com/sh/mmyqr05gb8c8hgv/eKE4W216Dj

FORUM DIRECTORY
http://www.newtriton.net/phpbb/viewtopic.php?f=3&t=8230
User avatar
AussieAnth
Platinum Subscriber
 
Posts: 265
Joined: Mon Nov 11, 2013 8:44 pm
Location: Melbourne, VIC


Re: Stage 1 of Anths cheap custom shelf and drawer build

Postby c-dale on Tue Jan 20, 2015 2:51 pm

Should be good to see it all come together Anth. Sounds like you have given it a fair amount of thought.

Do you run a fridge? If so whats the olan for its location?

With the draws will they be on some sort of runner or is the black base of the ply slick enough not to require it?
User avatar
c-dale
Platinum Subscriber
 
Posts: 1119
Joined: Wed Dec 30, 2009 3:29 pm
Location: Bracken Ridge, Brisbane, QLD

Re: Stage 1 of Anths cheap custom shelf and drawer build

Postby AussieAnth on Tue Jan 20, 2015 3:17 pm

I've got a 50ltr Techniice, which I usually place on the back seat and seatbelt it in. Keeps it cooler and free from knocks and vibration. When child 2 comes along I might create a space for it in the canopy. Not sure exactly where yet but that's the beauty of a modular shelf. I can even make a different shelf panel to swap one out, for different needs like this.

Maybe fridge could go where the first panel is just behind the cabin, and I'll make another panel to fill the remaining space.

No runners necessary. The black coating is really slick against the tub liner. May cut up a large nylon kitchen chopping board and fix to the underside of the floor panel. That stuff slides well and is durable.
MY13 GLX Plus pack dual cab Triton.

My MN & ML Triton WORKSHOP MANUAL page on DropBox. Take a look.
https://www.dropbox.com/sh/mmyqr05gb8c8hgv/eKE4W216Dj

FORUM DIRECTORY
http://www.newtriton.net/phpbb/viewtopic.php?f=3&t=8230
User avatar
AussieAnth
Platinum Subscriber
 
Posts: 265
Joined: Mon Nov 11, 2013 8:44 pm
Location: Melbourne, VIC

Re: Stage 1 of Anths cheap custom shelf and drawer build

Postby Naff on Tue Jan 20, 2015 4:07 pm

Isn't 18mm a bit on the heavy side of things?
User avatar
Naff
Platinum Subscriber
 
Posts: 4770
Joined: Sat May 17, 2008 2:00 pm
Location: Brisbane, QLD

Re: Stage 1 of Anths cheap custom shelf and drawer build

Postby AussieAnth on Tue Jan 20, 2015 4:50 pm

Could use thinner stuff for the base panel and side boxes for sure. Need to buy that ply yet, so I have that option.

But.... 18mm gives me a more sturdy base to screw and bolt into for the upright walls, etc. I'll firm up the plan and decide before I buy.

As for the top shelves, needed 18mm so it doesn't flex or warp under weight.
MY13 GLX Plus pack dual cab Triton.

My MN & ML Triton WORKSHOP MANUAL page on DropBox. Take a look.
https://www.dropbox.com/sh/mmyqr05gb8c8hgv/eKE4W216Dj

FORUM DIRECTORY
http://www.newtriton.net/phpbb/viewtopic.php?f=3&t=8230
User avatar
AussieAnth
Platinum Subscriber
 
Posts: 265
Joined: Mon Nov 11, 2013 8:44 pm
Location: Melbourne, VIC

Re: Stage 1 of Anths cheap custom shelf and drawer build

Postby kxboss on Tue Jan 20, 2015 5:59 pm

:D :)
kxboss
 
Posts: 421
Joined: Tue Feb 19, 2013 12:33 pm

Re: Stage 1 of Anths cheap custom shelf and drawer build

Postby Cowboy Dave on Tue Jan 20, 2015 6:44 pm

I like the idea of the shelf. Was it you that posted on facebook about it recently? It looks like much the same thing but I guess it could have been someone else with the same idea.

Have you considered taking the tub liner out? It's probably marginal but you might get an extra inch of space across the floor pan out of it. I got rid of mine when my drawers went in and was surprised to see how much paint had rubbed off underneath when it came out.
The Hitchhiker's guide to the the Triton universe and NTN.

A how to on finding your own way - search me.

The two threads I wish people would use more: thing 1 and thing 2.
User avatar
Cowboy Dave
Moderator
 
Posts: 18098
Joined: Tue Dec 29, 2009 9:46 am
Location: Sydney

Re: Stage 1 of Anths cheap custom shelf and drawer build

Postby AussieAnth on Wed Jan 21, 2015 9:34 am

Hi Dave, yep that was my FB Post. I've read so many good DIY guides on the forum here I thought it time I started one myself. I'll continue and take more detailed photos along the way, especially when I've loaded up gear in the back. Away this weekend so that will give me some more ideas on how to proceed.
Yeah not sure about the tub liner.... I'll figure it out as I go.

I rarely have a complete plan laid out so I'll make some of it up as I go. Often 2 steps forward, swear out loud, then one step back :oops:
MY13 GLX Plus pack dual cab Triton.

My MN & ML Triton WORKSHOP MANUAL page on DropBox. Take a look.
https://www.dropbox.com/sh/mmyqr05gb8c8hgv/eKE4W216Dj

FORUM DIRECTORY
http://www.newtriton.net/phpbb/viewtopic.php?f=3&t=8230
User avatar
AussieAnth
Platinum Subscriber
 
Posts: 265
Joined: Mon Nov 11, 2013 8:44 pm
Location: Melbourne, VIC

Re: Stage 1 of Anths cheap custom shelf and drawer build

Postby Cowboy Dave on Wed Jan 21, 2015 10:05 am

I don't think you're Robinson Crusoe there mate. I think it's the same for most of the mods we attempt.
The Hitchhiker's guide to the the Triton universe and NTN.

A how to on finding your own way - search me.

The two threads I wish people would use more: thing 1 and thing 2.
User avatar
Cowboy Dave
Moderator
 
Posts: 18098
Joined: Tue Dec 29, 2009 9:46 am
Location: Sydney

Stage 2 of the storage build.

Postby AussieAnth on Sun Mar 22, 2015 9:20 pm

OK finally got to spend some more time on the storage project this weekend. Phase 2.

Phase 2 so far involved building the 2 side boxes. Because I'm keeping the factory tub liner in, which has lots of curves and bumps, a lot of time has been spent cutting notches, curves, edges and shapes into the ply....with mixed success. No disasters, but some of my work matches the contours of the tub better than others. If I ditched the tub liner and built this directly into the tub, it would be simpler in some ways to fix ply directly in, but I like the durability of the liner, so we'll see how it goes. I found it handy making a template out of cardboard first, trimming it down until it was just right, then tracing it and making a single cut on the ply. Much easier than climbing in and out of the back to make small cuts until it fit.

I know a lot of guys have ditched tub liners because of dust, moisture and paint rub, but for now I'm happy with it and I'll work with what I've got. The liner has lots of channels and edges I can use in the design, plus I can drive loads of screws into the liner with no real long term consequence. Luckily I have a circular saw, mitre drop saw, jig saw & belt sander at my disposal. Might have to put a router & planer on the shopping list.

The boxes at this stage do not have a solid bottom or outer side wall. I'm just using the tub liner for this. I could build them in, but I'd also loose a lot of space. This way I'm keeping the weight down while maximising available storage. Work in progress, so I'll re-assess after a couple of trips away. I'm fixing the boxes to the tub with some L shaped brackets that take up to 5 screws on each plate. Should be effective at spreading the load over several screws. Wouldn't take much to tear a screw out of the tub liner, but in batches of 4, it should hold up I think. Its mostly to keep it in place, not to bear weight, so I think it should suffice.

Because the boxes will be mostly 2 walls and a lid, I've had to brace them with L shaped brackets. Found a combo that works well and they're really rigid.

Another idea I had was to slide a long 10mm ply sheet up the side between the liner & the tub. I could then fix as many screws as I like through the liner into the ply underneath without hitting the tub. Still thinking about that one.

I've now got a compartment around each wheel arch. Im going to look at water bladders for each box. That seems to be the best use of a weird space. Or maybe it will just be for small tools and spare bits.

I'm also re-using some of the ply from the old BT-50 project, so some of it looks like a dogs breakfast. Im going to re-carpet the entire setup, so some bits have old carpet or glue stuck on them.

Click to view larger picture

Click to view larger picture

Click to view larger picture

Click to view larger picture

Click to view larger picture

Click to view larger picture

Click to view larger picture

Click to view larger picture
MY13 GLX Plus pack dual cab Triton.

My MN & ML Triton WORKSHOP MANUAL page on DropBox. Take a look.
https://www.dropbox.com/sh/mmyqr05gb8c8hgv/eKE4W216Dj

FORUM DIRECTORY
http://www.newtriton.net/phpbb/viewtopic.php?f=3&t=8230
User avatar
AussieAnth
Platinum Subscriber
 
Posts: 265
Joined: Mon Nov 11, 2013 8:44 pm
Location: Melbourne, VIC

Re: Stage 1 of Anths cheap custom shelf and drawer build

Postby BlackCaviar on Sat May 16, 2015 7:30 pm

Looking good mate. I'm looking forward to seeing how this ends up.
If in doubt, plant the right foot.
User avatar
BlackCaviar
 
Posts: 15
Joined: Sat Jun 08, 2013 8:21 pm

Re: Stage 3 of Anths cheap custom shelf and drawer build

Postby AussieAnth on Sun May 24, 2015 9:30 am

Its now at a stage where I can use it, and its been getting used for a few trips and weekend jobs.

Its working out so well I have'nt put the final touches on and finished the carpet yet. I figure I'll use it for a few months and see just how practical it is. I'm surprised just how versatile and functional its been.

I've only carpeted the side boxes. Ran out of time before Easter, so only the outsides are glued down. Had to button screw the carpet down on the insides. No carpet on the top shelves or bottom sliding shelves yet, and no lids on the side boxes either. Might not bother with lids. Having them open is pretty handy.

The boxes are really sturdy. No movement with all those brackets holding them in. Really happy with that solution.

I've managed to fit quite a lot of recovery gear around the wheel arches where the space is limited and difficult to use. Bow shackles, snatch blocks & straps, tree protector, gloves. Easier to retrieve than behind the back seat (I've usually got a baby seat strapped in).

Here's where its at so far:

Click to view larger picture[/URL]

I can slide them out a fair way without it tipping out. Easy to grab stuff right at the back

Click to view larger picture[/URL]

Or slide them out individually

Click to view larger picture[/URL]

Plenty of space between the lower and upper shelves. Can remove any or all of the upper 3 shelves to fit taller things in. Particularly good if you want an esky or fridge in, and access to open the lid.

Click to view larger picture[/URL]

The side boxes are pretty handy. Lined with carpet, you can put breakables in there. Also fits those reusable supermarket food bags nicely, slabs of beer, or boxes of wine ;)

How it looks loaded up. Unpacking after Easter was much easier than climbing in to reach the back stuff. The side windows let you get to stuff on the top shelf close to the cabin.

Click to view larger picture[/URL]

Click to view larger picture[/URL]

And I've still retained the flexibility to load up the back with wood or other stuff. Out come the top shelves and its good to go. The side boxes easily handled having wood stacked on them.

Click to view larger picture[/URL]

The plan was to carpet the top shelves. I'll do that next & and finish gluing in the box carpet. Im not so sure about the bottom sliding base. The other day I loaded up about 10 bluestone pavers, about 10kg each. They slide around a bit but didnt scratch through the black coating. What every they put on concrete forming ply, its bloody tough. Might still carpet it and just throw in a tarp when using it for wood & other stuff.

Other additions will be proper straps to pull them out. I've also got a deep cycle battery box that will fit in the side boxes. I'll pick a side & put a divider or something in to stop it sliding back and forth. I've also got to route the cabling from the engine bay, and mount a power unit with a cig charger port, dual usb port & voltage meter. That will go in the back facing end of one of the side boxes. Nothing new there. Will be a handy addition. Might look into an inverter & 240v outlet as well.

Couldn't be happier with it so far.
MY13 GLX Plus pack dual cab Triton.

My MN & ML Triton WORKSHOP MANUAL page on DropBox. Take a look.
https://www.dropbox.com/sh/mmyqr05gb8c8hgv/eKE4W216Dj

FORUM DIRECTORY
http://www.newtriton.net/phpbb/viewtopic.php?f=3&t=8230
User avatar
AussieAnth
Platinum Subscriber
 
Posts: 265
Joined: Mon Nov 11, 2013 8:44 pm
Location: Melbourne, VIC

Re: Stage 1 of Anths cheap custom shelf and drawer build

Postby Duck on Sun May 24, 2015 11:53 am

God job looks like a fire is on the cards :)
The wood in the back not the job at hand :lol:
Life is what happens while you are busy making plans........
User avatar
Duck
 
Posts: 2001
Joined: Tue Feb 14, 2012 3:48 pm
Location: North Side Of Brisbane


Return to Exterior Mods

Who is online

Users browsing this forum: No registered users and 25 guests