Dan.Batto's Build
Re: Dan.Batto's Build
![]() by irwazza on Fri Aug 17, 2012 4:14 pm
by irwazza on Fri Aug 17, 2012 4:14 pm
-

irwazza - Posts: 615
- Joined: Sun Jul 10, 2011 9:07 pm
Re: Dan.Batto's Build
![]() by dan.batto on Fri Aug 17, 2012 4:16 pm
by dan.batto on Fri Aug 17, 2012 4:16 pm
My Shed Here: http://www.newtriton.net/myshed.php?vie ... =dan.batto[/b]
-

dan.batto - Posts: 3269
- Joined: Wed Apr 06, 2011 10:34 pm
- Location: Rowville, Melbourne
Re: Dan.Batto's Build
![]() by srb on Sat Aug 18, 2012 6:37 am
by srb on Sat Aug 18, 2012 6:37 am
http://www.exploroz.com/Members/281229. ... x#mptabs=2
http://www.flickr.com/photos/exploroz/
Only those who will risk going too far can possibly know how far they can go.
-

srb - Platinum Subscriber
- Posts: 1737
- Joined: Sun Feb 06, 2011 6:10 pm
- Location: Sydney
Re: Dan.Batto's Build
![]() by dan.batto on Sat Aug 18, 2012 6:39 am
by dan.batto on Sat Aug 18, 2012 6:39 am
Have you got a pic of the type of diode you used?
My Shed Here: http://www.newtriton.net/myshed.php?vie ... =dan.batto[/b]
-
dan.batto - Posts: 3269
- Joined: Wed Apr 06, 2011 10:34 pm
- Location: Rowville, Melbourne
Re: Dan.Batto's Build
![]() by srb on Sat Aug 18, 2012 7:10 am
by srb on Sat Aug 18, 2012 7:10 am
http://www.exploroz.com/Members/281229. ... x#mptabs=2
http://www.flickr.com/photos/exploroz/
Only those who will risk going too far can possibly know how far they can go.
-
srb - Platinum Subscriber
- Posts: 1737
- Joined: Sun Feb 06, 2011 6:10 pm
- Location: Sydney
Re: Dan.Batto's Build
![]() by irwazza on Sat Aug 18, 2012 7:36 am
by irwazza on Sat Aug 18, 2012 7:36 am
-
irwazza - Posts: 615
- Joined: Sun Jul 10, 2011 9:07 pm
Re: Dan.Batto's Build
![]() by dan.batto on Sat Aug 18, 2012 9:33 am
by dan.batto on Sat Aug 18, 2012 9:33 am
About that fix for the cold weather: I think it's sorted! I have had it running for 3 days now an no issues I can see so far. I'll give it a few more days just to confirm, then I suggest email Matt at Digoptions with a photo of your model number.
My Shed Here: http://www.newtriton.net/myshed.php?vie ... =dan.batto[/b]
-
dan.batto - Posts: 3269
- Joined: Wed Apr 06, 2011 10:34 pm
- Location: Rowville, Melbourne
Re: Dan.Batto's Build
![]() by irwazza on Sat Aug 18, 2012 4:39 pm
by irwazza on Sat Aug 18, 2012 4:39 pm
-
irwazza - Posts: 615
- Joined: Sun Jul 10, 2011 9:07 pm
Re: Dan.Batto's Build
![]() by dan.batto on Sat Aug 18, 2012 6:35 pm
by dan.batto on Sat Aug 18, 2012 6:35 pm
My Shed Here: http://www.newtriton.net/myshed.php?vie ... =dan.batto[/b]
-
dan.batto - Posts: 3269
- Joined: Wed Apr 06, 2011 10:34 pm
- Location: Rowville, Melbourne
Re: Dan.Batto's Build
![]() by dan.batto on Fri Aug 24, 2012 3:31 pm
by dan.batto on Fri Aug 24, 2012 3:31 pm

My Shed Here: http://www.newtriton.net/myshed.php?vie ... =dan.batto[/b]
-
dan.batto - Posts: 3269
- Joined: Wed Apr 06, 2011 10:34 pm
- Location: Rowville, Melbourne
Re: Dan.Batto's Build
![]() by ratstriton on Fri Aug 24, 2012 4:31 pm
by ratstriton on Fri Aug 24, 2012 4:31 pm
Try this link mate.
-

ratstriton - Platinum Subscriber
- Posts: 1525
- Joined: Sun Nov 18, 2007 3:00 pm
- Location: wantirna, VIC
Re: Dan.Batto's Build
![]() by irwazza on Fri Aug 24, 2012 4:36 pm
by irwazza on Fri Aug 24, 2012 4:36 pm
-
irwazza - Posts: 615
- Joined: Sun Jul 10, 2011 9:07 pm
Re: Dan.Batto's Build
![]() by Mattstruck on Fri Aug 24, 2012 5:05 pm
by Mattstruck on Fri Aug 24, 2012 5:05 pm
You could do it just with the switch you know!
SPDT or DPDT switch will do it!
Only thing is you would need to run two wires instead of one
Sometimes indecipherable to the average Civillian. Example:
Homer:
I clearly remember Joe stating categorically that he prefers it in the bottom
Joe:
I didn't say it was better in the bottom, I just said it was easier and quicker.
-

Mattstruck - Posts: 2844
- Joined: Fri Nov 19, 2010 7:47 pm
- Location: Melbourne
Re: Dan.Batto's Build
![]() by irwazza on Fri Aug 24, 2012 5:15 pm
by irwazza on Fri Aug 24, 2012 5:15 pm
-
irwazza - Posts: 615
- Joined: Sun Jul 10, 2011 9:07 pm
Re: Dan.Batto's Build
![]() by dan.batto on Fri Aug 24, 2012 11:13 pm
by dan.batto on Fri Aug 24, 2012 11:13 pm
My Shed Here: http://www.newtriton.net/myshed.php?vie ... =dan.batto[/b]
-
dan.batto - Posts: 3269
- Joined: Wed Apr 06, 2011 10:34 pm
- Location: Rowville, Melbourne
Re: Dan.Batto's Build
![]() by dan.batto on Mon Sep 17, 2012 9:22 pm
by dan.batto on Mon Sep 17, 2012 9:22 pm
Ark battery box! This is awesome for my camp lighting!! I need to work out what a voltage regulator is and how to add it into the line so I can charge the battery while I am driving, might just get a solar panel instead and have it happening when I setup.
Purchased an ultragauge! Still haven't set this up properly! I will get to it one day!!!
Dual battery link wasn't connected properly! So when I had a flat battery I was all excited cause I has the link switch and FAIL! Well I was told how to install it wrong! Fixed!
Draws are now nearly complete with the installation of some ply to keep things in place in the rear end, and also a power box/panel section which will house a power inverter, 2 accessory sockets, fridge socket. This is all connected via a fuse box. And Anderson plugs to make removal of the draws easy!


Bel and I made a bit of an investment! We finally purchased a decent tent! Well I have to say she bought a decent tent! The oztent rv5 with fly, ground mat, delux front panel, delux side panels. It's the works. And well seeing as she was buying that I got the guys to give me a deal on the foxwing awning with the tent connector!


I also got a high lift jack and shovel holder for the other side of the racks for my bday!
I made up a switch panel to go under the ash tray. It just wedges in.
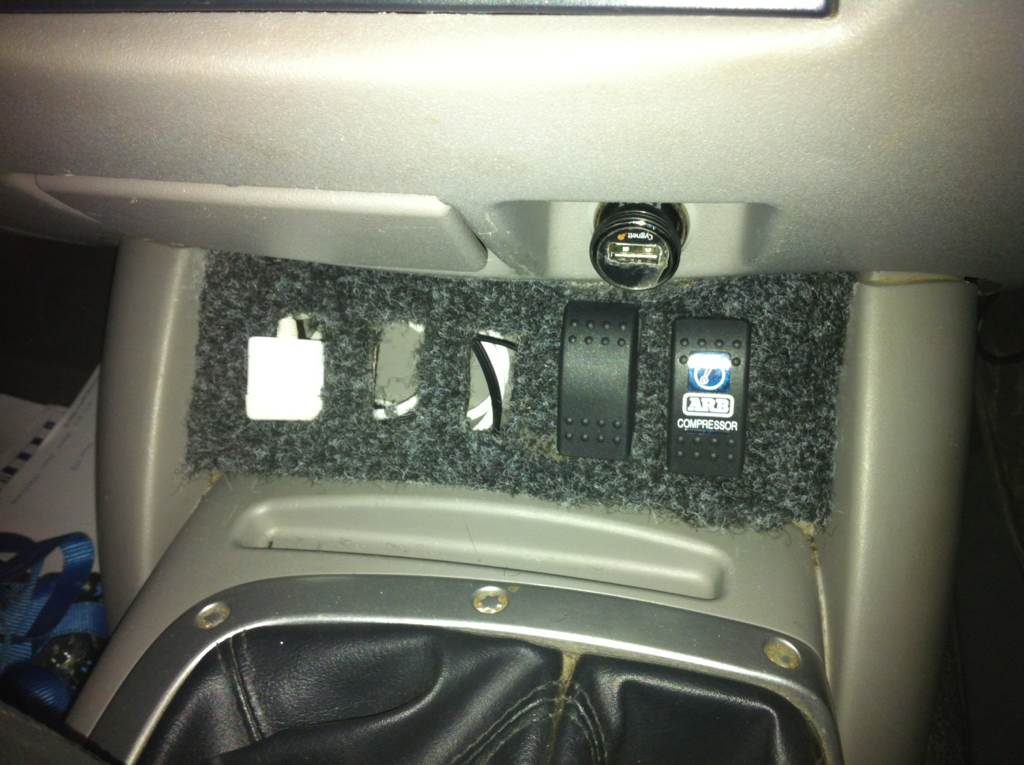
I since added the switch for the reverse camera too! So now I have the option where the camera comes on in reverse or I can flick a switch while driving an there it is!
Which led me to wanting to change the way my switches were powered and also my accessories.
While I slowly kept adding more and more accessories to the lighter socket, I figured I might be overloading it by now. So I ran a wire from the battery to a relay which powers up a small 6 blade fuse box when I turn the lights on. This box is for switches lighting. I then tapped into a wire I had run into the cab for a previous mod and installed a second fuse box to run the accessories, this is also power via a relay that doesn't flick on until the lighter socket gets power.
Also tapped into the ground of the wire that I ran into the cab earlier and have sent all the grounds back to the battery now, instead of the dodgy job they were before.
Now I just need to tidy up the birds best behind the dash! I can see some custom looms being made!
And that's about all the recent mods for now! I'll try grab some pics this weekend while out camping!
Mods still to come:
Battery monitors
Fridge temp gauge
Water tank or the like.
Get the darn tub paint fixed from that stupid hard lid which includes paying to remove and re install canopy
Replace the reverse lights with the prestige Offroad ones
Some work lights off the back of the roofracks
Internal canopy frame
And maybe the 2 other best mods you can do
And I wouldn't mind some bigger driving lights at some stage...
My Shed Here: http://www.newtriton.net/myshed.php?vie ... =dan.batto[/b]
-
dan.batto - Posts: 3269
- Joined: Wed Apr 06, 2011 10:34 pm
- Location: Rowville, Melbourne
Re: Dan.Batto's Build
![]() by dan.batto on Mon Sep 17, 2012 9:30 pm
by dan.batto on Mon Sep 17, 2012 9:30 pm
Heading to murrinidindi this weekend for a camping trip. If anyone is keen to tag along, feel free.
I'll put a warning here there may be no 4wd'ing as tracks may be closed but we will go for a scout on Saturday!!
Anyone is welcome. There is nothing set in stone as to location but we will head up frid after work. Be there before 7 I hope! All good I have tonnes of lighting
My Shed Here: http://www.newtriton.net/myshed.php?vie ... =dan.batto[/b]
-
dan.batto - Posts: 3269
- Joined: Wed Apr 06, 2011 10:34 pm
- Location: Rowville, Melbourne
Re: Dan.Batto's Build
![]() by big_bob_thefirst on Mon Sep 17, 2012 9:59 pm
by big_bob_thefirst on Mon Sep 17, 2012 9:59 pm
I've got the second battery hooked up and the accessories list is growing, so just wanted to make sure I understood it all.
It's the additional fuse boxes everywhere I've got to think of. Got one in the back, but may pull a big cable to the engine block and fuse box it there as well, similar to fish's set up...
It's just all the small wiring for relays which look annoying to figure out...
When they wake up in the morning, that's the best they're going to feel all day.
-

big_bob_thefirst - Platinum Subscriber
- Posts: 995
- Joined: Thu Oct 06, 2011 9:18 pm
- Location: Adelaide, South Australia
Re: Dan.Batto's Build
![]() by dan.batto on Sun Sep 23, 2012 8:42 pm
by dan.batto on Sun Sep 23, 2012 8:42 pm


My Shed Here: http://www.newtriton.net/myshed.php?vie ... =dan.batto[/b]
-
dan.batto - Posts: 3269
- Joined: Wed Apr 06, 2011 10:34 pm
- Location: Rowville, Melbourne
Re: Dan.Batto's Build
![]() by ratstriton on Mon Sep 24, 2012 5:29 am
by ratstriton on Mon Sep 24, 2012 5:29 am
-
ratstriton - Platinum Subscriber
- Posts: 1525
- Joined: Sun Nov 18, 2007 3:00 pm
- Location: wantirna, VIC
Re: Dan.Batto's Build
![]() by dan.batto on Mon Sep 24, 2012 5:46 am
by dan.batto on Mon Sep 24, 2012 5:46 am

My Shed Here: http://www.newtriton.net/myshed.php?vie ... =dan.batto[/b]
-
dan.batto - Posts: 3269
- Joined: Wed Apr 06, 2011 10:34 pm
- Location: Rowville, Melbourne
Re: Dan.Batto's Build
![]() by ratstriton on Mon Sep 24, 2012 6:02 am
by ratstriton on Mon Sep 24, 2012 6:02 am
-
ratstriton - Platinum Subscriber
- Posts: 1525
- Joined: Sun Nov 18, 2007 3:00 pm
- Location: wantirna, VIC
Re: Dan.Batto's Build
![]() by dan.batto on Mon Sep 24, 2012 6:19 am
by dan.batto on Mon Sep 24, 2012 6:19 am
My Shed Here: http://www.newtriton.net/myshed.php?vie ... =dan.batto[/b]
-
dan.batto - Posts: 3269
- Joined: Wed Apr 06, 2011 10:34 pm
- Location: Rowville, Melbourne
Re: Dan.Batto's Build
![]() by mattz on Mon Sep 24, 2012 7:17 am
by mattz on Mon Sep 24, 2012 7:17 am
dan.batto wrote:
There is something wrong here
I dont think I've ever seen you with that much space left.
Had you finished packing?
Go hawks!!!!!
THE PRICE OF HIS TOYS
-

mattz - Posts: 7101
- Joined: Thu Mar 11, 2010 6:26 pm
- Location: Mornington Peninsula vic
Re: Dan.Batto's Build
![]() by timbo on Mon Sep 24, 2012 8:20 am
by timbo on Mon Sep 24, 2012 8:20 am
-

timbo - Posts: 289
- Joined: Mon Aug 30, 2010 6:22 pm
- Location: bundoora vic
Who is online
Users browsing this forum: No registered users and 14 guests
![]()